Native ads
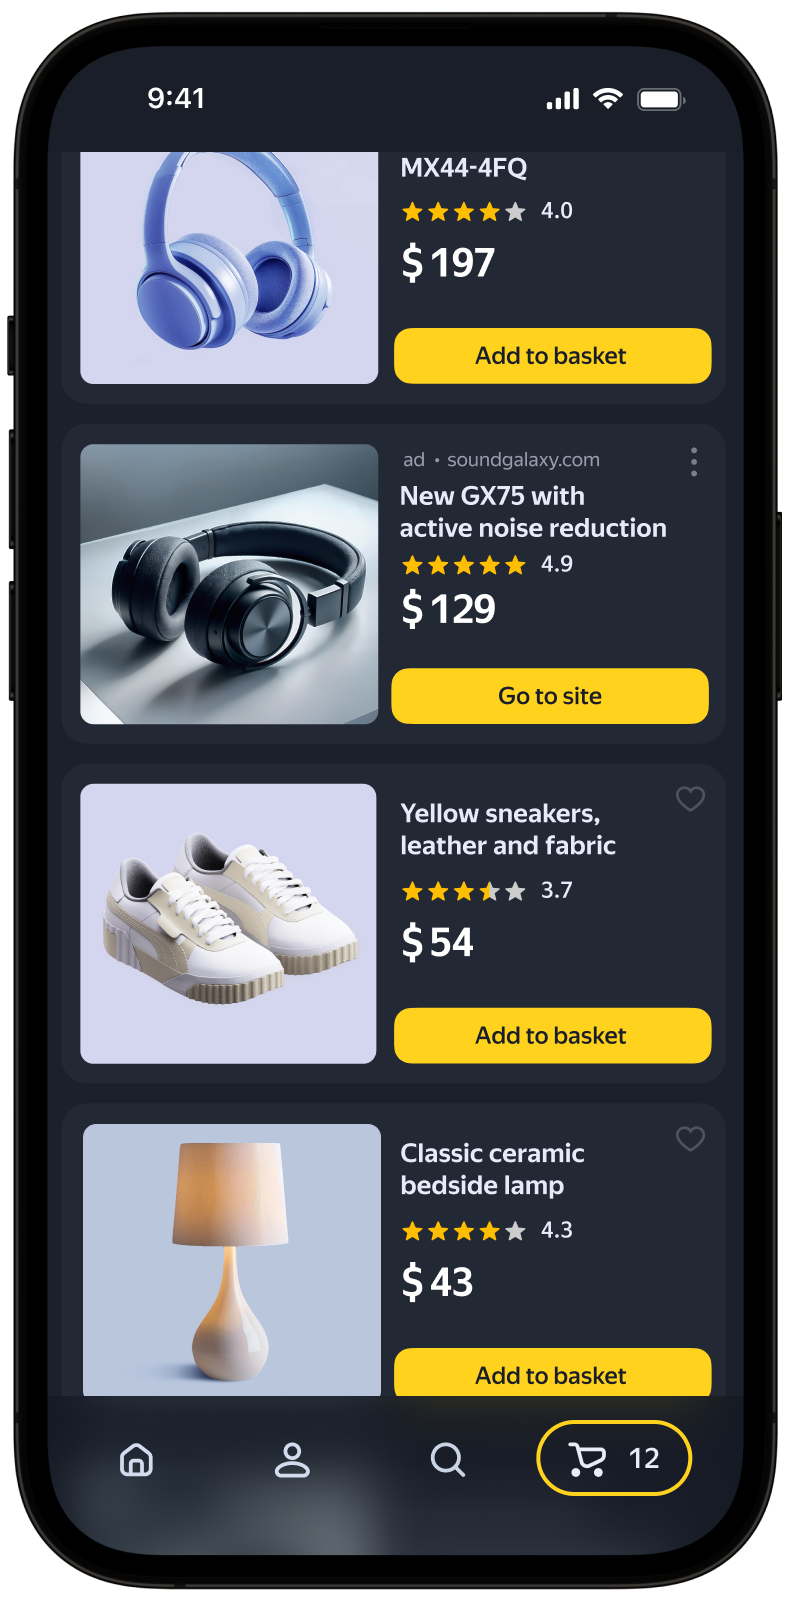
Native advertising is an ad type where the layout can be defined on the app side. This feature allows you to change the visual style of ads and their placement, considering the app design specifics.
Native ads enhance the ad experience. As a result, you can display more ads without losing user interest. This ensures maximum revenue from advertising in the long run.
Ad rendering is performed with native platform tools, which enhances ad performance and quality.
Appearance
This guide covers the process of integrating native ads into Android apps. Besides code samples and instructions, it contains format-specific recommendations and links to additional resources.
Prerequisite
- Follow the SDK integration steps described under Quick start.
- First, you need to initialize the advertising SDK.
- Make sure you have the latest Yandex Mobile Ads SDK version. If you're using mediation, update to the most recent single build version.
Implementation
Key steps for integrating native ads:
- Create and configure an ad loader named NativeAdLoader.
- Register an ad load event listener.
- Load the ad.
- Render the loaded ad.
Specifics of native ad integration
-
All calls to Yandex Mobile Ads SDK methods must be made from the main thread.
-
If the
onAdFailedToLoad()callback returns an error, don't try to load a new ad again. If there's no other option, limit the number of ad load retries. This will help avoid constant unsuccessful requests and connection issues if there are limitations. -
We recommend maintaining a strong reference to the ad and its loader throughout the lifespan of the screen where the ad interaction is taking place.
-
The size of the ad container should be based on the ad content. Once the ad has finished loading, you need to render all of its assets. You can get the list of available ad assets from the NativeAd advertising object.
-
Video ads usually yield the best results. To display video ads, the size of the ad container and the MediaView asset must be at least 300×160 dp (density-independent pixels).
-
We recommend using a layout that includes all the possible assets. In practical terms, such layouts result in higher conversion rates.
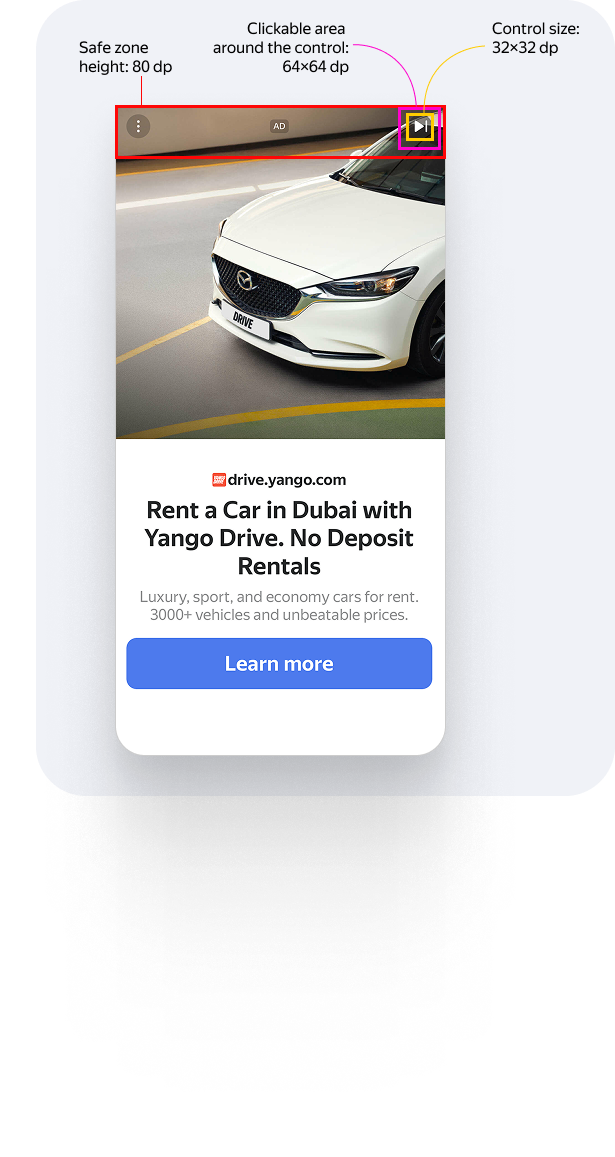
Rules for rendering fullscreen native ads
-
The height of the top non-clickable safe zone is 80 dp. Controls within the zone can be clickable.
-
Visual elements (assets) must be at least 32×32 dp in size. These include the Close button as well as all other icons.
-
Clickable area around assets must be at least 64×64 dp. For example, if an asset measures 32×32 dp, the padding around it must ensure that the total clickable area is 64×64 dp.
-
If a control appears with a delay, you must display a timer or progress bar until the element loads.
Example
Loading ads
To load your native ads, create a NativeAdLoader object.
The ad request parameters are configured via the AdRequest.Builder class object. In request parameters, you can pass the ad unit ID, image loading method, age, gender attributes, and other data that can make impressions more relevant. Read more in the Ad Targeting section.
To receive notifications about ad loading results, create a NativeAdLoadListener instance and set it as an ad loader event listener.
To load the ad, call the loadAd() method.
The example below shows how to load native ads from the Activity:
class CustomNativeAdActivity : AppCompatActivity(R.layout.activity_custom_native_ad) {

  private val nativeAdView get() = binding.nativeAd.root

  private var nativeAdLoader: NativeAdLoader? = null

  private lateinit var binding: ActivityCustomNativeAdBinding

  override fun onCreate(savedInstanceState: Bundle?) {
      super.onCreate(savedInstanceState)
      binding = ActivityCustomNativeAdBinding.inflate(layoutInflater)
      setContentView(binding.root)

      nativeAdLoader = createNativeAdLoader()
      nativeAdLoader?.loadAd(
          // Methods in the AdRequest.Builder class can be used here to specify individual options settings.
          AdRequest.Builder("your-ad-unit-id").build())
  }

  private fun createNativeAdLoader(): NativeAdLoader {
      return nativeAdLoader ?: NativeAdLoader(this).apply {
          setNativeAdLoadListener(object : NativeAdLoadListener {
              override fun onAdLoaded(p0: NativeAd) {
                  // The ad was loaded successfully. Now you can show the loaded ad.
              }

              override fun onAdFailedToLoad(p0: AdRequestError) {
                  // Ad failed to load with AdRequestError.
                  // Attempting to load a new ad from the onAdFailedToLoad() method is strongly discouraged.
              }
          })
      }
  }
}
class CustomNativeAdActivity extends AppCompatActivity {
  private NativeAdView mNativeAdView = mBinding.nativeAd.getRoot();

  @Nullable private NativeAdLoader mNativeAdLoader = null;

  private ActivityCustomNativeAdBinding mBinding;

  @Override
  public void onCreate(@Nullable Bundle savedInstanceState) {
      super.onCreate(savedInstanceState);
      mBinding = ActivityCustomNativeAdBinding.inflate(getLayoutInflater());
      setContentView(mBinding.getRoot());

      mNativeAdLoader = createNativeAdLoader();
      if (mNativeAdLoader != null) {
          // Methods in the AdRequest.Builder class can be used here to specify individual options settings.
          mNativeAdLoader.loadAd(
                  new AdRequest.Builder("your-ad-unit-id").build()
          );
      }
  }

  private NativeAdLoader createNativeAdLoader() {
      if (mNativeAdLoader != null) {
          return mNativeAdLoader;
      }

      final NativeAdLoader newNativeAdLoader = new NativeAdLoader(this);
      newNativeAdLoader.setNativeAdLoadListener(new NativeAdLoadListener() {
          @Override
          public void onAdLoaded(@NonNull final NativeAd nativeAd) {
              // The ad was loaded successfully. Now you can show the loaded ad.
          }

          @Override
          public void onAdFailedToLoad(@NonNull final AdRequestError error) {
              // Ad failed to load with AdRequestError.
              // Attempting to load a new ad from the onAdFailedToLoad() method is strongly discouraged.
          }
      });
      return newNativeAdLoader;
  }
}
If you serve ads through Adfox, then after the banner ad response, the campaignId, bannerId, and placeId data can be accessed from the NativeAd or BannerAdView objects using the adAttributes property of the AdAttributes type.
Displaying ads
Once the ad has finished loading, you need to render all of its assets. You can get the list of available ad assets from the NativeAd advertising object.
Manual configuration of the native ad layout
This method allows you to create a custom layout for your native ads and define their positioning relative to each other. The ad may include both required and optional assets for display. For the full list, see Native ad assets.
Tip
We recommend using a layout that includes all the possible assets. In practical terms, such layouts result in higher conversion rates.
For each ad asset, provide a View through an instance of the NativeAdViewBinder.Builder class. The class accepts the NativeAdView container as an argument. Make sure to define all the ad assets as this container's subview.
Link the ready-made ad layout to the NativeAd object.
Sample code
private fun showAd(nativeAd: NativeAd) {
    val nativeAdViewBinder = binding.nativeAd.run {
        NativeAdViewBinder.Builder(nativeAdView)
            .setAgeView(age)
            .setBodyView(body)
            .setCallToActionView(callToAction)
            .setDomainView(domain)
            .setFaviconView(favicon)
            .setFeedbackView(feedback)
            .setIconView(icon)
            .setMediaView(media)
            .setPriceView(price)
            .setRatingView(rating)
            .setReviewCountView(reviewCount)
            .setSponsoredView(sponsored)
            .setTitleView(title)
            .setWarningView(warning)
            .build()
    }

    try {
        nativeAd.bindNativeAd(nativeAdViewBinder)
        nativeAd.setNativeAdEventListener(NativeAdEventLogger())
    } catch (exception: NativeAdException) {
        Logger.error(exception.message.orEmpty())
    }
}

private inner class NativeAdEventLogger : NativeAdEventListener {

    override fun onAdClicked() {
        // Called when a click is recorded for an ad.
    }

    override fun onLeftApplication() {
        // Called when the user is about to leave the application (e.g., to go to the browser), as a result of clicking on the ad.
    }

    override fun onReturnedToApplication() {
        // Called when the user returns to the application after a click.
    }

    override fun onImpression(data: ImpressionData?) {
        // Called when an impression is recorded for an ad.
    }
}
private void showAd(@NonNull final NativeAd nativeAd) {
    final NativeAdViewBinder nativeAdViewBinder = new NativeAdViewBinder.Builder(mNativeAdView)
            .setAgeView(age)
            .setBodyView(body)
            .setCallToActionView(callToAction)
            .setDomainView(domain)
            .setFaviconView(favicon)
            .setFeedbackView(feedback)
            .setIconView(icon)
            .setMediaView(media)
            .setPriceView(price)
            .setRatingView(rating)
            .setReviewCountView(reviewCount)
            .setSponsoredView(sponsored)
            .setTitleView(title)
            .setWarningView(warning)
            .build();
    try {
        nativeAd.bindNativeAd(nativeAdViewBinder);
        nativeAd.setNativeAdEventListener(new CustomNativeAdActivity.NativeAdEventLogger());
    } catch (final NativeAdException exception) {
        Log.e("TAG", exception.getMessage());
    }
}

private class NativeAdEventLogger implements NativeAdEventListener {
    @Override
    public void onAdClicked() {
        // Called when a click is recorded for an ad.
    }

    @Override
    public void onLeftApplication() {
        // Called when the user is about to leave the application (e.g., to go to the browser), as a result of clicking on the ad.
    }

    @Override
    public void onReturnedToApplication() {
        // Called when the user returns to the application after a click.
    }

    @Override
    public void onImpression(@Nullable ImpressionData data) {
        // Called when an impression is recorded for an ad.
    }
}
Loading multiple ads
The Yandex Mobile Ads SDK provides the option to load multiple ads in a single request (up to nine ads).
To make a bulk ad request, use an instance of the NativeBulkAdLoader class. It accepts the count argument in the loadAds method, which identifies the desired number of ads per request.
Sample code
class NativeBulkAdLoaderActivity : AppCompatActivity(R.layout.activity_custom_native_ad) {

    private val nativeAdView get() = binding.nativeAd.root

    private var nativeAdsLoader: NativeBulkAdLoader? = null

    private lateinit var binding: ActivityCustomNativeAdBinding

    override fun onCreate(savedInstanceState: Bundle?) {
        super.onCreate(savedInstanceState)
        binding = ActivityCustomNativeAdBinding.inflate(layoutInflater)
        setContentView(binding.root)

        nativeAdsLoader = createNativeBulkAdLoader()
        // Methods in the AdRequest.Builder class can be used here to specify individual options settings.
        val adRequest = AdRequest.Builder("your-ad-unit-id").build()
        nativeAdsLoader?.loadAds(adRequest, 3)
    }

    private fun createNativeBulkAdLoader(): NativeBulkAdLoader {
        return nativeAdsLoader ?: NativeBulkAdLoader(this).apply {
            setNativeBulkAdLoadListener(object : NativeBulkAdLoadListener {
                override fun onAdsLoaded(p0: MutableList<NativeAd>) {
                    // The ads were loaded successfully. Now you can show the loaded ads.
                    for (nativeAd in p0) {
                        showAd(nativeAd)
                    }
                }

                override fun onAdsFailedToLoad(p0: AdRequestError) {
                    // Ad failed to load with AdRequestError.
                    // Attempting to load new ads from the onAdFailedToLoad() method is strongly discouraged.
                }
            })
        }
    }
}
class CustomBulkNativeAdActivity extends AppCompatActivity {
    private NativeAdView mNativeAdView = mBinding.nativeAd.getRoot();

    @Nullable private NativeBulkAdLoader mNativeAdsLoader = null;

    private ActivityCustomNativeAdBinding mBinding;

    @Override
    public void onCreate(@Nullable Bundle savedInstanceState) {
        super.onCreate(savedInstanceState);
        mBinding = ActivityCustomNativeAdBinding.inflate(getLayoutInflater());
        setContentView(mBinding.getRoot());

        mNativeAdsLoader = createNativeBulkAdLoader();
        if (mNativeAdsLoader != null) {
            // Methods in the AdRequest.Builder class can be used here to specify individual options settings.
            mNativeAdsLoader.loadAds(
                    new AdRequest.Builder("your-ad-unit-id").build();
            );
        }
    }

    private NativeBulkAdLoader createNativeBulkAdLoader() {
        if (mNativeAdsLoader != null) {
            return mNativeAdsLoader;
        }

        final NativeBulkAdLoader newNativeBulkAdLoader = new NativeBulkAdLoader(this);

        newNativeBulkAdLoader.setNativeBulkAdLoadListener(new NativeBulkAdLoadListener() {
            @Override
            public void onAdsLoaded(@NonNull final List<NativeAd> list) {
                // The ad was loaded successfully. Now you can show the loaded ad.
            }

            @Override
            public void onAdsFailedToLoad(@NonNull final AdRequestError error) {
                // Ad failed to load with AdRequestError.
                // Attempting to load a new ad from the onAdFailedToLoad() method is strongly discouraged.
            }
        });
        return newNativeBulkAdLoader;
    }
}
Note
Using a bulk ad request, you can select multiple distinct ads.
An array of ads returned by a bulk request may contain between 0 and count of NativeAd objects. All the received ad objects can be displayed independently, using the previously described methods for native ad layout.
Testing native ad integration
Using demo ad units for ad testing
Use test ads to check your native ad integration and the app itself.
To make sure that test ads are returned for each ad request, we created a special demo ad placement ID designed to help you test your ad integration.
Demo adUnitId for Combinatorial ads: demo-native-content-yandex.
Demo adUnitId for ads for mobile apps: demo-native-app-yandex.
Warning
Before publishing your app in the store, make sure to replace the demo placement ID with a real ID you obtained in the Yandex Advertising Network interface.
Testing ad integration
You can check if your native ads are integrated correctly using the SDK's built-in analyzer.
This tool checks whether native ads are enabled properly and outputs a detailed report to a log. To view the report, run a search by the “YandexAds” keyword in Logcat, a tool for debugging Android apps.
adb logcat -v brief '*:S YandexAds'
If the integration is successful, the following message is returned:
adb logcat -v brief '*:S YandexAds'
mobileads$ adb logcat -v brief '*:S YandexAds'
I/YandexAds(13719): [Integration] Ad type native was integrated successfully
If there are any native ad integration issues, you'll get a detailed issue report and troubleshooting recommendations.
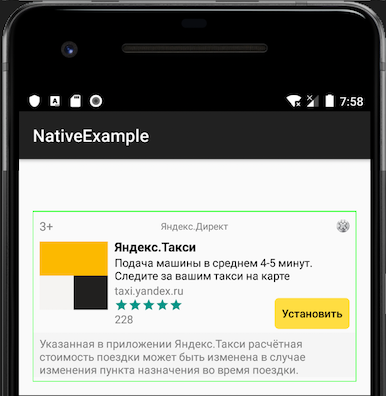
Indicator of correct native ad integration
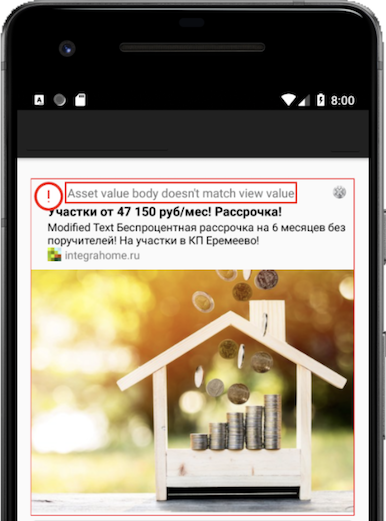
Using this indicator, you can find out whether the native ad integration was successful. If not, you can get debug info describing the issue cause.
Note
You can now enable/disable the indicator of correct ad integration in the Debug Panel.
To enable the indicator's display in debug mode, call the enableDebugErrorIndicator method set to true:
YandexAds.enableDebugErrorIndicator(true)
If the integration was successful, a light-green border will appear over the ad in debug mode.
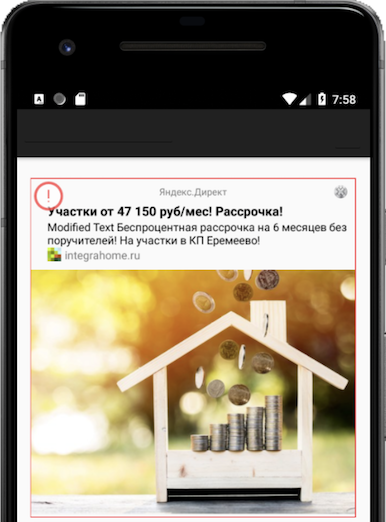
If there's an error in native ad integration, the indicator will appear over the ad in debug mode. Click the indicator to see the debug message, which should point you to the root cause of the problem. Clicking the indicator again hides the message.
|
|
|
To disable the indicator's display in debug mode, call the enableDebugErrorIndicator method set to false:
YandexAds.enableDebugErrorIndicator(false)
Hardware acceleration for video ads
To make sure video ads are played successfully on your app screen, hardware acceleration must be enabled (learn more in the documentation).
By default, hardware acceleration is enabled. If you disabled hardware acceleration in your app, be sure to enable it on the screen of the app where ads are served.
Code to enable hardware acceleration
<application android:hardwareAccelerated="true">
    <!-- For activities that use ads, hardwareAcceleration should be true. -->
    <activity android:hardwareAccelerated="true" />
</application>