---
metadata:
- name: generator
content: Diplodoc Platform v5.52.0
alternate:
- https://ads.yandex.com/helpcenter/en/dev/flutter/adaptive-sticky-banner.md
- https://ads.yandex.com/helpcenter/ru/dev/flutter/adaptive-sticky-banner.md
- https://ads.yandex.com/helpcenter/zh/dev/flutter/adaptive-sticky-banner.md
- href: en/dev/flutter/adaptive-sticky-banner.md
type: text/markdown
title: Markdown version
- href: llms.txt
type: text/markdown
title: llms.txt
---
> **Documentation Index:** Fetch the complete configuration index at https://ads.yandex.com/helpcenter/en/llms.txt
# Adaptive sticky banner
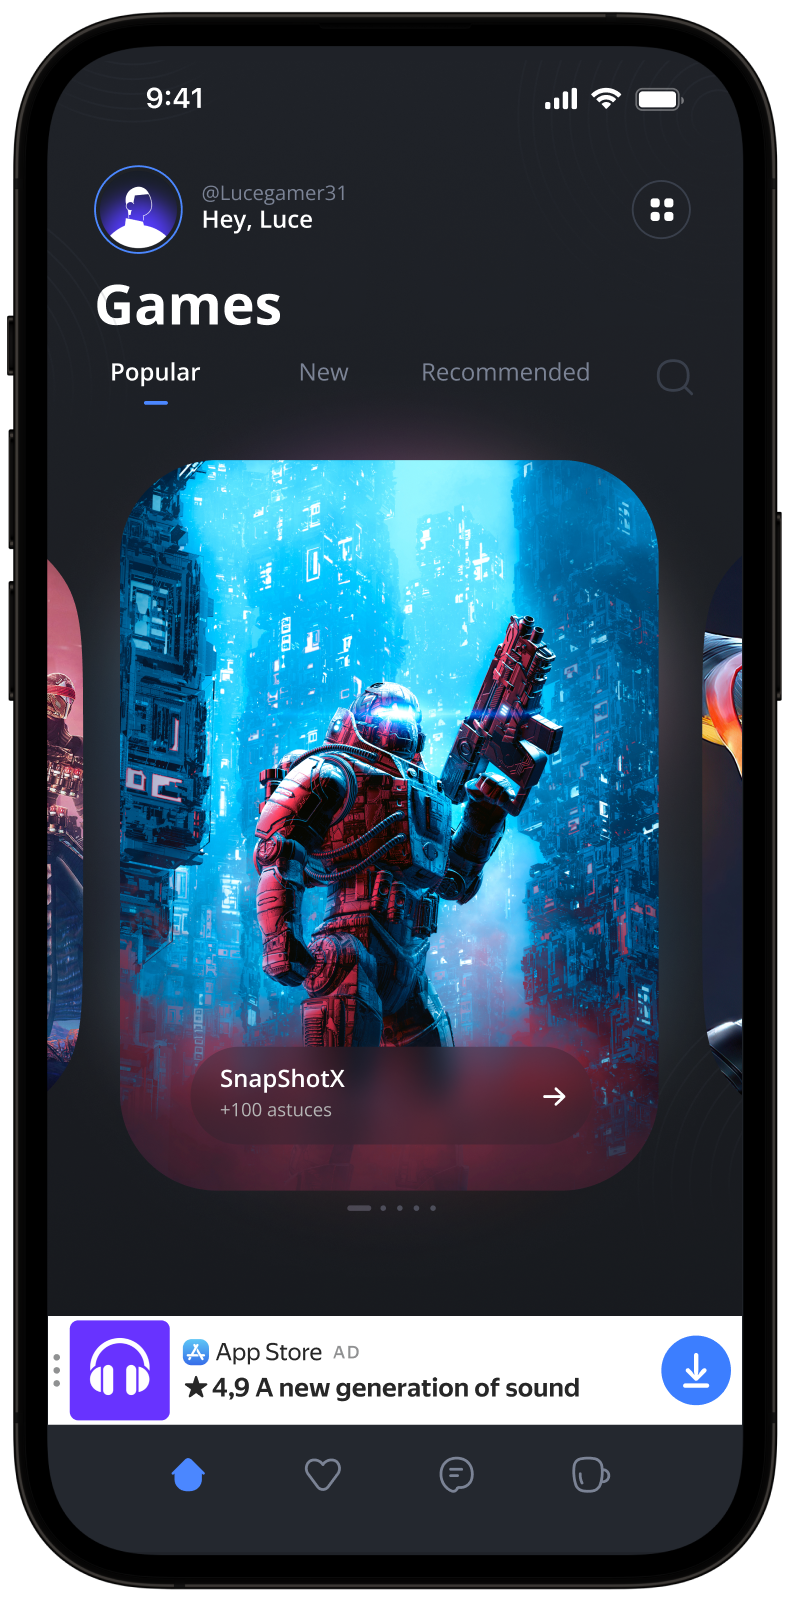
An adaptive sticky banner is a small, automatically updated ad placed at the bottom or top of the app screen. It doesn't overlap the main content and is often used in gaming apps.
The adaptive sticky banner delivers maximum performance by optimizing the ad size for each device. With this ad type, developers can set the maximum allowable ad width, and the system determines the optimal ad size automatically.
{% cut "Appearance" %}
 {% endcut %}
This guide shows how to integrate adaptive sticky banners into Flutter apps.
In addition to code examples and instructions, it has offers format-specific recommendations and links to additional resources.
## Prerequisite {#pre}
1. Follow the process in [Quick start](https://ads.yandex.com/helpcenter/en/dev/flutter/quick-start.md) to integrate the Yandex Mobile Ads Flutter Plugin.
2. Make sure you're running the latest [Yandex Mobile Ads Flutter Plugin](https://ads.yandex.com/helpcenter/en/dev/platforms.md) version. If you're using mediation, make sure you're running the latest version of the [unified build](https://ads.yandex.com/helpcenter/en/dev/platforms.md).
## Implementation {#implement}
Key steps for integrating adaptive sticky banners:
* Create and configure a widget for displaying banner ads.
* Subscribe to load state and event streams.
* Load the ad.
## Features of adaptive sticky banner integration {#features}
1. We strongly advise against attempting to load a new ad when receiving an error in the `onAdFailedToLoad()` method. If you need to load an ad from `onAdFailedToLoad()`, restrict ad load retries to avoid recurring failed ad requests due to network connection constraints.
2. Adaptive sticky banners work best when using all the available width. In most cases, that's the full width of the device screen. Make sure to include all padding and safe display areas applicable to your app.
3. To get the size of the ad, use the `BannerAdSize.stickySize(adWidth)` method, which accepts the available width of the ad container as the argument.
4. The `BannerAdSize` object, which is calculated using the `BannerAdSize.stickySize(adWidth)` method, contains constant ad width and height values for identical devices. Once you test your app layout on a specific device, you can be sure the ad size will be constant. Use the `BannerAdSize::getCalculatedBannerAdSize()` method to get the actual width and height of the ad.
5. The height of the adaptive sticky banner shouldn't exceed 15% of the screen height and should be at least 50 dp.
## Adding a banner widget to the app layout
To display banner ads, you need to add `AdWidget` to the app layout.
Example of adding `AdWidget` to the app screen layout:
```dart
@override
Widget build(BuildContext context) {
return Scaffold(
body: Align(
alignment: Alignment.bottomCenter,
child: AdWidget(bannerAd: banner),
),
);
}
```
## Loading and rendering ads
Once `AdWidget` has been created and added to the app screen, the ad needs to be loaded. The ad size must also be calculated for each device before loading an adaptive sticky banner.
That is performed automatically via the SDK API: `BannerAdSize.sticky(width: screenWidth)`.
As an argument, pass the maximum permissible width of the ad container. We recommend using the entire width of the device screen or the width of the parent container. Be sure to include all the applicable paddings and safe display areas applicable to your app.
```dart
BannerAdSize getAdSize() {
final screenWidth = MediaQuery.of(context).size.width.round();
return BannerAdSize.sticky(width: screenWidth);
}
```
To load an ad, you'll need the ad unit ID from the Yandex Advertising Network interface (adUnitId).
To track when ads load or fail to load and to monitor the lifecycle of adaptive sticky banners, subscribe to the `loadStateStream` and `events` streams on the `BannerAd` class instance.
You can expand ad request parameters through `AdRequest()` by passing user interests, contextual page data, location details, or other data. Delivering additional contextual data in the request can significantly improve your ad quality. Read more in the [Ad Targeting](https://ads.yandex.com/helpcenter/en/dev/flutter/target.md) section.
The following example shows how to load an adaptive sticky banner. After successfully loading, the banner will be displayed automatically:
```dart
class _MyHomePageState extends State {
BannerAd? _banner;
var isBannerAlreadyCreated = false;
BannerAdSize _getAdSize() {
final screenWidth = MediaQuery.of(context).size.width.round();
return BannerAdSize.sticky(width: screenWidth);
}
void _loadAd() {
final banner = BannerAd(adSize: _getAdSize());
banner.loadStateStream.listen((state) {
if (state is BannerAdLoadStateLoaded) {
// The ad was loaded successfully. Now it will be shown.
} else if (state is BannerAdLoadStateError) {
// Ad failed to load with AdRequestError.
// Attempting to load a new ad from the error handler is strongly discouraged.
}
});
banner.events.listen((event) {
if (event is BannerAdClickedEvent) {
// Called when a click is recorded for an ad.
} else if (event is BannerAdImpressionEvent) {
// Called when an impression is recorded for an ad.
}
});
banner.load(AdRequest(adUnitId: 'R-M-XXXXXX-Y')); // or 'demo-banner-yandex'
_banner = banner;
setState(() {
isBannerAlreadyCreated = true;
});
}
@override
initState() {
super.initState();
YandexAds.initialize();
_loadAd();
}
@override
Widget build(BuildContext context) {
return Scaffold(
body: Align(
alignment: Alignment.bottomCenter,
child: isBannerAlreadyCreated ? AdWidget(bannerAd: _banner!) : null,
),
);
}
}
```
## Releasing resources
When you no longer need the banner, call the `destroy()` method to release resources:
```dart
await _banner?.destroy();
_banner = null;
```
## Testing adaptive sticky banner integration {#test}
{% list tabs %}
- Android
### Using demo ad units for ad testing {#demo-blocks}
Use test ads to check your adaptive sticky banner integration and the app itself. To make sure that test ads are returned for each ad request, you can use a special demo ad placement ID.
Demo adUnitId: `demo-banner-yandex`.
{% note warning %}
Before publishing your app in the store, make sure to replace the demo placement ID with the real ID you obtained in the Yandex Advertising Network interface.
{% endnote %}
For the list of all available demo ad placement IDs, see [Demo ad units for testing](https://ads.yandex.com/helpcenter/en/dev/android/demo-blocks.md).
### Testing ad integration {#test-int}
You can check if your adaptive sticky banners are integrated correctly using the SDK's built-in analyzer. A detailed report with the test results will appear in the log.
To view the report, search for the keyword “YandexAds” in [Logcat](https://developer.android.com/studio/command-line/logcat), a tool for debugging Android apps.
```bash
adb logcat -v brief '*:S YandexAds'
```
If the integration is successful, the following message is returned:
```bash
adb logcat -v brief '*:S YandexAds'
mobileads$ adb logcat -v brief '*:S YandexAds'
I/YandexAds(13719): [Integration] Ad type banner was integrated successfully
```
If there are any banner integration issues, you'll get a detailed issue report and troubleshooting recommendations.
- iOS
### Using demo ad units for ad testing
We recommend using test ads to test your ad integration and your app itself.
To guarantee that test ads are returned for every ad request, we created a special demo ad placement ID. Use it to check your ad integration.
Demo adUnitId: `demo-banner-yandex`.
{% note warning %}
Before publishing your app to the store, make sure you replace the demo ad unit ID with a real one obtained from the Yandex Advertising Network interface.
{% endnote %}
You can find the list of available demo ad placement IDs in the [Demo ad units for testing](https://ads.yandex.com/helpcenter/en/dev/ios/demo-blocks.md) section.
### Testing ad integration
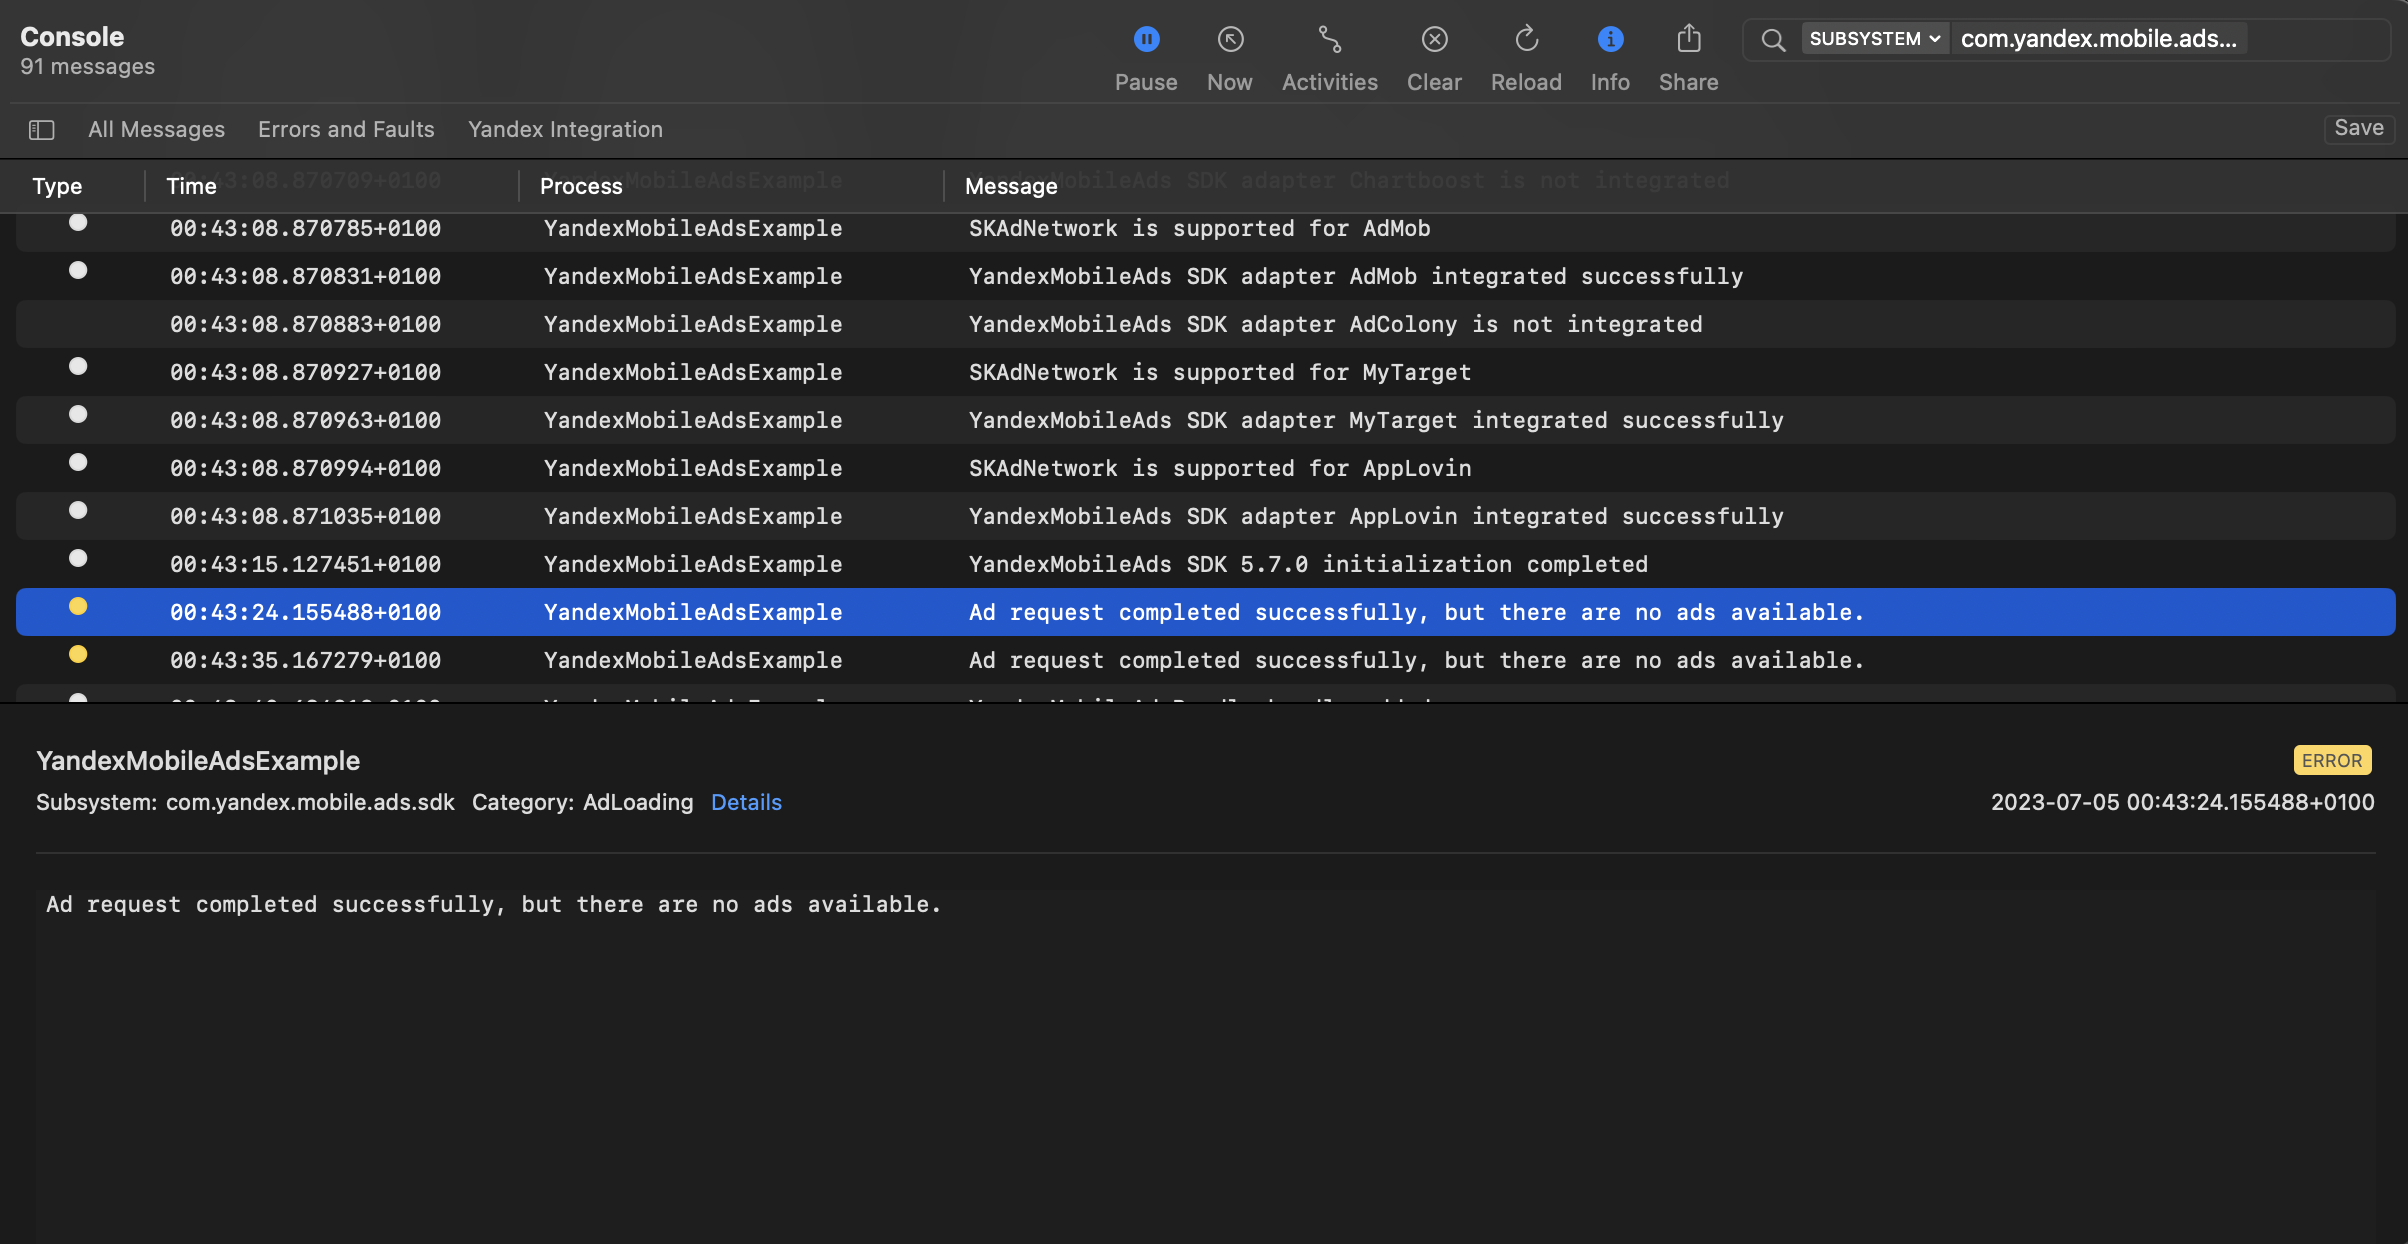
You can test your ad integration using the native Console tool.
To view detailed logs, call the `YandexAds` class's `enableLogging` method.
```swift
YandexAds.enableLogging()
```
To view SDK logs, go to the Console tool and set `Subsystem = com.mobile.ads.ads.sdk`. You can also filter logs by category and error level.
If you're having problems integrating ads, you'll get a detailed report on the issues and recommendations for how to fix them.
{% endcut %}
This guide shows how to integrate adaptive sticky banners into Flutter apps.
In addition to code examples and instructions, it has offers format-specific recommendations and links to additional resources.
## Prerequisite {#pre}
1. Follow the process in [Quick start](https://ads.yandex.com/helpcenter/en/dev/flutter/quick-start.md) to integrate the Yandex Mobile Ads Flutter Plugin.
2. Make sure you're running the latest [Yandex Mobile Ads Flutter Plugin](https://ads.yandex.com/helpcenter/en/dev/platforms.md) version. If you're using mediation, make sure you're running the latest version of the [unified build](https://ads.yandex.com/helpcenter/en/dev/platforms.md).
## Implementation {#implement}
Key steps for integrating adaptive sticky banners:
* Create and configure a widget for displaying banner ads.
* Subscribe to load state and event streams.
* Load the ad.
## Features of adaptive sticky banner integration {#features}
1. We strongly advise against attempting to load a new ad when receiving an error in the `onAdFailedToLoad()` method. If you need to load an ad from `onAdFailedToLoad()`, restrict ad load retries to avoid recurring failed ad requests due to network connection constraints.
2. Adaptive sticky banners work best when using all the available width. In most cases, that's the full width of the device screen. Make sure to include all padding and safe display areas applicable to your app.
3. To get the size of the ad, use the `BannerAdSize.stickySize(adWidth)` method, which accepts the available width of the ad container as the argument.
4. The `BannerAdSize` object, which is calculated using the `BannerAdSize.stickySize(adWidth)` method, contains constant ad width and height values for identical devices. Once you test your app layout on a specific device, you can be sure the ad size will be constant. Use the `BannerAdSize::getCalculatedBannerAdSize()` method to get the actual width and height of the ad.
5. The height of the adaptive sticky banner shouldn't exceed 15% of the screen height and should be at least 50 dp.
## Adding a banner widget to the app layout
To display banner ads, you need to add `AdWidget` to the app layout.
Example of adding `AdWidget` to the app screen layout:
```dart
@override
Widget build(BuildContext context) {
return Scaffold(
body: Align(
alignment: Alignment.bottomCenter,
child: AdWidget(bannerAd: banner),
),
);
}
```
## Loading and rendering ads
Once `AdWidget` has been created and added to the app screen, the ad needs to be loaded. The ad size must also be calculated for each device before loading an adaptive sticky banner.
That is performed automatically via the SDK API: `BannerAdSize.sticky(width: screenWidth)`.
As an argument, pass the maximum permissible width of the ad container. We recommend using the entire width of the device screen or the width of the parent container. Be sure to include all the applicable paddings and safe display areas applicable to your app.
```dart
BannerAdSize getAdSize() {
final screenWidth = MediaQuery.of(context).size.width.round();
return BannerAdSize.sticky(width: screenWidth);
}
```
To load an ad, you'll need the ad unit ID from the Yandex Advertising Network interface (adUnitId).
To track when ads load or fail to load and to monitor the lifecycle of adaptive sticky banners, subscribe to the `loadStateStream` and `events` streams on the `BannerAd` class instance.
You can expand ad request parameters through `AdRequest()` by passing user interests, contextual page data, location details, or other data. Delivering additional contextual data in the request can significantly improve your ad quality. Read more in the [Ad Targeting](https://ads.yandex.com/helpcenter/en/dev/flutter/target.md) section.
The following example shows how to load an adaptive sticky banner. After successfully loading, the banner will be displayed automatically:
```dart
class _MyHomePageState extends State {
BannerAd? _banner;
var isBannerAlreadyCreated = false;
BannerAdSize _getAdSize() {
final screenWidth = MediaQuery.of(context).size.width.round();
return BannerAdSize.sticky(width: screenWidth);
}
void _loadAd() {
final banner = BannerAd(adSize: _getAdSize());
banner.loadStateStream.listen((state) {
if (state is BannerAdLoadStateLoaded) {
// The ad was loaded successfully. Now it will be shown.
} else if (state is BannerAdLoadStateError) {
// Ad failed to load with AdRequestError.
// Attempting to load a new ad from the error handler is strongly discouraged.
}
});
banner.events.listen((event) {
if (event is BannerAdClickedEvent) {
// Called when a click is recorded for an ad.
} else if (event is BannerAdImpressionEvent) {
// Called when an impression is recorded for an ad.
}
});
banner.load(AdRequest(adUnitId: 'R-M-XXXXXX-Y')); // or 'demo-banner-yandex'
_banner = banner;
setState(() {
isBannerAlreadyCreated = true;
});
}
@override
initState() {
super.initState();
YandexAds.initialize();
_loadAd();
}
@override
Widget build(BuildContext context) {
return Scaffold(
body: Align(
alignment: Alignment.bottomCenter,
child: isBannerAlreadyCreated ? AdWidget(bannerAd: _banner!) : null,
),
);
}
}
```
## Releasing resources
When you no longer need the banner, call the `destroy()` method to release resources:
```dart
await _banner?.destroy();
_banner = null;
```
## Testing adaptive sticky banner integration {#test}
{% list tabs %}
- Android
### Using demo ad units for ad testing {#demo-blocks}
Use test ads to check your adaptive sticky banner integration and the app itself. To make sure that test ads are returned for each ad request, you can use a special demo ad placement ID.
Demo adUnitId: `demo-banner-yandex`.
{% note warning %}
Before publishing your app in the store, make sure to replace the demo placement ID with the real ID you obtained in the Yandex Advertising Network interface.
{% endnote %}
For the list of all available demo ad placement IDs, see [Demo ad units for testing](https://ads.yandex.com/helpcenter/en/dev/android/demo-blocks.md).
### Testing ad integration {#test-int}
You can check if your adaptive sticky banners are integrated correctly using the SDK's built-in analyzer. A detailed report with the test results will appear in the log.
To view the report, search for the keyword “YandexAds” in [Logcat](https://developer.android.com/studio/command-line/logcat), a tool for debugging Android apps.
```bash
adb logcat -v brief '*:S YandexAds'
```
If the integration is successful, the following message is returned:
```bash
adb logcat -v brief '*:S YandexAds'
mobileads$ adb logcat -v brief '*:S YandexAds'
I/YandexAds(13719): [Integration] Ad type banner was integrated successfully
```
If there are any banner integration issues, you'll get a detailed issue report and troubleshooting recommendations.
- iOS
### Using demo ad units for ad testing
We recommend using test ads to test your ad integration and your app itself.
To guarantee that test ads are returned for every ad request, we created a special demo ad placement ID. Use it to check your ad integration.
Demo adUnitId: `demo-banner-yandex`.
{% note warning %}
Before publishing your app to the store, make sure you replace the demo ad unit ID with a real one obtained from the Yandex Advertising Network interface.
{% endnote %}
You can find the list of available demo ad placement IDs in the [Demo ad units for testing](https://ads.yandex.com/helpcenter/en/dev/ios/demo-blocks.md) section.
### Testing ad integration
You can test your ad integration using the native Console tool.
To view detailed logs, call the `YandexAds` class's `enableLogging` method.
```swift
YandexAds.enableLogging()
```
To view SDK logs, go to the Console tool and set `Subsystem = com.mobile.ads.ads.sdk`. You can also filter logs by category and error level.
If you're having problems integrating ads, you'll get a detailed report on the issues and recommendations for how to fix them.
 {% endlist %}
## Additional resources {#resources}
*
Link to [pub.dev](https://pub.dev/packages/yandex_mobileads/example).
{% endlist %}
## Additional resources {#resources}
*
Link to [pub.dev](https://pub.dev/packages/yandex_mobileads/example).