---
metadata:
- name: generator
content: Diplodoc Platform v5.52.0
alternate:
- https://ads.yandex.com/helpcenter/en/dev/ios/adaptive-inline-banner.md
- https://ads.yandex.com/helpcenter/pt/dev/ios/adaptive-inline-banner.md
- https://ads.yandex.com/helpcenter/ru/dev/ios/adaptive-inline-banner.md
- https://ads.yandex.com/helpcenter/zh/dev/ios/adaptive-inline-banner.md
- href: en/dev/ios/adaptive-inline-banner.md
type: text/markdown
title: Markdown version
- href: llms.txt
type: text/markdown
title: llms.txt
---
> **Documentation Index:** Fetch the complete configuration index at https://ads.yandex.com/helpcenter/en/llms.txt
# Adaptive inline banner
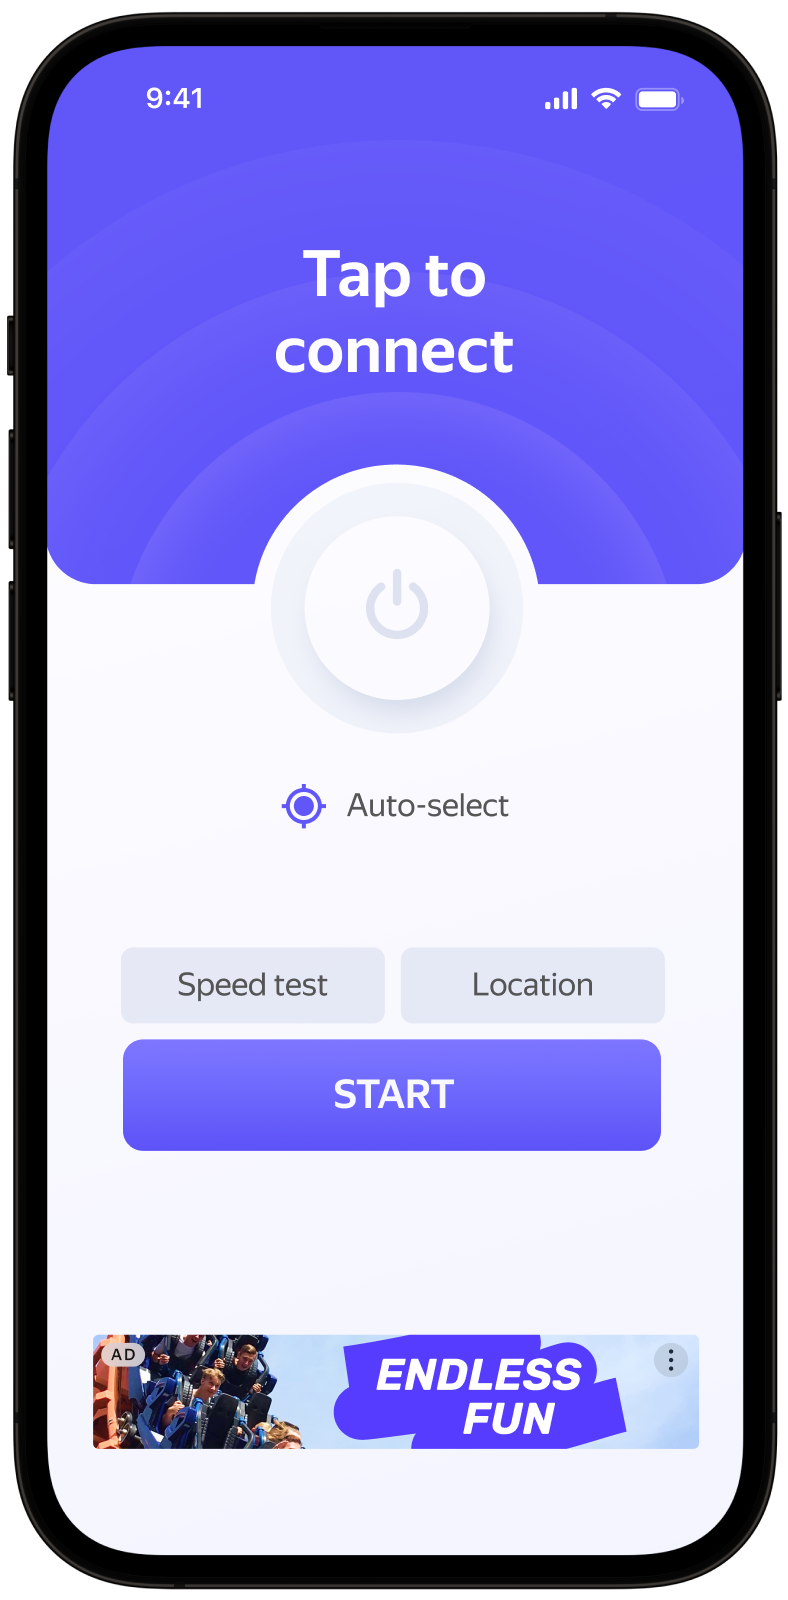
An adaptive inline banner is a flexible banner ad format that ensures maximum efficiency by optimizing ad size for each device.
With this ad type, developers can set the maximum allowable ad width and height, and the system determines the optimal ad size automatically. To choose the best ad size, adaptive inline banners use a maximum height instead of a fixed one. This helps improve performance.
Typically, that format is used in feed-based apps or contexts where it's okay to focus primarily on the ad.
{% cut "Appearance" %}
 {% endcut %}
This guide shows how to integrate adaptive inline banners into iOS apps.
In addition to code examples and instructions, it contains format-specific recommendations and links to additional resources.
## Prerequisite {#pre}
1. Follow the SDK integration steps described in [Quick start](https://ads.yandex.com/helpcenter/en/dev/ios/quick-start.md).
2. [Initialize](https://ads.yandex.com/helpcenter/en/dev/ios/quick-start.md#init) your ad SDK in advance.
3. Make sure you're running the latest [Yandex Mobile Ads SDK](https://ads.yandex.com/helpcenter/en/dev/platforms.md) version. If you're using mediation, make sure you're also running the latest version of the [unified build](https://ads.yandex.com/helpcenter/en/dev/platforms.md).
## Implementation {#implement}
Key steps for integrating adaptive inline banners:
- Create a `BannerAdView` instance.
- Implement the delegate methods.
- Load the ad.
- Pass [additional settings](https://ads.yandex.com/helpcenter/en/dev/ios/target-adfox.md) if you're using Adfox.
- Receive the ad in the delegate method and render it.
## Features of adaptive inline banner integration {#features}
1. All calls to Yandex Mobile Ads SDK methods must be made from the main thread.
2. We strongly advise against attempting to load a new ad when receiving an error in the `func bannerAdViewDidFailLoading(_ bannerAdView: BannerAdView, error: Error)` delegate method. If you need to load an ad from `func bannerAdViewDidFailLoading(_ bannerAdView: BannerAdView, error: Error)`, restrict ad load retries to avoid recurring failed ad requests due to network connection constraints.
3. To make sure your adaptive inline banners work correctly, use [Auto Layout](https://developer.apple.com/library/archive/documentation/UserExperience/Conceptual/AutolayoutPG/AnatomyofaConstraint.html). Using a fixed-sized frame for the view may result in incorrect ad rendering.
4. Adaptive inline banners work best when using all the available width. In most cases, that's the full width of the device screen. Make sure to include all padding and safe display areas applicable to your app.
5. Adaptive inline banners are designed for placement in scrollable content. It can have the same height as the device screen or be limited to the maximum height depending on the API.
6. To get the ad size, use the `BannerAdSize.inline(width: CGFloat, maxHeight: CGFloat)` method, passing the available width of the ad container and the maximum allowed ad height as arguments.
7. The `BannerAdSize` object calculated using `BannerAdSize.inline(width: CGFloat, maxHeight: CGFloat)` contains constant ad width and height values for the same device. Once you test your app layout on a specific device, you can be sure the ad size will not change.
## Creating a `BannerAdView` instance
To display banner ads, create a `BannerAdView` instance, passing only the ad size. You also need to set a delegate for `BannerAdView` by implementing the `BannerAdViewDelegate` protocol in your class.
Ads are sized for the device using the SDK method `BannerAdSize.inline(width: CGFloat, maxHeight: CGFloat)`. Pass the maximum permissible width of the ad container. We recommend using the entire width of the device screen or the width of the parent container. Make sure you include all padding and safe display areas applicable to your app.
You will also need the ad unit ID (adUnitId) from the Yandex Advertising Network interface.
Example of creating a `BannerAdView` in a view controller:
```swift
final class InlineBannerViewController: UIViewController {
private lazy var bannerAdView: BannerAdView = {
let adSize = BannerAdSize.inline(width: 320, maxHeight: 320)
let bannerAdView = BannerAdView(adSize: adSize)
bannerAdView.delegate = self
bannerAdView.translatesAutoresizingMaskIntoConstraints = false
return bannerAdView
}()
}
extension InlineBannerViewController: BannerAdViewDelegate {
func bannerAdViewDidLoad(_ bannerAdView: BannerAdView) {
// Ad loaded successfully
}
func bannerAdViewDidFailLoading(_ bannerAdView: BannerAdView, error: Error) {
// Failed to load
}
}
```
## Loading ads
After you create `BannerAdView`, you need to load the ad.
To get notified about successful or failed loads and to track the adaptive inline banner lifecycle, set the delegate on the `BannerAdView` instance and implement `BannerAdViewDelegate`.
You can extend the ad request using `AdRequest` by passing user interests, page context, location, or other data. Additional contextual data can significantly improve ad quality. Read more in [Ad targeting](https://ads.yandex.com/helpcenter/en/dev/ios/target.md).
The following example shows how to load an adaptive inline banner. After a successful load, `func bannerAdViewDidLoad(_ bannerAdView: BannerAdView)` of `BannerAdViewDelegate` is called:
```swift
final class InlineBannerViewController: UIViewController {
private lazy var bannerAdView: BannerAdView = {
let adSize = BannerAdSize.inline(width: 320, maxHeight: 320)
let bannerAdView = BannerAdView(adSize: adSize)
bannerAdView.delegate = self
bannerAdView.translatesAutoresizingMaskIntoConstraints = false
return bannerAdView
}()
func loadAd() {
let request = AdRequest(adUnitID: "R-M-XXXXX-YY")
bannerAdView.loadAd(with: request)
}
}
```
## Displaying ads
After the ad loads successfully, add it to the view hierarchy using Auto Layout constraints.
Add `bannerAdView` from the delegate callback to your container, then add constraints so the banner appears where you need it.
```swift
final class InlineBannerViewController: UIViewController {
private lazy var bannerAdView: BannerAdView = {
let adSize = BannerAdSize.inline(width: 320, maxHeight: 320)
let bannerAdView = BannerAdView(adSize: adSize)
bannerAdView.delegate = self
bannerAdView.translatesAutoresizingMaskIntoConstraints = false
return bannerAdView
}()
func showAd() {
view.addSubview(bannerAdView)
NSLayoutConstraint.activate([
bannerAdView.topAnchor.constraint(equalTo: loadButton.bottomAnchor, constant: 100),
bannerAdView.centerXAnchor.constraint(equalTo: view.centerXAnchor)
])
}
}
```
## Testing adaptive inline banner integration {#test}
### Using demo ad units for ad testing
We recommend using test ads to test your ad integration and your app itself.
To guarantee that test ads are returned for every ad request, we created a special demo ad placement ID. Use it to check your ad integration.
Demo adUnitId: `demo-banner-yandex`.
{% note warning %}
Before publishing your app to the store, make sure you replace the demo ad unit ID with a real one obtained from the Yandex Advertising Network interface.
{% endnote %}
You can find the list of available demo ad placement IDs in the [Demo ad units for testing](https://ads.yandex.com/helpcenter/en/dev/ios/demo-blocks.md) section.
### Testing ad integration
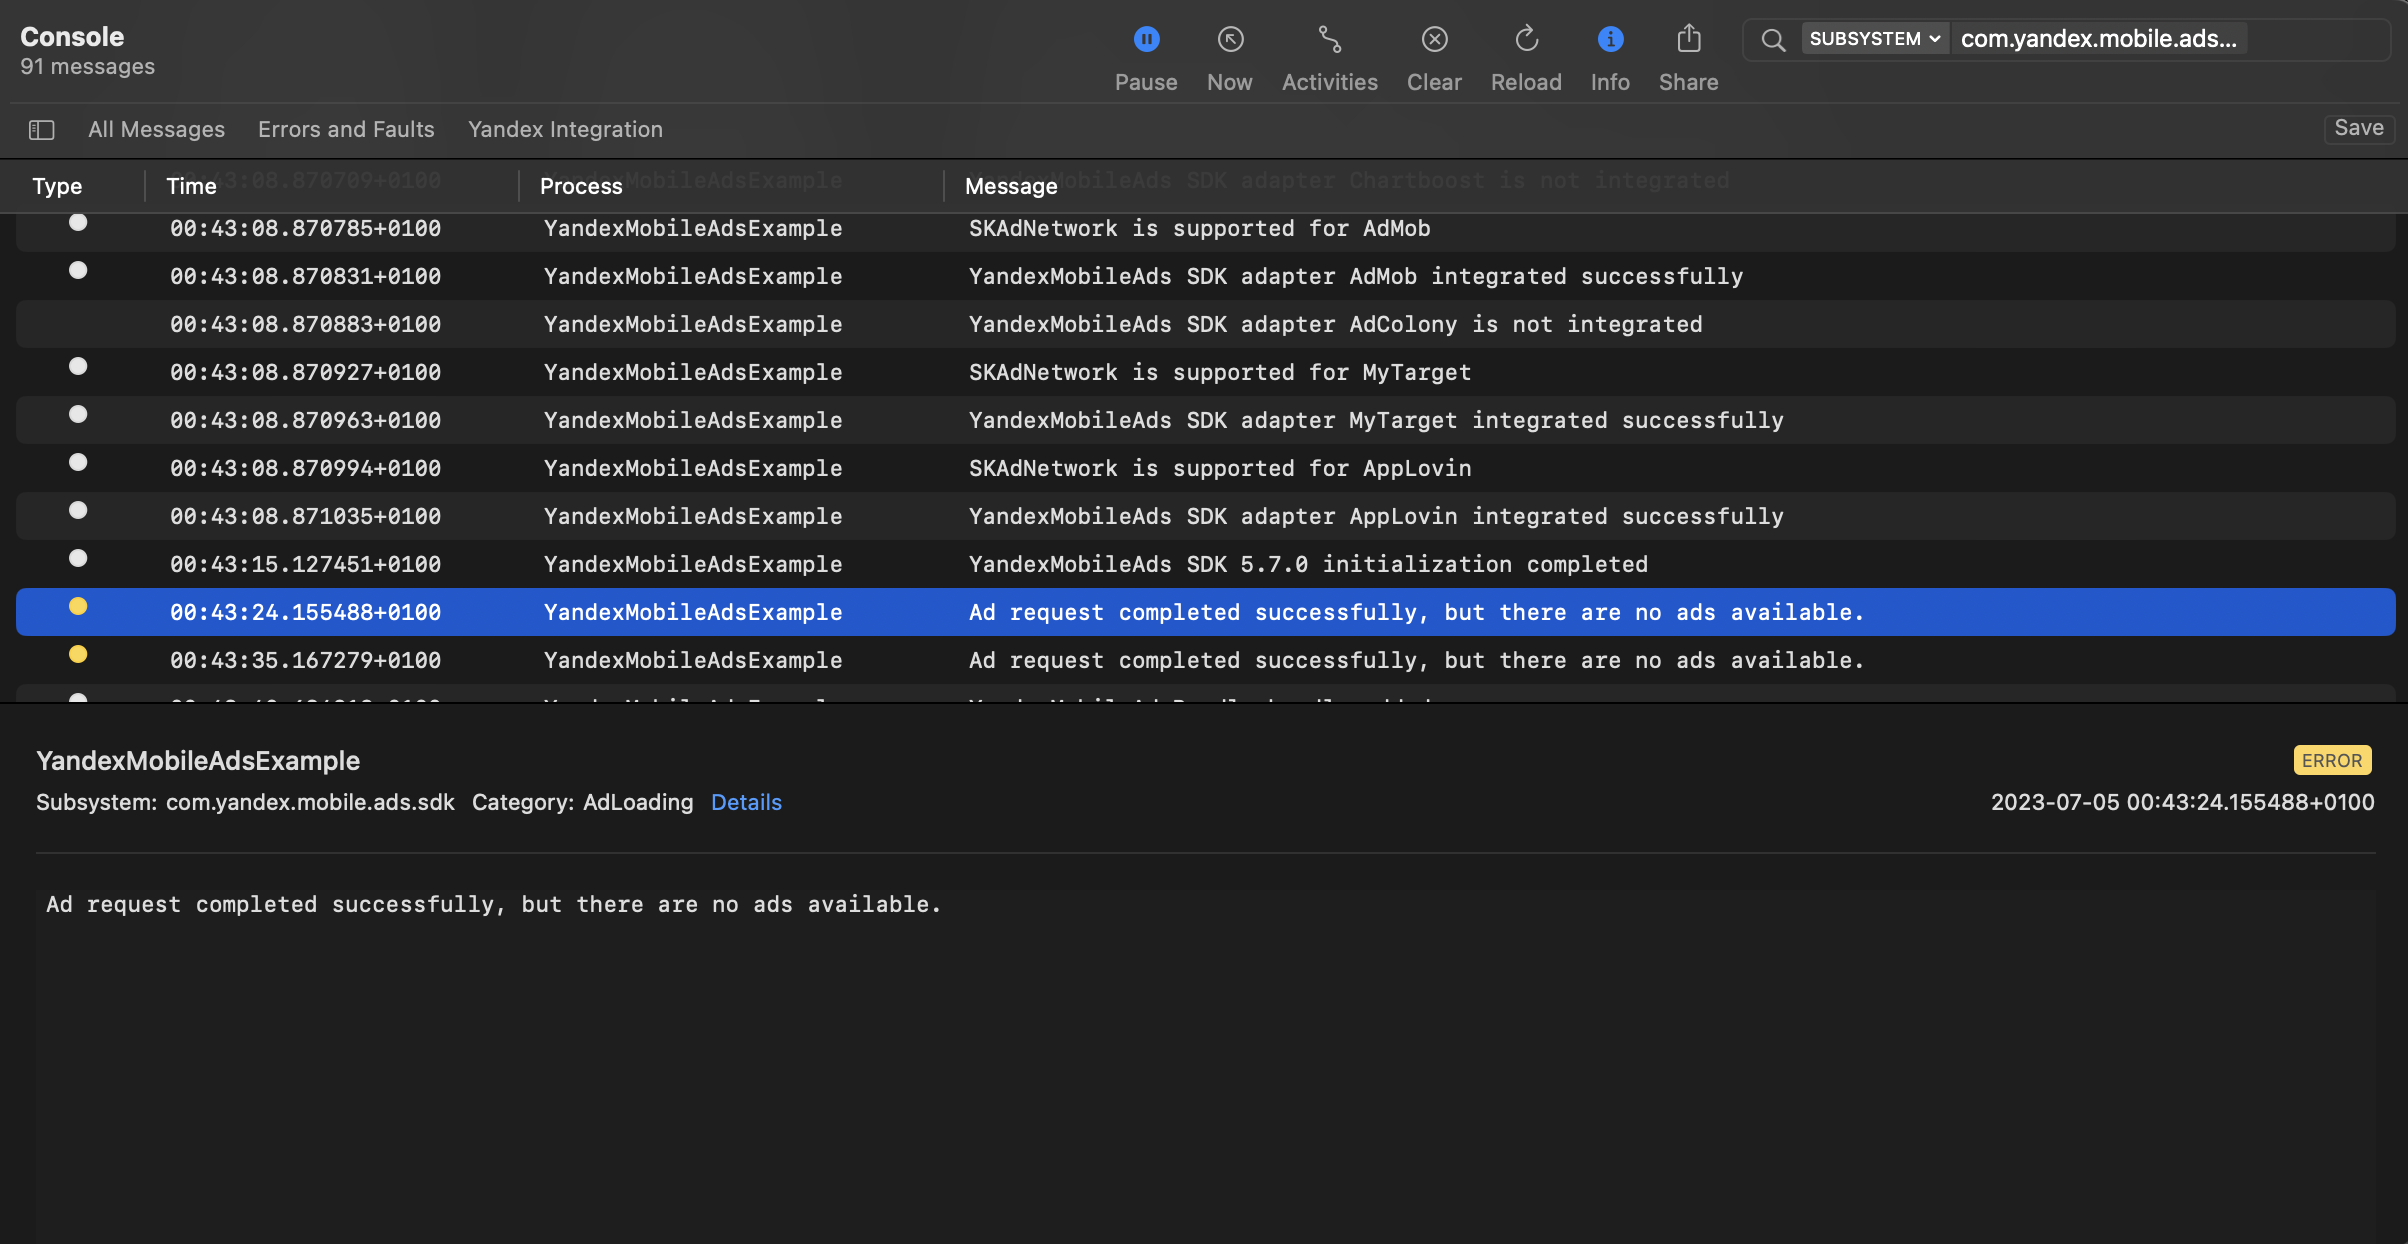
You can test your ad integration using the native Console tool.
To view detailed logs, call the `YandexAds` class's `enableLogging` method.
```swift
YandexAds.enableLogging()
```
To view SDK logs, go to the Console tool and set `Subsystem = com.mobile.ads.ads.sdk`. You can also filter logs by category and error level.
If you're having problems integrating ads, you'll get a detailed report on the issues and recommendations for how to fix them.
{% endcut %}
This guide shows how to integrate adaptive inline banners into iOS apps.
In addition to code examples and instructions, it contains format-specific recommendations and links to additional resources.
## Prerequisite {#pre}
1. Follow the SDK integration steps described in [Quick start](https://ads.yandex.com/helpcenter/en/dev/ios/quick-start.md).
2. [Initialize](https://ads.yandex.com/helpcenter/en/dev/ios/quick-start.md#init) your ad SDK in advance.
3. Make sure you're running the latest [Yandex Mobile Ads SDK](https://ads.yandex.com/helpcenter/en/dev/platforms.md) version. If you're using mediation, make sure you're also running the latest version of the [unified build](https://ads.yandex.com/helpcenter/en/dev/platforms.md).
## Implementation {#implement}
Key steps for integrating adaptive inline banners:
- Create a `BannerAdView` instance.
- Implement the delegate methods.
- Load the ad.
- Pass [additional settings](https://ads.yandex.com/helpcenter/en/dev/ios/target-adfox.md) if you're using Adfox.
- Receive the ad in the delegate method and render it.
## Features of adaptive inline banner integration {#features}
1. All calls to Yandex Mobile Ads SDK methods must be made from the main thread.
2. We strongly advise against attempting to load a new ad when receiving an error in the `func bannerAdViewDidFailLoading(_ bannerAdView: BannerAdView, error: Error)` delegate method. If you need to load an ad from `func bannerAdViewDidFailLoading(_ bannerAdView: BannerAdView, error: Error)`, restrict ad load retries to avoid recurring failed ad requests due to network connection constraints.
3. To make sure your adaptive inline banners work correctly, use [Auto Layout](https://developer.apple.com/library/archive/documentation/UserExperience/Conceptual/AutolayoutPG/AnatomyofaConstraint.html). Using a fixed-sized frame for the view may result in incorrect ad rendering.
4. Adaptive inline banners work best when using all the available width. In most cases, that's the full width of the device screen. Make sure to include all padding and safe display areas applicable to your app.
5. Adaptive inline banners are designed for placement in scrollable content. It can have the same height as the device screen or be limited to the maximum height depending on the API.
6. To get the ad size, use the `BannerAdSize.inline(width: CGFloat, maxHeight: CGFloat)` method, passing the available width of the ad container and the maximum allowed ad height as arguments.
7. The `BannerAdSize` object calculated using `BannerAdSize.inline(width: CGFloat, maxHeight: CGFloat)` contains constant ad width and height values for the same device. Once you test your app layout on a specific device, you can be sure the ad size will not change.
## Creating a `BannerAdView` instance
To display banner ads, create a `BannerAdView` instance, passing only the ad size. You also need to set a delegate for `BannerAdView` by implementing the `BannerAdViewDelegate` protocol in your class.
Ads are sized for the device using the SDK method `BannerAdSize.inline(width: CGFloat, maxHeight: CGFloat)`. Pass the maximum permissible width of the ad container. We recommend using the entire width of the device screen or the width of the parent container. Make sure you include all padding and safe display areas applicable to your app.
You will also need the ad unit ID (adUnitId) from the Yandex Advertising Network interface.
Example of creating a `BannerAdView` in a view controller:
```swift
final class InlineBannerViewController: UIViewController {
private lazy var bannerAdView: BannerAdView = {
let adSize = BannerAdSize.inline(width: 320, maxHeight: 320)
let bannerAdView = BannerAdView(adSize: adSize)
bannerAdView.delegate = self
bannerAdView.translatesAutoresizingMaskIntoConstraints = false
return bannerAdView
}()
}
extension InlineBannerViewController: BannerAdViewDelegate {
func bannerAdViewDidLoad(_ bannerAdView: BannerAdView) {
// Ad loaded successfully
}
func bannerAdViewDidFailLoading(_ bannerAdView: BannerAdView, error: Error) {
// Failed to load
}
}
```
## Loading ads
After you create `BannerAdView`, you need to load the ad.
To get notified about successful or failed loads and to track the adaptive inline banner lifecycle, set the delegate on the `BannerAdView` instance and implement `BannerAdViewDelegate`.
You can extend the ad request using `AdRequest` by passing user interests, page context, location, or other data. Additional contextual data can significantly improve ad quality. Read more in [Ad targeting](https://ads.yandex.com/helpcenter/en/dev/ios/target.md).
The following example shows how to load an adaptive inline banner. After a successful load, `func bannerAdViewDidLoad(_ bannerAdView: BannerAdView)` of `BannerAdViewDelegate` is called:
```swift
final class InlineBannerViewController: UIViewController {
private lazy var bannerAdView: BannerAdView = {
let adSize = BannerAdSize.inline(width: 320, maxHeight: 320)
let bannerAdView = BannerAdView(adSize: adSize)
bannerAdView.delegate = self
bannerAdView.translatesAutoresizingMaskIntoConstraints = false
return bannerAdView
}()
func loadAd() {
let request = AdRequest(adUnitID: "R-M-XXXXX-YY")
bannerAdView.loadAd(with: request)
}
}
```
## Displaying ads
After the ad loads successfully, add it to the view hierarchy using Auto Layout constraints.
Add `bannerAdView` from the delegate callback to your container, then add constraints so the banner appears where you need it.
```swift
final class InlineBannerViewController: UIViewController {
private lazy var bannerAdView: BannerAdView = {
let adSize = BannerAdSize.inline(width: 320, maxHeight: 320)
let bannerAdView = BannerAdView(adSize: adSize)
bannerAdView.delegate = self
bannerAdView.translatesAutoresizingMaskIntoConstraints = false
return bannerAdView
}()
func showAd() {
view.addSubview(bannerAdView)
NSLayoutConstraint.activate([
bannerAdView.topAnchor.constraint(equalTo: loadButton.bottomAnchor, constant: 100),
bannerAdView.centerXAnchor.constraint(equalTo: view.centerXAnchor)
])
}
}
```
## Testing adaptive inline banner integration {#test}
### Using demo ad units for ad testing
We recommend using test ads to test your ad integration and your app itself.
To guarantee that test ads are returned for every ad request, we created a special demo ad placement ID. Use it to check your ad integration.
Demo adUnitId: `demo-banner-yandex`.
{% note warning %}
Before publishing your app to the store, make sure you replace the demo ad unit ID with a real one obtained from the Yandex Advertising Network interface.
{% endnote %}
You can find the list of available demo ad placement IDs in the [Demo ad units for testing](https://ads.yandex.com/helpcenter/en/dev/ios/demo-blocks.md) section.
### Testing ad integration
You can test your ad integration using the native Console tool.
To view detailed logs, call the `YandexAds` class's `enableLogging` method.
```swift
YandexAds.enableLogging()
```
To view SDK logs, go to the Console tool and set `Subsystem = com.mobile.ads.ads.sdk`. You can also filter logs by category and error level.
If you're having problems integrating ads, you'll get a detailed report on the issues and recommendations for how to fix them.
 ## Additional resources {#resources}
*
Link to [GitHub](https://github.com/yandexmobile/yandex-ads-sdk-ios/blob/master/Examples/YandexMobileAdsExample/YandexMobileAdsExample/Yandex/Banner/InlineBannerViewController.swift).
## Additional resources {#resources}
*
Link to [GitHub](https://github.com/yandexmobile/yandex-ads-sdk-ios/blob/master/Examples/YandexMobileAdsExample/YandexMobileAdsExample/Yandex/Banner/InlineBannerViewController.swift).