Native ads
Native advertising is an ad type where the layout can be defined on the app side. This feature allows you to change the visual style of ads and their placement, considering the app design specifics.
Native ads enhance the ad experience. As a result, you can display more ads without losing user interest. This ensures maximum revenue from advertising in the long run.
Ad rendering is performed with native platform tools, which enhances ad performance and quality.
Appearance
This guide will show how to integrate native ads into iOS apps. In addition to code examples and instructions, it contains format-specific recommendations and links to additional resources.
Prerequisite
- Follow the SDK integration steps described in Quick start.
- Initialize your ad SDK in advance.
- Make sure you're running the latest Yandex Mobile Ads SDK version. If you're using mediation, make sure you're also running the latest version of the unified build.
Implementation
Key steps for integrating native ads:
- Create and configure the
NativeAdLoader. - Load the ad.
- Pass additional settings if you're using Adfox.
- Display the loaded ad.
Features of native ad integration
-
All calls to Yandex Mobile Ads SDK methods must be made from the main thread.
-
We strongly advise against attempting to load a new ad when a load error occurs. With a completion handler, that is a
.failureresult; with Swift Concurrency, handle it incatch. If you need to retry from the error handler, limit ad load retries to avoid recurring failed ad requests due to network connection constraints. -
We recommend keeping a strong reference to the ad and its loader throughout the lifecycle of the screen interacting with the ad.
-
We recommend calculating the size of the ad container based on the ad content.
When the ad is loaded, you must render all of its assets. You can get the list of components available in the ad from the
NativeAdad object. -
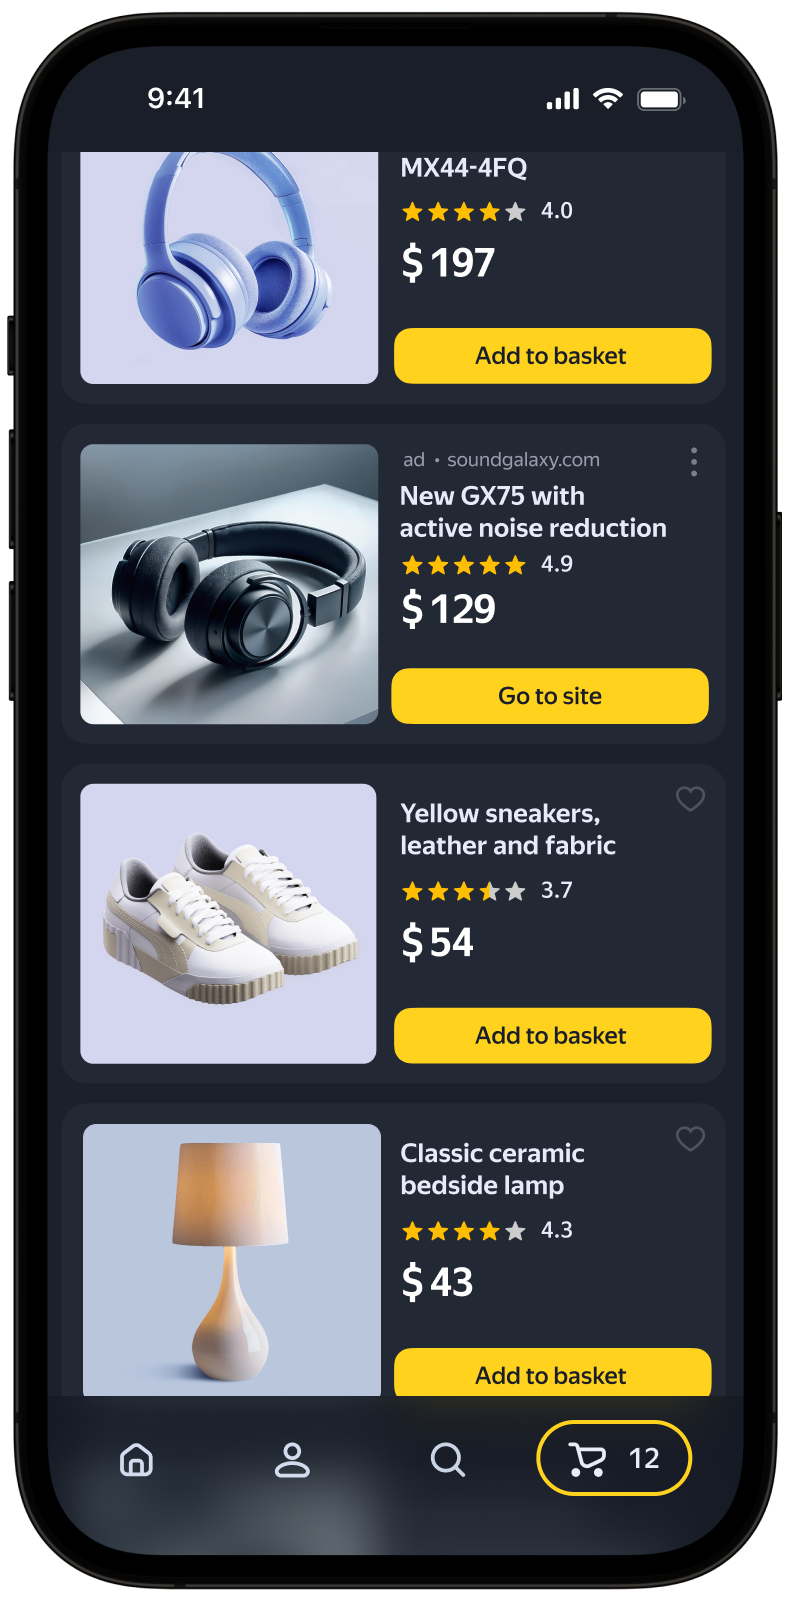
Ads with video usually have a higher CTR, which results in higher ad revenue. To display video ads, the size of the ad container and the MediaView component should be at least 300x160 dp (density-independent pixels).
-
We recommend that you use a layout that includes the complete set of possible assets. In our experience, layouts that include the entire set of assets convert better.
Loading ads
To load native ads, create a NativeAdLoader object.
Ad request parameters are set through the AdRequest class. Pass the ad block ID; you can also configure targeting and other data that can improve ad quality. Image loading options are passed via NativeAdOptions. Read more in the Ad targeting section.
Use loadAd(with:options:completion:) with a completion handler, or the Swift Concurrency overload loadAd(with:options:).
The following example shows how to load native ads from a view controller.
final class CustomNativeViewController: UIViewController {
    private var adLoader: NativeAdLoader?

    override func viewDidLoad() {
        adLoader = NativeAdLoader()
    }

    private func loadNativeAd() async {
        let request = AdRequest(adUnitID: "R-M-XXXXX-YY")
        let options = NativeAdOptions()
        do {
            let ad = try await adLoader?.loadAd(with: request, options: options)
            // Notifies that a native ad is loaded
        } catch {
            // Notifies that the ad failed to load
        }
    }
}
final class CustomNativeViewController: UIViewController {
    private var adLoader: NativeAdLoader?

    override func viewDidLoad() {
        adLoader = NativeAdLoader()
    }

    private func loadNativeAd() {
        let request = AdRequest(adUnitID: "R-M-XXXXX-YY")
        let options = NativeAdOptions()
        adLoader?.loadAd(with: request, options: options) { [weak self] result in
            switch result {
            case .success(let ad):
                // Notifies that a native ad is loaded
                break
            case .failure:
                // Notifies that the ad failed to load
                break
            }
        }
    }
}
Rendering ads
Warning
Starting in version 8.0.0, native templates (NativeBannerView, MutableNativeTemplateAppearance, and related types) are fully removed from the SDK. Use manual layout for native ads as described below.
When the ad is loaded, you must render all of its assets. You can get the list of components available in the ad from the NativeAd ad object.
Manual setup of a native ad layout
This method lets you build a native ad layout and place ad components relative to each other. The ad can include both required and optional components. You can find the full list in Native ad assets.
Tip
We recommend that you use a layout that includes the complete set of possible assets. In practice, that tends to improve conversions.
To manually configure native ads:
-
Create a custom
viewfor theNativeAdViewclass. -
Configure the placement of custom elements to display components.
-
Link these custom elements to the corresponding
NativeAdViewproperties:final class CustomNativeAdView: NativeAdView { // ... init() { super.init(frame: CGRect()) setupUI() bindAssets() } private func bindAssets() { titleLabel = customTitleLabel domainLabel = customDomainLabel warningLabel = customWarningLabel sponsoredLabel = customSponsoredLabel feedbackButton = customFeedbackButton callToActionButton = customCallToActionButton mediaView = customMediaView priceLabel = customPriceLabel reviewCountLabel = customReviewCountLabel ratingView = customRatingView bodyLabel = customBodyLabel iconImageView = customIconImageView } private func setupUI() { // ... } }Note
If you don't link a custom element to the
NativeAdViewproperty for a mandatory component, the ad won't be displayed. -
Link the custom
viewto theNativeAdobject to display the ad after a successful load. Callbind(with adView: NativeAdView)on theNativeAdobject:final class NativeCustomViewController: UIViewController, NativeAdDelegate { private let adView = NativeCustomAdView() // ... private lazy var adLoader: NativeAdLoader = { let adLoader = NativeAdLoader() return adLoader }() override func viewDidLoad() { super.viewDidLoad() setupUI() loadNativeAd() } private func loadNativeAd() { let request = AdRequest(adUnitID: "demo-native-app-yandex") let options = NativeAdOptions() adLoader.loadAd(with: request, options: options) { [weak self] result in if case .success(let ad) = result { self?.bindNativeAd(ad) } } } private func bindNativeAd(_ ad: NativeAd) { ad.delegate = self do { try ad.bind(with: adView) } catch { // ... } } private func setupUI() { // ... } }
Loading multiple ads
The Yandex Mobile Ads SDK allows loading multiple ads in a single request (up to nine ads).
Note
Use the demo ad unit demo-native-bulk-yandex for adUnitID. You can view the supported platforms on the page Demo ad units.
-
Create an instance of the
NativeBulkAdLoaderclass to get native ads. -
Create an
AdRequestwith the ad block ID andNativeAdOptionsfor additional options (images, and so on). -
Call
loadAds(with:adsCount:options:completion:)to load the ads.
let request = AdRequest(adUnitID: AdUnitID)
let options = NativeAdOptions()
let adLoader = NativeBulkAdLoader()

do {
    let ads = try await adLoader.loadAds(with: request, adsCount: adsCount, options: options)
    // Handle each NativeAd separately
} catch {
    // Load error
}
let request = AdRequest(adUnitID: AdUnitID)
let options = NativeAdOptions()
let adLoader = NativeBulkAdLoader()

adLoader.loadAds(with: request, adsCount: adsCount, options: options) { result in
    switch result {
    case .success(let ads):
        // Handle each NativeAd separately
        break
    case .failure:
        break
    }
}
Note
A bulk ad request allows you to select multiple distinct ads.
The array of ads returned by a bulk request may contain between zero and adsCount NativeAd objects. All ad objects received can be rendered independently of each another using the above methods for native ad layout.
Testing native ad integration
Using demo ad units for ad testing
We recomend using test ads to test your native ad integration and your app itself.
To guarantee that test ads are returned for every ad request, we created a special demo ad placement ID. Use it to check your ad integration.
Demo adUnitId for a text and image ad: demo-native-content-yandex.
Demo adUnitId for an ad for mobile apps: demo-native-app-yandex.
Warning
Before publishing your app in the store, make sure to replace the demo ad unit ID with a real one obtained from the Yandex Advertising Network interface.
Testing ad integration
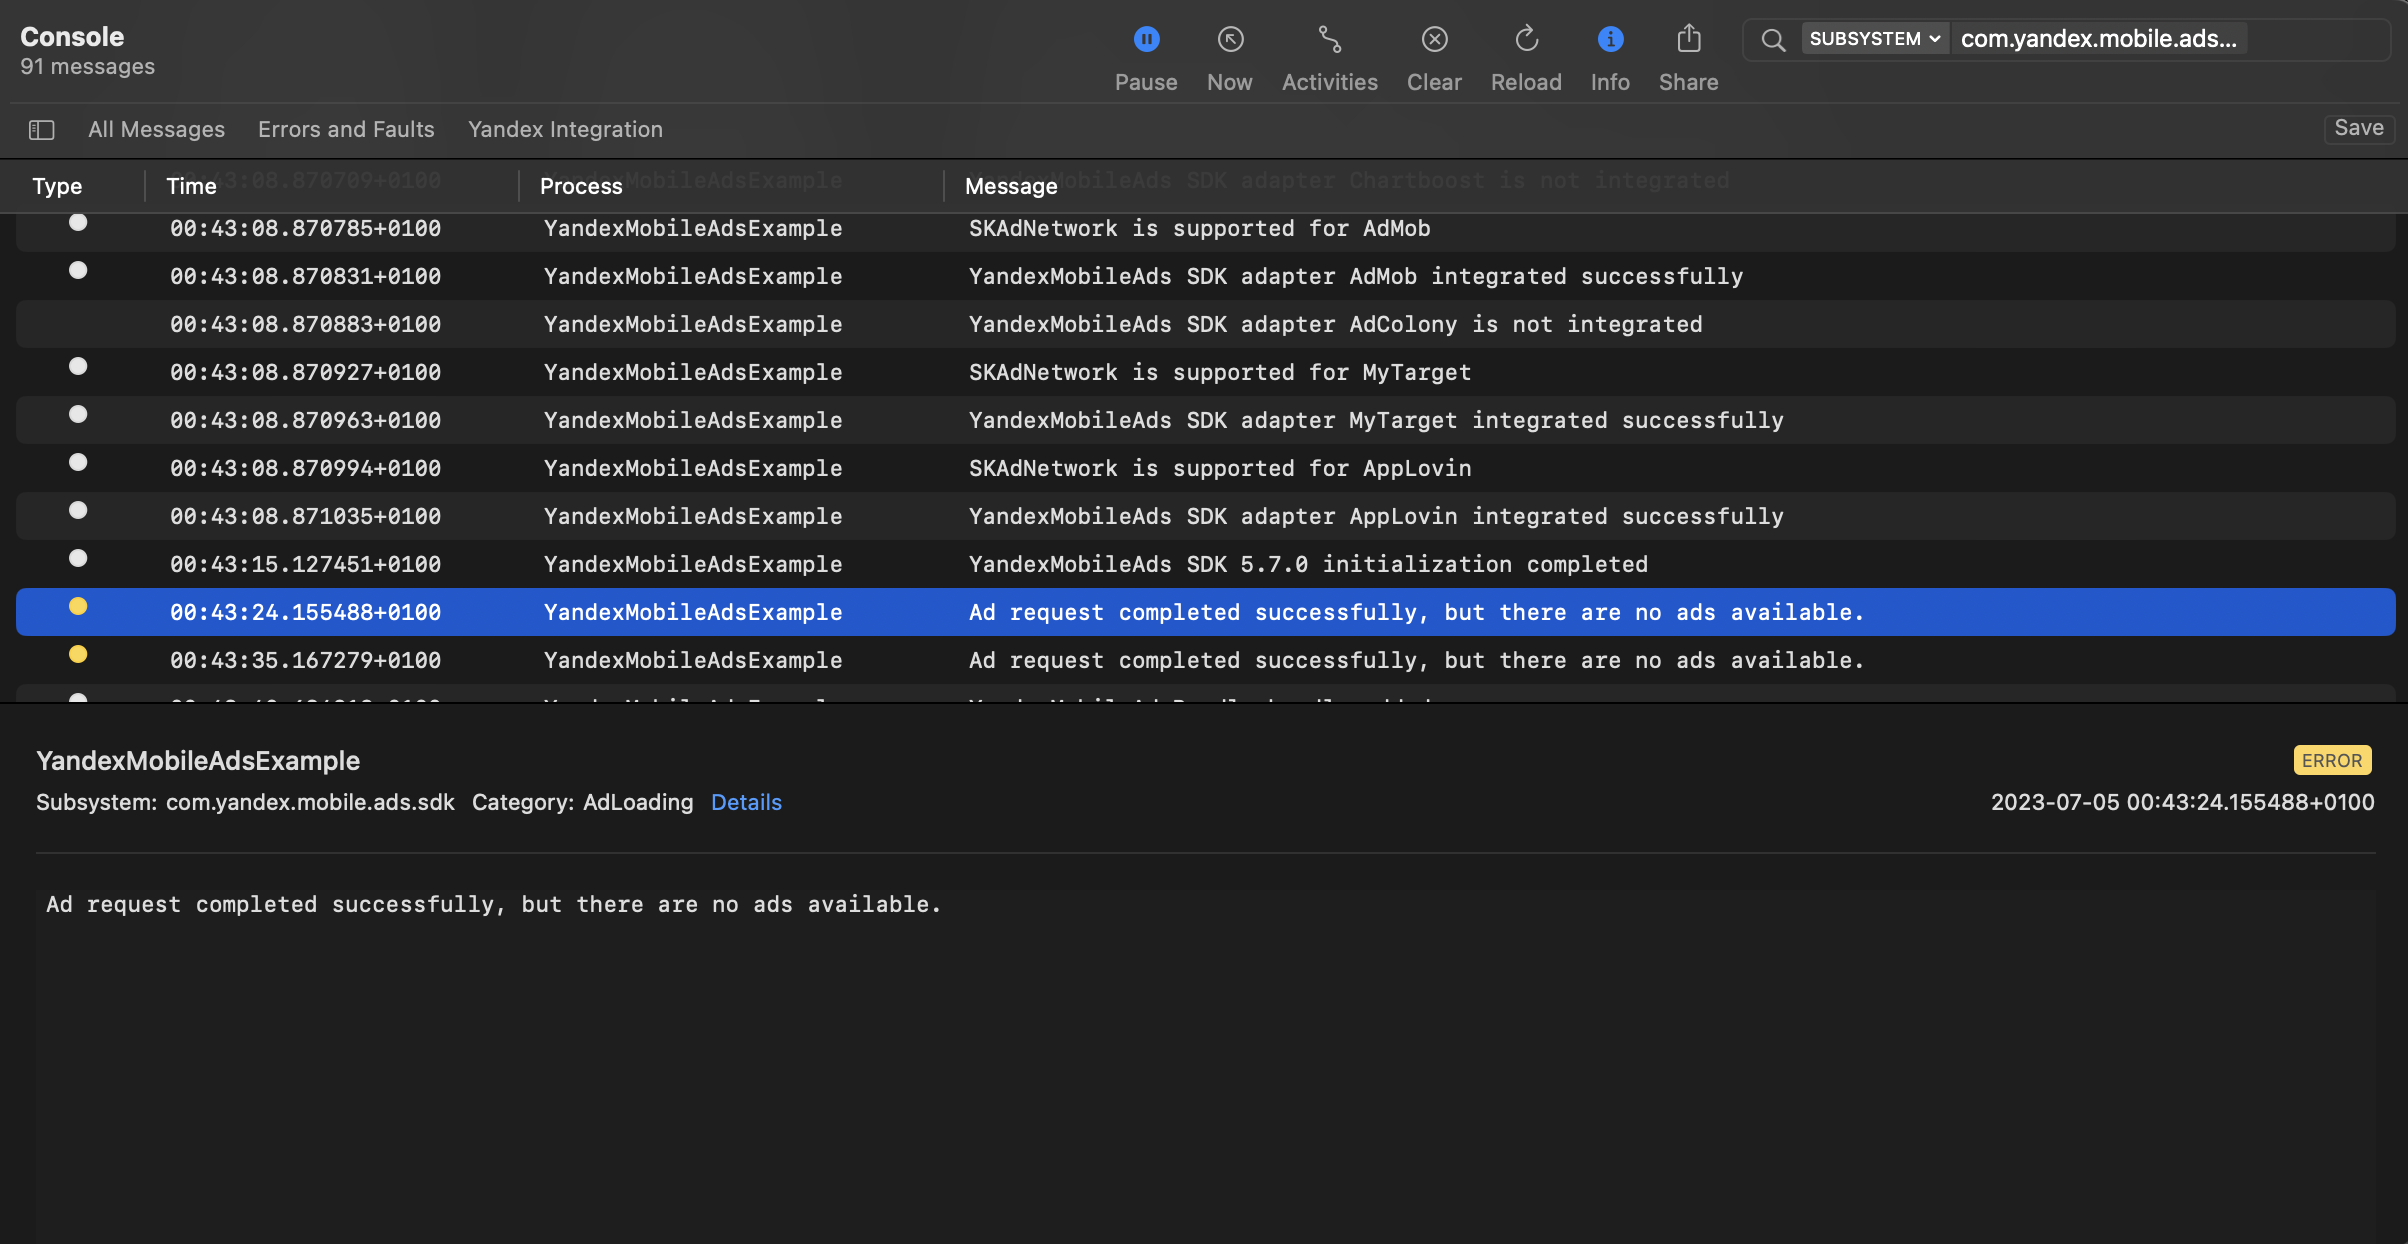
You can test your ad integration using the native Console tool.
To view detailed logs, call the YandexAds class's enableLogging method.
YandexAds.enableLogging()
To view SDK logs, go to the Console tool and set Subsystem = com.mobile.ads.ads.sdk. You can also filter logs by category and error level.
If you're having problems integrating ads, you'll get a detailed report on the issues and recommendations for how to fix them.
Native ad integration indicator
Note
By default, the indicator is only shown in simulator mode (device type DeviceTypeSimulator). You can view device types in DeviceType.
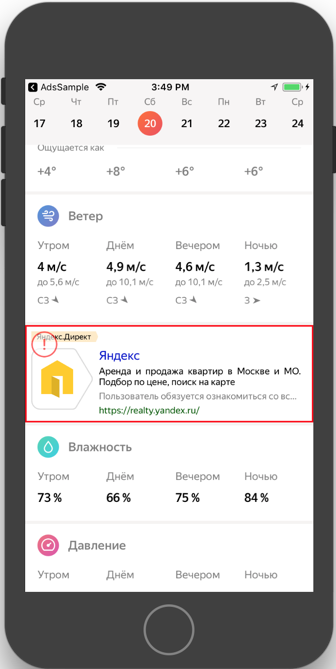
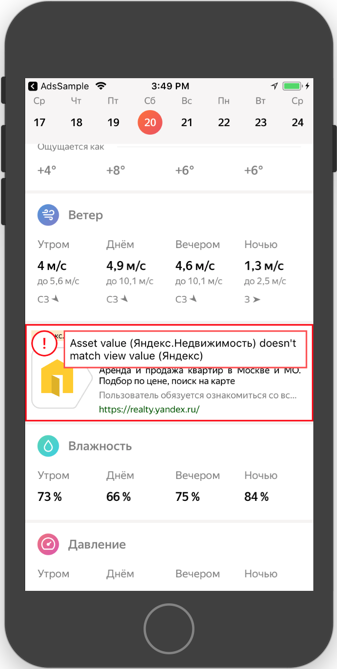
If an error was made when integrating native ads, an indicator appears on top of the ad in simulator mode. Click on the indicator to see a message with debugging information to help you understand the reason for the error. Click the indicator again to hide the message.
To enable the indicator for real devices as well, pass the value DeviceTypeHardware | DeviceTypeSimulator in the enableVisibilityErrorIndicatorForDeviceType: method.
YandexAds.enableVisibilityErrorIndicator(for: [.hardware, .simulator])
To disable the indicator, pass the value DeviceTypeNone in the enableVisibilityErrorIndicatorForDeviceType: method.
YandexAds.enableVisibilityErrorIndicator(for: [])
|
|
|
Additional resources
- Link to GitHub.