---
metadata:
- name: generator
content: Diplodoc Platform v5.50.6
alternate:
- https://ads.yandex.com/helpcenter/en/dev/unity7/adaptive-sticky-banner.md
- https://ads.yandex.com/helpcenter/ru/dev/unity7/adaptive-sticky-banner.md
---
> **Documentation Index:** Fetch the complete configuration index at https://ads.yandex.com/helpcenter/en/llms.txt
# Adaptive sticky banner
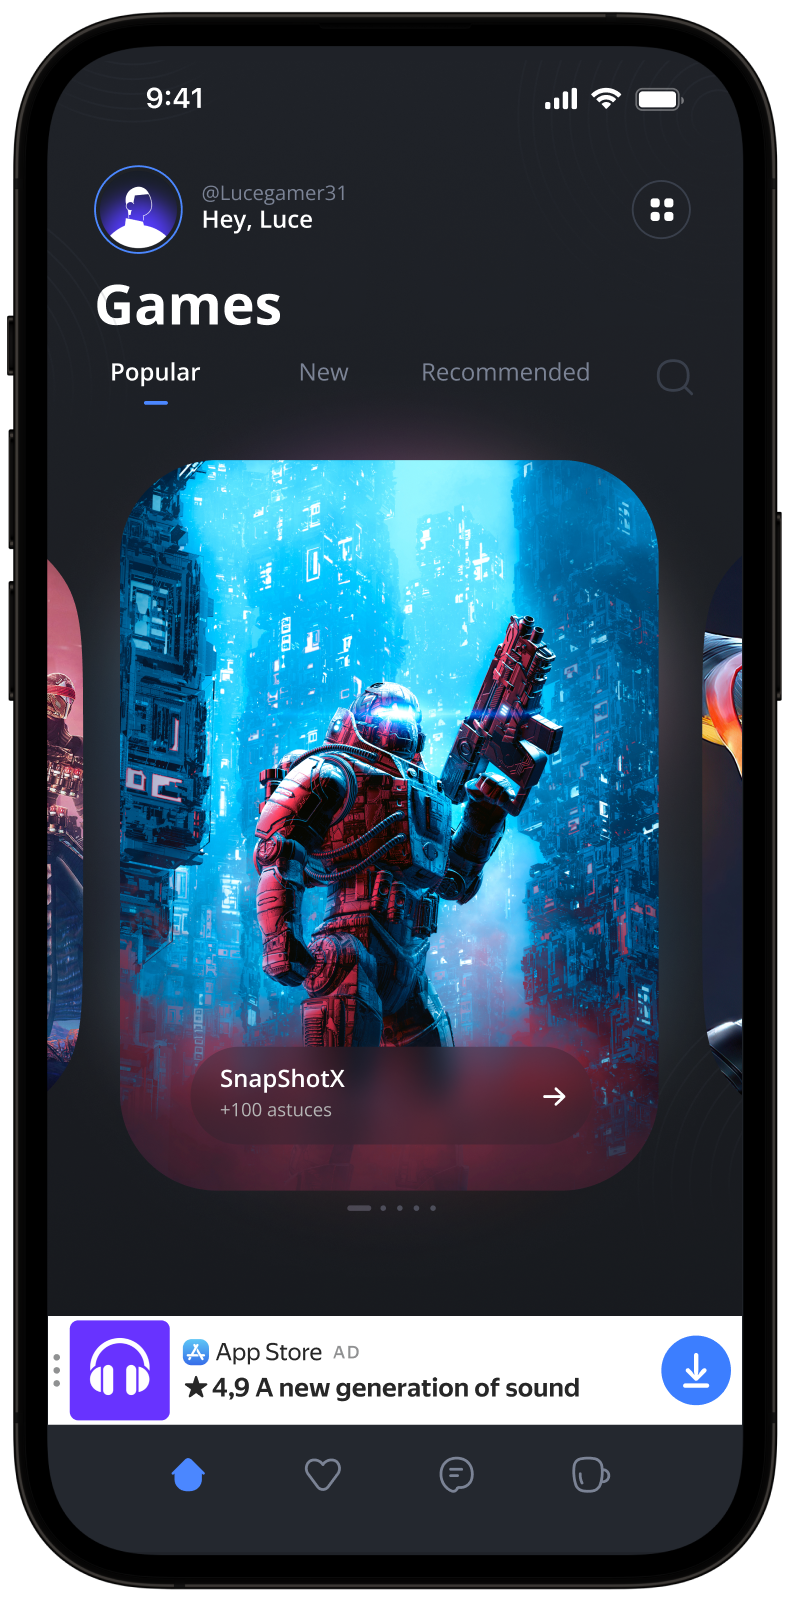
That is a small, automatically updated ad placed at the top or bottom of the app screen. It does not overlap the main app content and is often used in game apps.
Adaptive sticky banners provide maximum efficiency by optimizing the size of the ad on each device. This ad type lets developers set a maximum allowable ad width, though the optimal ad size is still determined automatically. The height of the adaptive sticky banner shouldn't exceed 15% of the screen height.
{% cut "Appearance" %}
 {% endcut %}
## Prerequisite {#pre}
1. Follow the process in [Quick start](https://ads.yandex.com/helpcenter/en/dev/unity7/quick-start.md) for integrating the Yandex Mobile Ads Unity Plugin.
2. Make sure you're running the latest [Yandex Mobile Ads Unity Plugin](https://ads.yandex.com/helpcenter/en/dev/platforms.md) version. If you're using mediation, make sure you're also running the latest version of the [unified build](https://ads.yandex.com/helpcenter/en/dev/platforms.md).
## Implementation {#implement}
Key steps for integrating adaptive sticky banners:
* Create and configure the Banner ad object.
* Register a callback method listener.
* Load the ad.
* Pass [additional settings](https://ads.yandex.com/helpcenter/en/dev/unity7/target-adfox.md) if you're using Adfox.
## Features of adaptive sticky banner integration {#features}
1. If you received an error in the `onAdFailedToLoad` event, don't try to load a new ad again. If there's no other option, limit the number of ad load retries. That will help avoid constant unsuccessful requests and connection issues when limitations arise.
2. Adaptive sticky banners work best when using all the available width. In most cases, that's the full width of the device screen. Make sure to include all padding and safe display areas applicable to your app.
3. To get the size of the ad, use the `BannerAdSize.stickySize(adWidth)` method, which accepts the available width of the ad container as the argument.
4. The `BannerAdSize` object, which is calculated using the `BannerAdSize.stickySize(adWidth)` method, contains constant ad width and height values for identical devices. Once you test your app layout on a specific device, you can be sure the ad size will be constant.
5. The height of the adaptive sticky banner shouldn't exceed 15% of the screen height and should be at least 50 dp.
## Adding Banner to the project
To display a banner in your app, create a `Banner` object in the script (in C#) that is attached to the `GameObject`.
```c#
using UnityEngine;
using YandexMobileAds;
using YandexMobileAds.Base;
public class YandexMobileAdsStickyBannerDemoScript : MonoBehaviour
{
private Banner banner;
private int GetScreenWidthDp()
{
int screenWidth = (int)Screen.safeArea.width;
return ScreenUtils.ConvertPixelsToDp(screenWidth);
}
private void RequestStickyBanner()
{
string adUnitId = "demo-banner-yandex"; // replace with "R-M-XXXXXX-Y"
BannerAdSize bannerMaxSize = BannerAdSize.StickySize(GetScreenWidthDp());
banner = new Banner(adUnitId, bannerMaxSize, AdPosition.BottomCenter);
}
}
```
The `Banner` constructor contains the following parameters:
* `AdUnitId`: A unique identifier that is issued in the Yandex Advertising Network interface and looks like this: R-M-XXXXXX-Y.
{% note tip %}
For testing purposes, you can use the demo unit ID: `demo-banner-yandex`. Before publishing your ad, make sure you replace the demo unit ID with a real ad unit ID.
{% endnote %}
* `BannerAdSize`: Size of the banner you want to display.
* `AdPosition`: The position on the screen.
* `StickySize(int width)`: Banner size.
You need to set a full screen width without margins. The ad will fit into these dimensions. The optimal size of the ad will be determined automatically. The height of the adaptive sticky banner shouldn't exceed 15% of the screen height.
## Loading and rendering ads
After creating and configuring an object of the `Banner` class, you need to load the ad. To load an ad, use the `LoadAd` method, which takes the `AdRequest` object as an argument.
The ad size must also be calculated for each device before loading an adaptive sticky banner.
That is performed automatically via the SDK API: `BannerAdSize.stickySize(adWidth)`.
You can expand the ad request parameters through `AdRequest.Builder()` by passing user interests, contextual app data, location details, or other data in the request. Delivering additional contextual data in the request can significantly improve your ad quality. Read more in the [Ad Targeting](https://ads.yandex.com/helpcenter/en/dev/unity7/target.md) section.
To notify when ads load or fail to load and to track the life cycle of adaptive sticky banners, set the callback functions for the `BannerAd` class object.
```c#
private void RequestStickyBanner()
{
// ...
AdRequest request = new AdRequest.Builder().Build();
banner.LoadAd(request);
}
```
## Banner ad events
To track events that occur in banner ads, register a delegate for the appropriate `EventHandler`, as shown below:
```c#
using System;
// ...
private void RequestStickyBanner()
{
// ...
// Called when rewarded ad was loaded
banner.OnAdLoaded += HandleAdLoaded;
// Called when there was an error loading the ad
banner.OnAdFailedToLoad += HandleAdFailedToLoad;
//Called when the app went inactive because the user tapped an ad and is about to switch to a different app (for example, a browser).
banner.OnLeftApplication += HandleLeftApplication;
// Called when the user returns to the app after a tap
banner.OnReturnedToApplication += HandleReturnedToApplication;
// Called when the user clicks the ad
banner.OnAdClicked += HandleAdClicked;
// Called when an impression is registered
banner.OnImpression += HandleImpression;
// ...
}
private void HandleAdLoaded(object sender, EventArgs args)
{
Debug.Log("AdLoaded event received");
banner.Show();
}
private void HandleAdFailedToLoad(object sender, AdFailureEventArgs args)
{
Debug.Log($"AdFailedToLoad event received with message: {args.Message}");
// We strongly advise against loading a new ad using this method
}
private void HandleLeftApplication(object sender, EventArgs args)
{
Debug.Log("LeftApplication event received");
}
private void HandleReturnedToApplication(object sender, EventArgs args)
{
Debug.Log("ReturnedToApplication event received");
}
private void HandleAdClicked(object sender, EventArgs args)
{
Debug.Log("AdClicked event received");
}
private void HandleImpression(object sender, ImpressionData impressionData)
{
var data = impressionData == null ? "null" : impressionData.rawData;
Debug.Log($"HandleImpression event received with data: {data}");
}
```
## Testing adaptive sticky banner integration {#test}
{% list tabs %}
- Android
### Using demo ad units for ad testing {#demo-blocks}
We recommend using test ads to test your adaptive sticky banner integration and your app itself.
To guarantee that test ads are returned for every ad request, we created a special demo ad placement ID. Use it to check your ad integration.
Demo adUnitId: `demo-banner-yandex`.
{% note warning %}
Before publishing your app in the store, make sure to replace the demo ad placement ID with a real one obtained from the Yandex Advertising Network interface.
{% endnote %}
You can find the list of available demo ad placement IDs in the [Demo ad units for testing](https://ads.yandex.com/helpcenter/en/dev/android7/demo-blocks.md) section.
### Testing ad integration {#test-int}
You can check your adaptive sticky banner integration using the SDK's built-in analyzer.
The tool makes sure your ads are integrated properly and outputs a detailed report to the log.
To view the report, search for the “YandexAds” keyword in the [Logcat](https://developer.android.com/studio/command-line/logcat) tool for Android app debugging.
```bash
adb logcat -v brief '*:S YandexAds'
```
If the integration is successful, you'll see this message:
```bash
adb logcat -v brief '*:S YandexAds'
mobileads$ adb logcat -v brief '*:S YandexAds'
I/YandexAds(13719): [Integration] Ad type banner was integrated successfully
```
If you're having problems integrating banner ads, you'll get a detailed report on the issues and recommendations for how to fix them.
- iOS
### Using demo ad units for ad testing
We recommend using test ads to test your ad integration and your app itself.
To guarantee that test ads are returned for every ad request, we created a special demo ad placement ID. Use it to check your ad integration.
Demo adUnitId: `demo-banner-yandex`.
{% note warning %}
Before publishing your app to the store, make sure you replace the demo ad unit ID with a real one obtained from the Yandex Advertising Network interface.
{% endnote %}
You can find the list of available demo ad placement IDs in the [Demo ad units for testing](https://ads.yandex.com/helpcenter/en/dev/ios7/demo-blocks.md) section.
### Testing ad integration
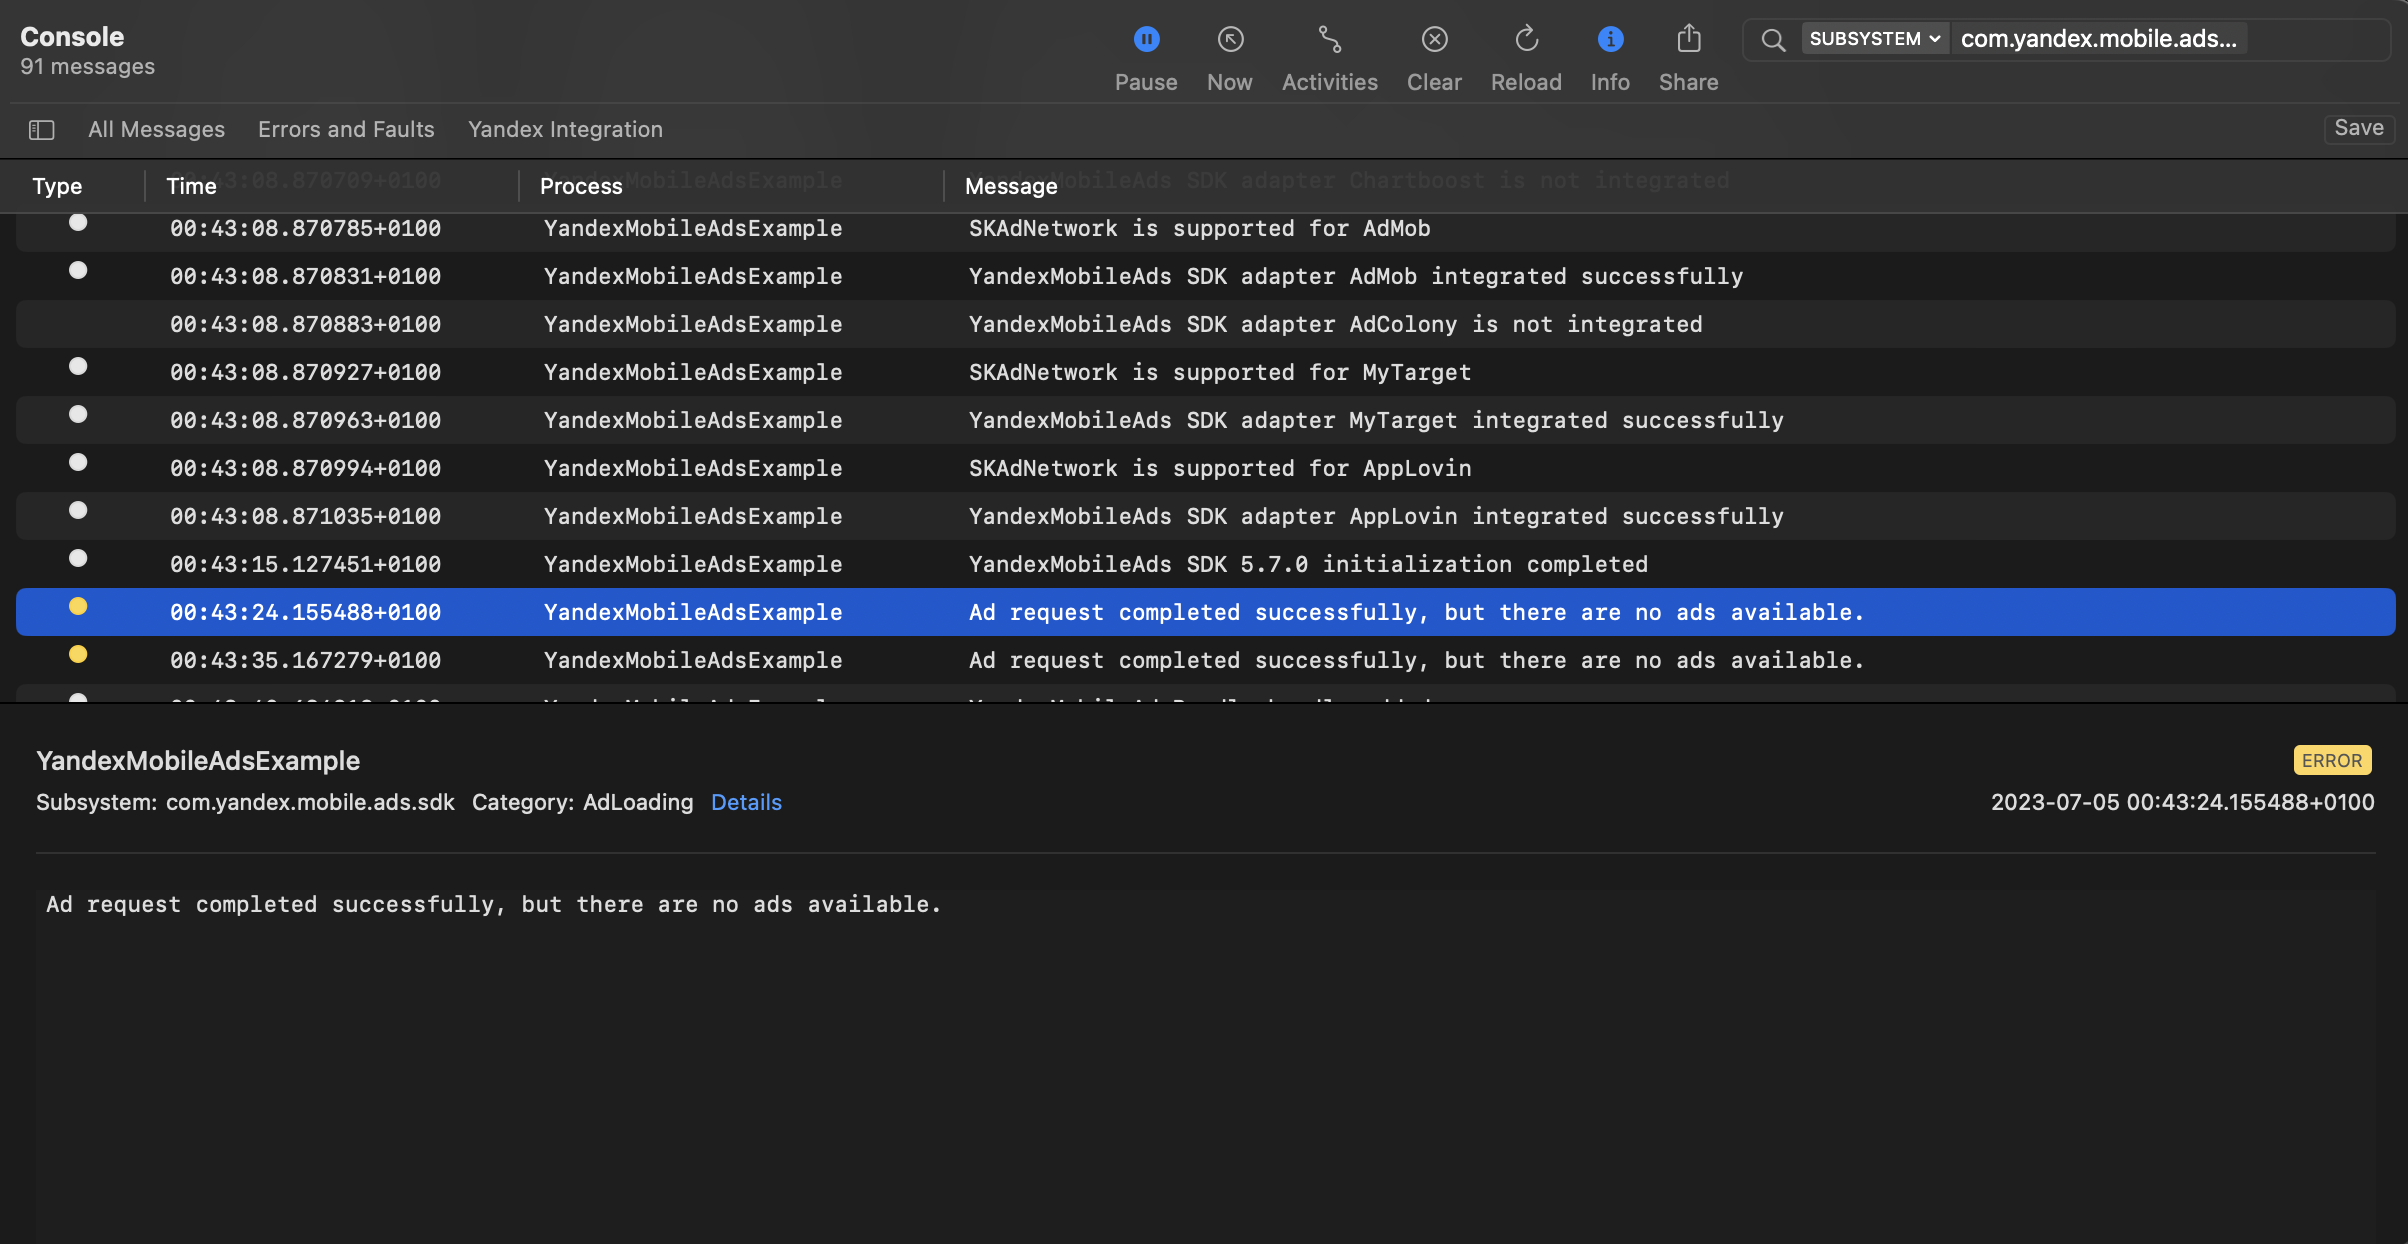
You can test your ad integration using the native Console tool.
To view detailed logs, call the `MobileAds` class's `enableLogging` method.
```swift
MobileAds.enableLogging()
```
To view SDK logs, go to the Console tool and set `Subsystem = com.mobile.ads.ads.sdk`. You can also filter logs by category and error level.
If you're having problems integrating ads, you'll get a detailed report on the issues and recommendations for how to fix them.
{% endcut %}
## Prerequisite {#pre}
1. Follow the process in [Quick start](https://ads.yandex.com/helpcenter/en/dev/unity7/quick-start.md) for integrating the Yandex Mobile Ads Unity Plugin.
2. Make sure you're running the latest [Yandex Mobile Ads Unity Plugin](https://ads.yandex.com/helpcenter/en/dev/platforms.md) version. If you're using mediation, make sure you're also running the latest version of the [unified build](https://ads.yandex.com/helpcenter/en/dev/platforms.md).
## Implementation {#implement}
Key steps for integrating adaptive sticky banners:
* Create and configure the Banner ad object.
* Register a callback method listener.
* Load the ad.
* Pass [additional settings](https://ads.yandex.com/helpcenter/en/dev/unity7/target-adfox.md) if you're using Adfox.
## Features of adaptive sticky banner integration {#features}
1. If you received an error in the `onAdFailedToLoad` event, don't try to load a new ad again. If there's no other option, limit the number of ad load retries. That will help avoid constant unsuccessful requests and connection issues when limitations arise.
2. Adaptive sticky banners work best when using all the available width. In most cases, that's the full width of the device screen. Make sure to include all padding and safe display areas applicable to your app.
3. To get the size of the ad, use the `BannerAdSize.stickySize(adWidth)` method, which accepts the available width of the ad container as the argument.
4. The `BannerAdSize` object, which is calculated using the `BannerAdSize.stickySize(adWidth)` method, contains constant ad width and height values for identical devices. Once you test your app layout on a specific device, you can be sure the ad size will be constant.
5. The height of the adaptive sticky banner shouldn't exceed 15% of the screen height and should be at least 50 dp.
## Adding Banner to the project
To display a banner in your app, create a `Banner` object in the script (in C#) that is attached to the `GameObject`.
```c#
using UnityEngine;
using YandexMobileAds;
using YandexMobileAds.Base;
public class YandexMobileAdsStickyBannerDemoScript : MonoBehaviour
{
private Banner banner;
private int GetScreenWidthDp()
{
int screenWidth = (int)Screen.safeArea.width;
return ScreenUtils.ConvertPixelsToDp(screenWidth);
}
private void RequestStickyBanner()
{
string adUnitId = "demo-banner-yandex"; // replace with "R-M-XXXXXX-Y"
BannerAdSize bannerMaxSize = BannerAdSize.StickySize(GetScreenWidthDp());
banner = new Banner(adUnitId, bannerMaxSize, AdPosition.BottomCenter);
}
}
```
The `Banner` constructor contains the following parameters:
* `AdUnitId`: A unique identifier that is issued in the Yandex Advertising Network interface and looks like this: R-M-XXXXXX-Y.
{% note tip %}
For testing purposes, you can use the demo unit ID: `demo-banner-yandex`. Before publishing your ad, make sure you replace the demo unit ID with a real ad unit ID.
{% endnote %}
* `BannerAdSize`: Size of the banner you want to display.
* `AdPosition`: The position on the screen.
* `StickySize(int width)`: Banner size.
You need to set a full screen width without margins. The ad will fit into these dimensions. The optimal size of the ad will be determined automatically. The height of the adaptive sticky banner shouldn't exceed 15% of the screen height.
## Loading and rendering ads
After creating and configuring an object of the `Banner` class, you need to load the ad. To load an ad, use the `LoadAd` method, which takes the `AdRequest` object as an argument.
The ad size must also be calculated for each device before loading an adaptive sticky banner.
That is performed automatically via the SDK API: `BannerAdSize.stickySize(adWidth)`.
You can expand the ad request parameters through `AdRequest.Builder()` by passing user interests, contextual app data, location details, or other data in the request. Delivering additional contextual data in the request can significantly improve your ad quality. Read more in the [Ad Targeting](https://ads.yandex.com/helpcenter/en/dev/unity7/target.md) section.
To notify when ads load or fail to load and to track the life cycle of adaptive sticky banners, set the callback functions for the `BannerAd` class object.
```c#
private void RequestStickyBanner()
{
// ...
AdRequest request = new AdRequest.Builder().Build();
banner.LoadAd(request);
}
```
## Banner ad events
To track events that occur in banner ads, register a delegate for the appropriate `EventHandler`, as shown below:
```c#
using System;
// ...
private void RequestStickyBanner()
{
// ...
// Called when rewarded ad was loaded
banner.OnAdLoaded += HandleAdLoaded;
// Called when there was an error loading the ad
banner.OnAdFailedToLoad += HandleAdFailedToLoad;
//Called when the app went inactive because the user tapped an ad and is about to switch to a different app (for example, a browser).
banner.OnLeftApplication += HandleLeftApplication;
// Called when the user returns to the app after a tap
banner.OnReturnedToApplication += HandleReturnedToApplication;
// Called when the user clicks the ad
banner.OnAdClicked += HandleAdClicked;
// Called when an impression is registered
banner.OnImpression += HandleImpression;
// ...
}
private void HandleAdLoaded(object sender, EventArgs args)
{
Debug.Log("AdLoaded event received");
banner.Show();
}
private void HandleAdFailedToLoad(object sender, AdFailureEventArgs args)
{
Debug.Log($"AdFailedToLoad event received with message: {args.Message}");
// We strongly advise against loading a new ad using this method
}
private void HandleLeftApplication(object sender, EventArgs args)
{
Debug.Log("LeftApplication event received");
}
private void HandleReturnedToApplication(object sender, EventArgs args)
{
Debug.Log("ReturnedToApplication event received");
}
private void HandleAdClicked(object sender, EventArgs args)
{
Debug.Log("AdClicked event received");
}
private void HandleImpression(object sender, ImpressionData impressionData)
{
var data = impressionData == null ? "null" : impressionData.rawData;
Debug.Log($"HandleImpression event received with data: {data}");
}
```
## Testing adaptive sticky banner integration {#test}
{% list tabs %}
- Android
### Using demo ad units for ad testing {#demo-blocks}
We recommend using test ads to test your adaptive sticky banner integration and your app itself.
To guarantee that test ads are returned for every ad request, we created a special demo ad placement ID. Use it to check your ad integration.
Demo adUnitId: `demo-banner-yandex`.
{% note warning %}
Before publishing your app in the store, make sure to replace the demo ad placement ID with a real one obtained from the Yandex Advertising Network interface.
{% endnote %}
You can find the list of available demo ad placement IDs in the [Demo ad units for testing](https://ads.yandex.com/helpcenter/en/dev/android7/demo-blocks.md) section.
### Testing ad integration {#test-int}
You can check your adaptive sticky banner integration using the SDK's built-in analyzer.
The tool makes sure your ads are integrated properly and outputs a detailed report to the log.
To view the report, search for the “YandexAds” keyword in the [Logcat](https://developer.android.com/studio/command-line/logcat) tool for Android app debugging.
```bash
adb logcat -v brief '*:S YandexAds'
```
If the integration is successful, you'll see this message:
```bash
adb logcat -v brief '*:S YandexAds'
mobileads$ adb logcat -v brief '*:S YandexAds'
I/YandexAds(13719): [Integration] Ad type banner was integrated successfully
```
If you're having problems integrating banner ads, you'll get a detailed report on the issues and recommendations for how to fix them.
- iOS
### Using demo ad units for ad testing
We recommend using test ads to test your ad integration and your app itself.
To guarantee that test ads are returned for every ad request, we created a special demo ad placement ID. Use it to check your ad integration.
Demo adUnitId: `demo-banner-yandex`.
{% note warning %}
Before publishing your app to the store, make sure you replace the demo ad unit ID with a real one obtained from the Yandex Advertising Network interface.
{% endnote %}
You can find the list of available demo ad placement IDs in the [Demo ad units for testing](https://ads.yandex.com/helpcenter/en/dev/ios7/demo-blocks.md) section.
### Testing ad integration
You can test your ad integration using the native Console tool.
To view detailed logs, call the `MobileAds` class's `enableLogging` method.
```swift
MobileAds.enableLogging()
```
To view SDK logs, go to the Console tool and set `Subsystem = com.mobile.ads.ads.sdk`. You can also filter logs by category and error level.
If you're having problems integrating ads, you'll get a detailed report on the issues and recommendations for how to fix them.
 {% endlist %}
## Tips
### Ad preloading
Loading an ad may take several seconds, depending on the number of ad networks connected in mobile mediation and the user's internet speed. We recommend preloading ads before displaying them.
You can load an ad at app startup or just before it's shown. Make sure to preserve the object between scenes using the `DontDestroyOnLoad(gameObject)` call. That ensures the ad that's loaded is not deleted with the `gameObject` on scene change.
When you then need to render the banner, call `banner.Show()`.
If you cache ads on too many screens that are unlikely to be shown, your ad effectiveness could drop. For example, if users complete 2-3 game levels per session, you shouldn't cache ads for 6-7 screens. Your ad viewability could decrease otherwise, and the advertising system might deprioritize your app.
To make sure you're finding a good balance for your app, track the "Share of impressions" or "Share of visible impressions" metric in the Yandex Advertising Network interface. If it's under 20%, you should probably revise your caching algorithm. The higher the percentage of impressions, the better.
### Clearing unused memory
We recommend calling `banner?.Destroy()` and re-creating the `Banner` object before each ad request. That ensures that all memory that was utilized is cleared, and the app can request and show ads many times without overwhelming the device. That can also prevent code errors related to repeated ad loading and lifecycle disruptions.
## Additional resources {#resources}
*
Link to [GitHub](https://github.com/yandexmobile/yandex-ads-unity-plugin).
{% endlist %}
## Tips
### Ad preloading
Loading an ad may take several seconds, depending on the number of ad networks connected in mobile mediation and the user's internet speed. We recommend preloading ads before displaying them.
You can load an ad at app startup or just before it's shown. Make sure to preserve the object between scenes using the `DontDestroyOnLoad(gameObject)` call. That ensures the ad that's loaded is not deleted with the `gameObject` on scene change.
When you then need to render the banner, call `banner.Show()`.
If you cache ads on too many screens that are unlikely to be shown, your ad effectiveness could drop. For example, if users complete 2-3 game levels per session, you shouldn't cache ads for 6-7 screens. Your ad viewability could decrease otherwise, and the advertising system might deprioritize your app.
To make sure you're finding a good balance for your app, track the "Share of impressions" or "Share of visible impressions" metric in the Yandex Advertising Network interface. If it's under 20%, you should probably revise your caching algorithm. The higher the percentage of impressions, the better.
### Clearing unused memory
We recommend calling `banner?.Destroy()` and re-creating the `Banner` object before each ad request. That ensures that all memory that was utilized is cleared, and the app can request and show ads many times without overwhelming the device. That can also prevent code errors related to repeated ad loading and lifecycle disruptions.
## Additional resources {#resources}
*
Link to [GitHub](https://github.com/yandexmobile/yandex-ads-unity-plugin).