---
metadata:
- name: generator
content: Diplodoc Platform v5.50.6
alternate:
- https://ads.yandex.com/helpcenter/en/dev/android/admob-third.md
- https://ads.yandex.com/helpcenter/ru/dev/android/admob-third.md
- https://ads.yandex.com/helpcenter/zh/dev/android/admob-third.md
---
> **Documentation Index:** Fetch the complete configuration index at https://ads.yandex.com/helpcenter/zh/llms.txt
# Google AdMob (ex. AdMob) 聚合
{% note info %}
如果您已在使用 Google AdMob 聚合,并且想要将 Yandex Advertising Network 添加为自定义事件,请按本指南进行操作。
如果您想要通过 Yandex Advertising Network 界面管理外部广告网络,请使用 [Yandex Mobile 聚合](https://ads.yandex.com/helpcenter/zh/easy/index.md)。
{% endnote %}
您可以通过 Google AdMob (ex. AdMob) 聚合连接到 Yandex Advertising Network。要将 Yandex Advertising Network 添加到 Google AdMob (ex. AdMob) 聚合,请按以下步骤操作:
1. [集成](https://developers.google.com/admob/android/mediate?hl=en) Google AdMob (ex. AdMob) 聚合。
2. 连接 Yandex Mobile Ads SDK 的适配器。
3. 在 [Yandex Advertising Network 界面](https://ads.yandex.com/helpcenter/zh/monetization/formats.yaml) 中为选定广告类型创建 AdUnitId。
4. 在 [Google AdMob (ex. AdMob) Web 界面](http://apps.admob.com/) 中添加 Yandex Advertising Network。
5. 在两个 Web 界面间同步广告单元设置。
## 连接 Yandex Mobile Ads SDK 的适配器 {#sdk-adapter}
要将 Yandex Advertising Network 与 Google AdMob (ex. AdMob) 聚合集成,请将适配器依赖项添加到项目模块的 build.gradle 文件中:
```
dependencies {
...
implementation 'com.yandex.ads.adapter:admob-mobileads:8.0.0.0'
}
```
要将应用代码中的 [GDPR](https://ads.yandex.com/helpcenter/zh/dev/android/gdpr.md)(用户同意)和 [COPPA](https://ads.yandex.com/helpcenter/zh/dev/android/coppa.md)(年龄受限用户)值手动传输到 Yandex Mobile Ads SDK,请确保同时启用 Yandex Mobile Ads SDK。将以下内容添加到“依赖项”块中:
```
implementation "com.yandex.android:mobileads:8.3.0.0"
```
## 在 Google AdMob (ex. AdMob) 聚合 Web 界面中添加 Yandex Advertising Network {#admob-add}
对于 Google AdMob (ex. AdMob) 聚合中的每个广告版位 (AdMob AdUnitId),请在 Yandex Advertising Network 界面中 [创建相应的广告单元](https://ads.yandex.com/helpcenter/zh/monetization/formats.yaml) (adUnitId)。
接下来,在 Google AdMob (ex. AdMob) 聚合 Web 界面中添加 Yandex Advertising Network:
### 1. 创建 Google AdMob (ex. AdMob) 广告单元
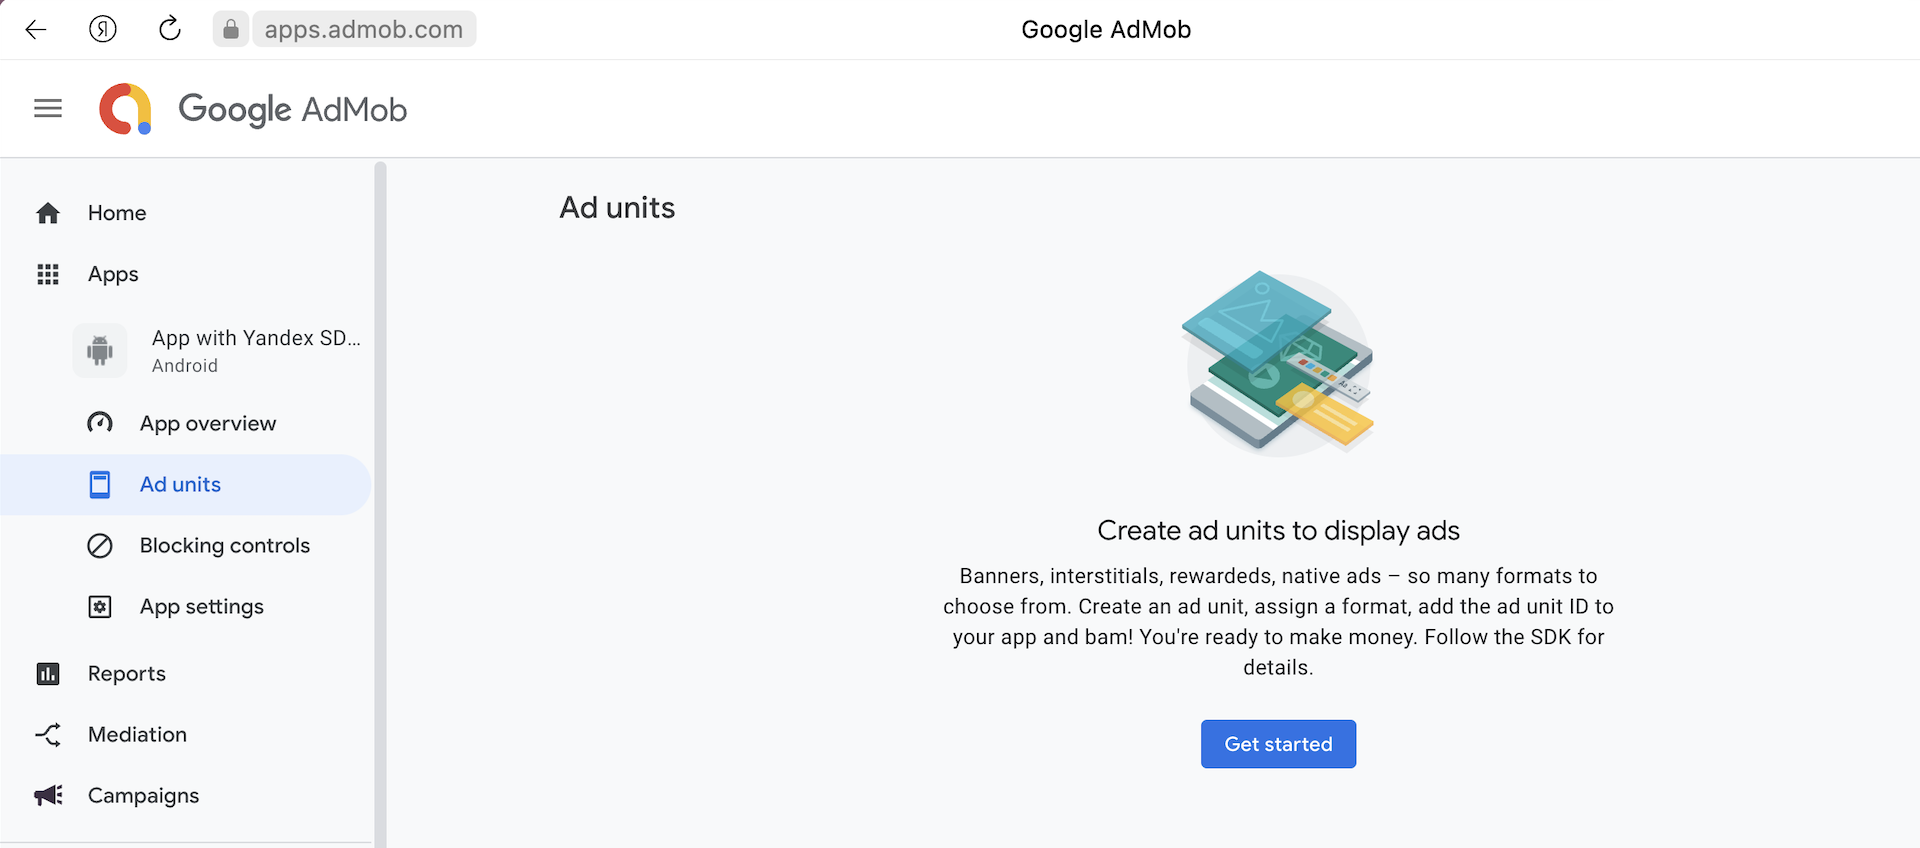
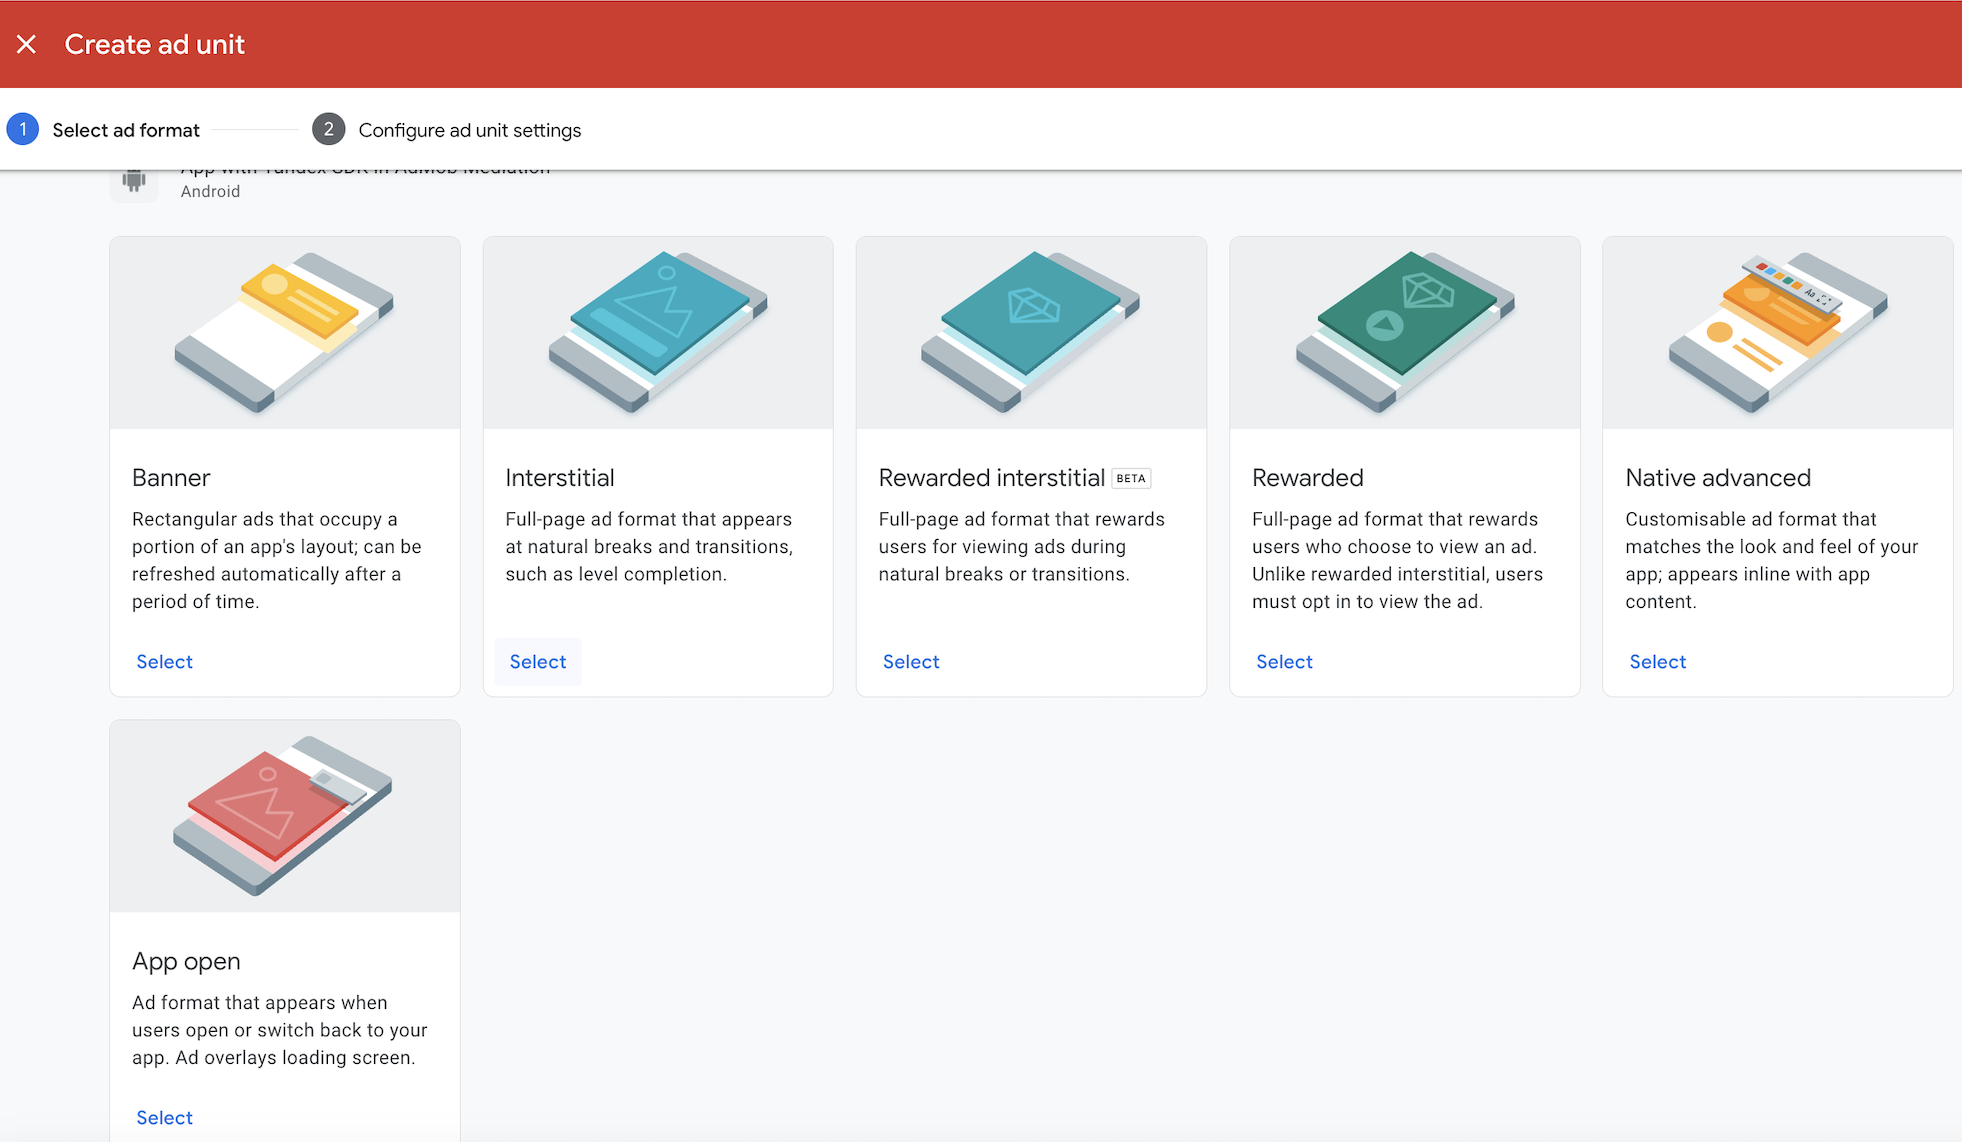
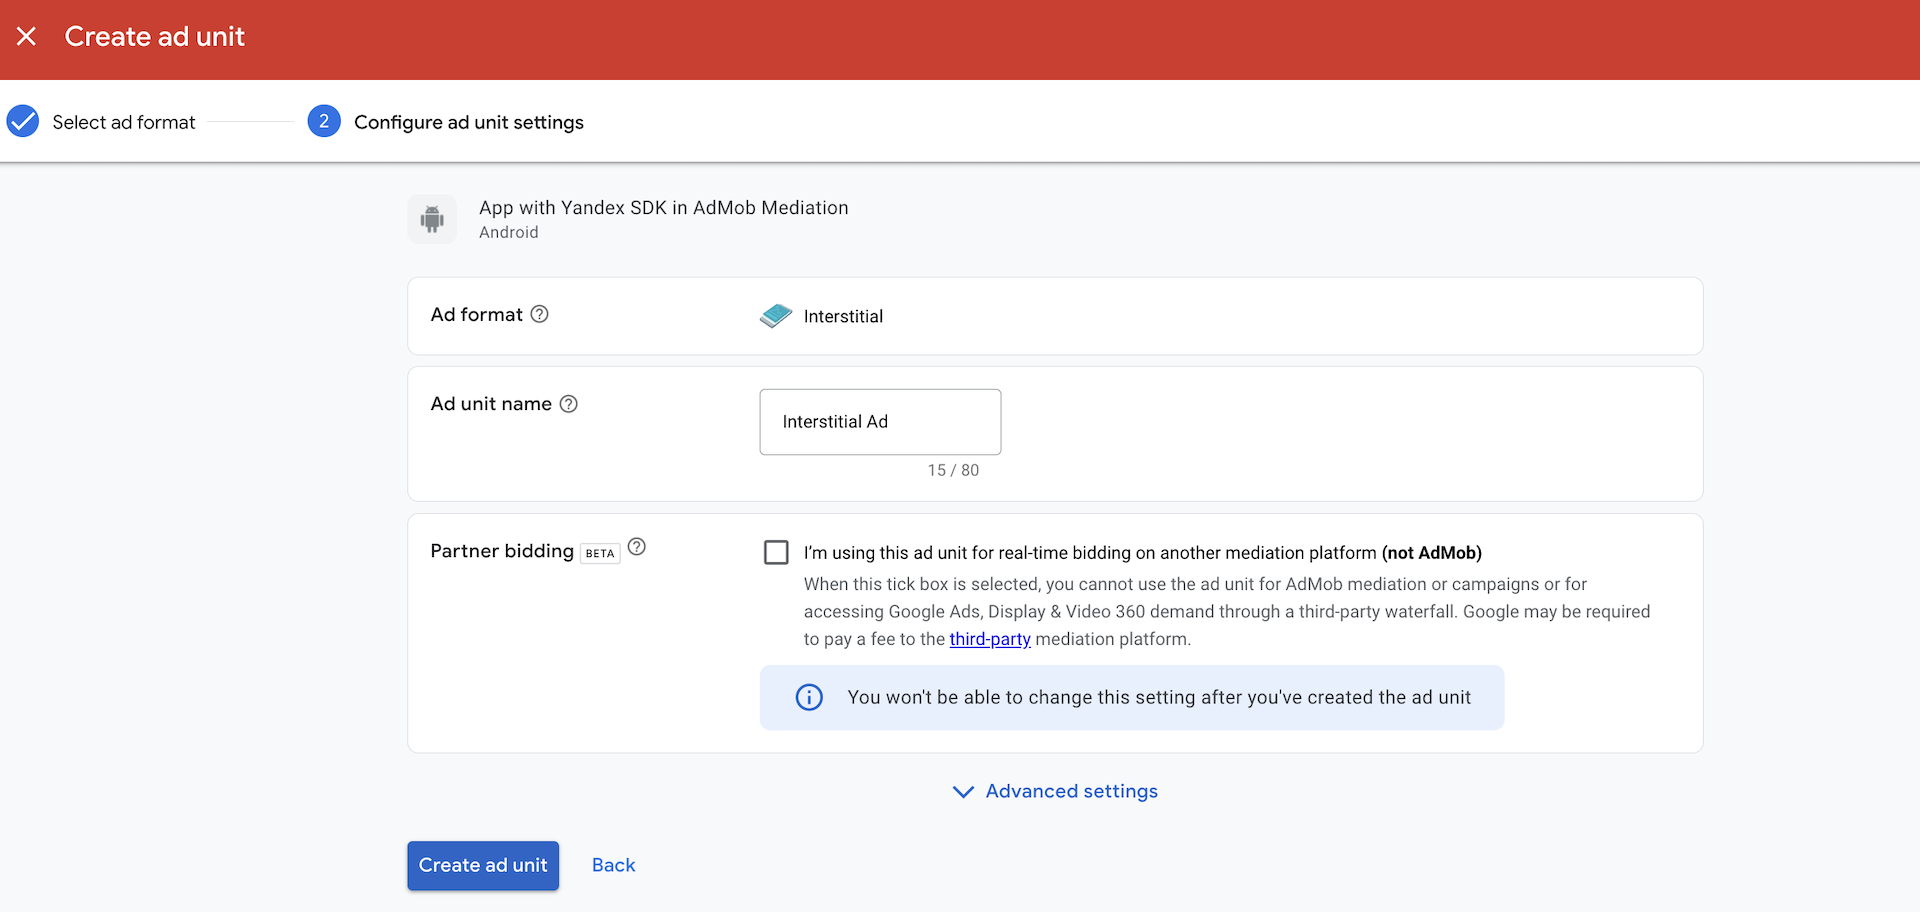
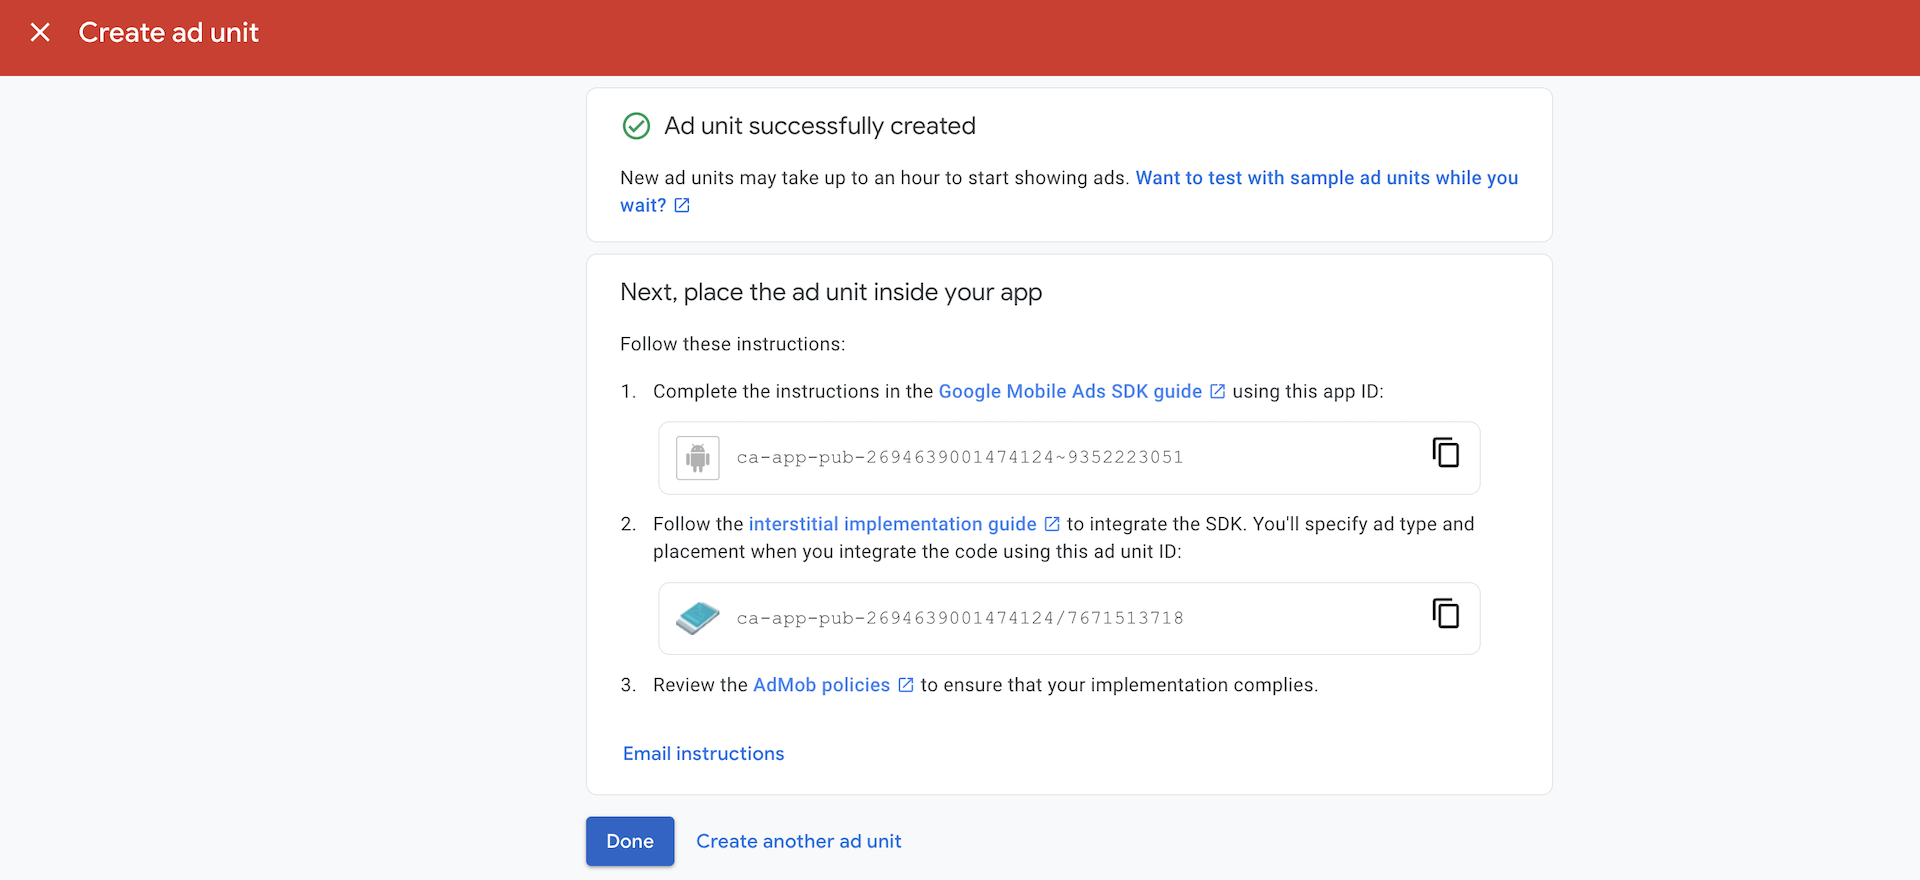
1. 前往您的应用版块。
2. 为选定广告格式创建广告单元,然后配置广告版位参数(例如,其名称)。
3. 创建广告单元后,保存其 ID。
{% cut "Google AdMob (ex. AdMob) 界面的屏幕截图" %}
 {% endcut %}
### 2. 创建 Yandex 广告单元
在 Yandex Advertising Network 界面中创建广告单元的 [指南](https://ads.yandex.com/helpcenter/zh/monetization/formats.yaml)。
### 3. 设置 Google AdMob (ex. AdMob) 聚合
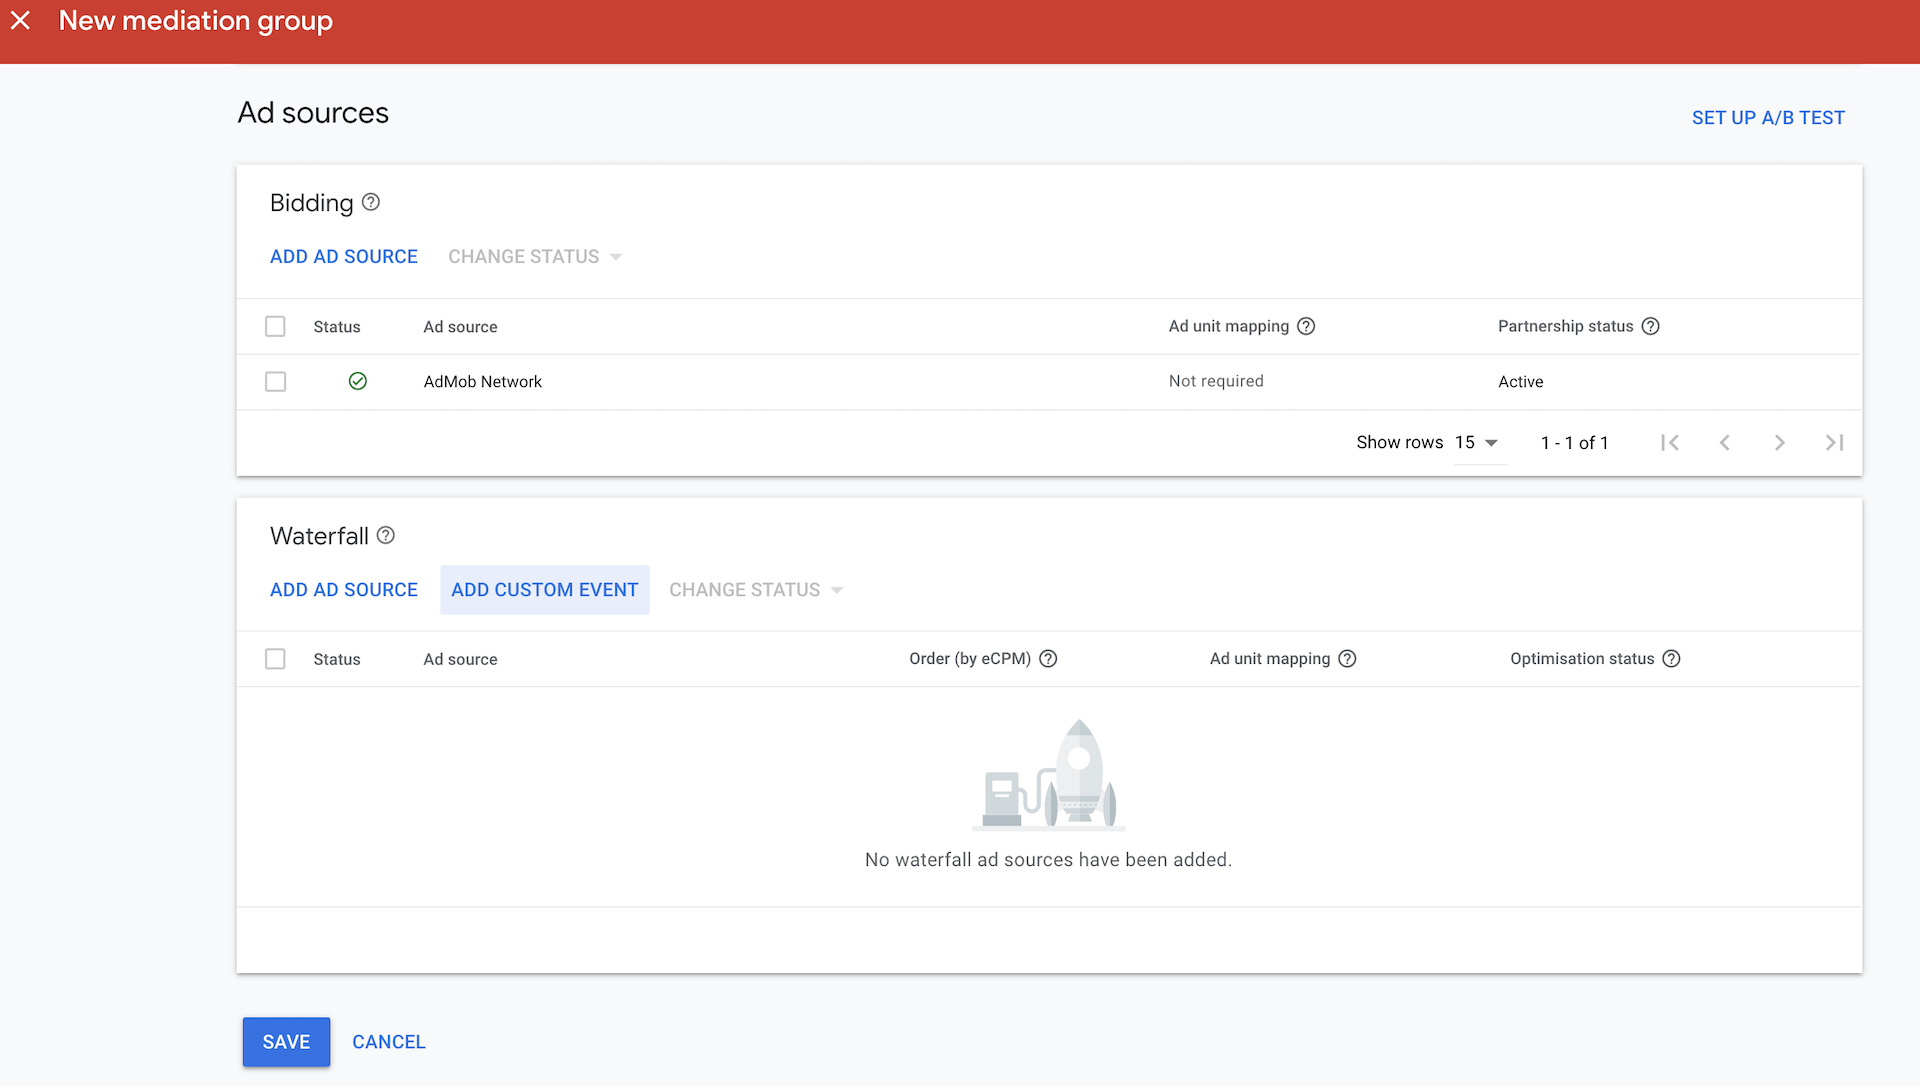
1. 在 Google AdMob (ex. AdMob) Web 界面中,前往 **Mediation** → **Mediation groups**,然后点击 **Create mediation group**。
2. 选择平台。
3. 设置名称和区域等聚合组参数,然后继续添加广告版位。
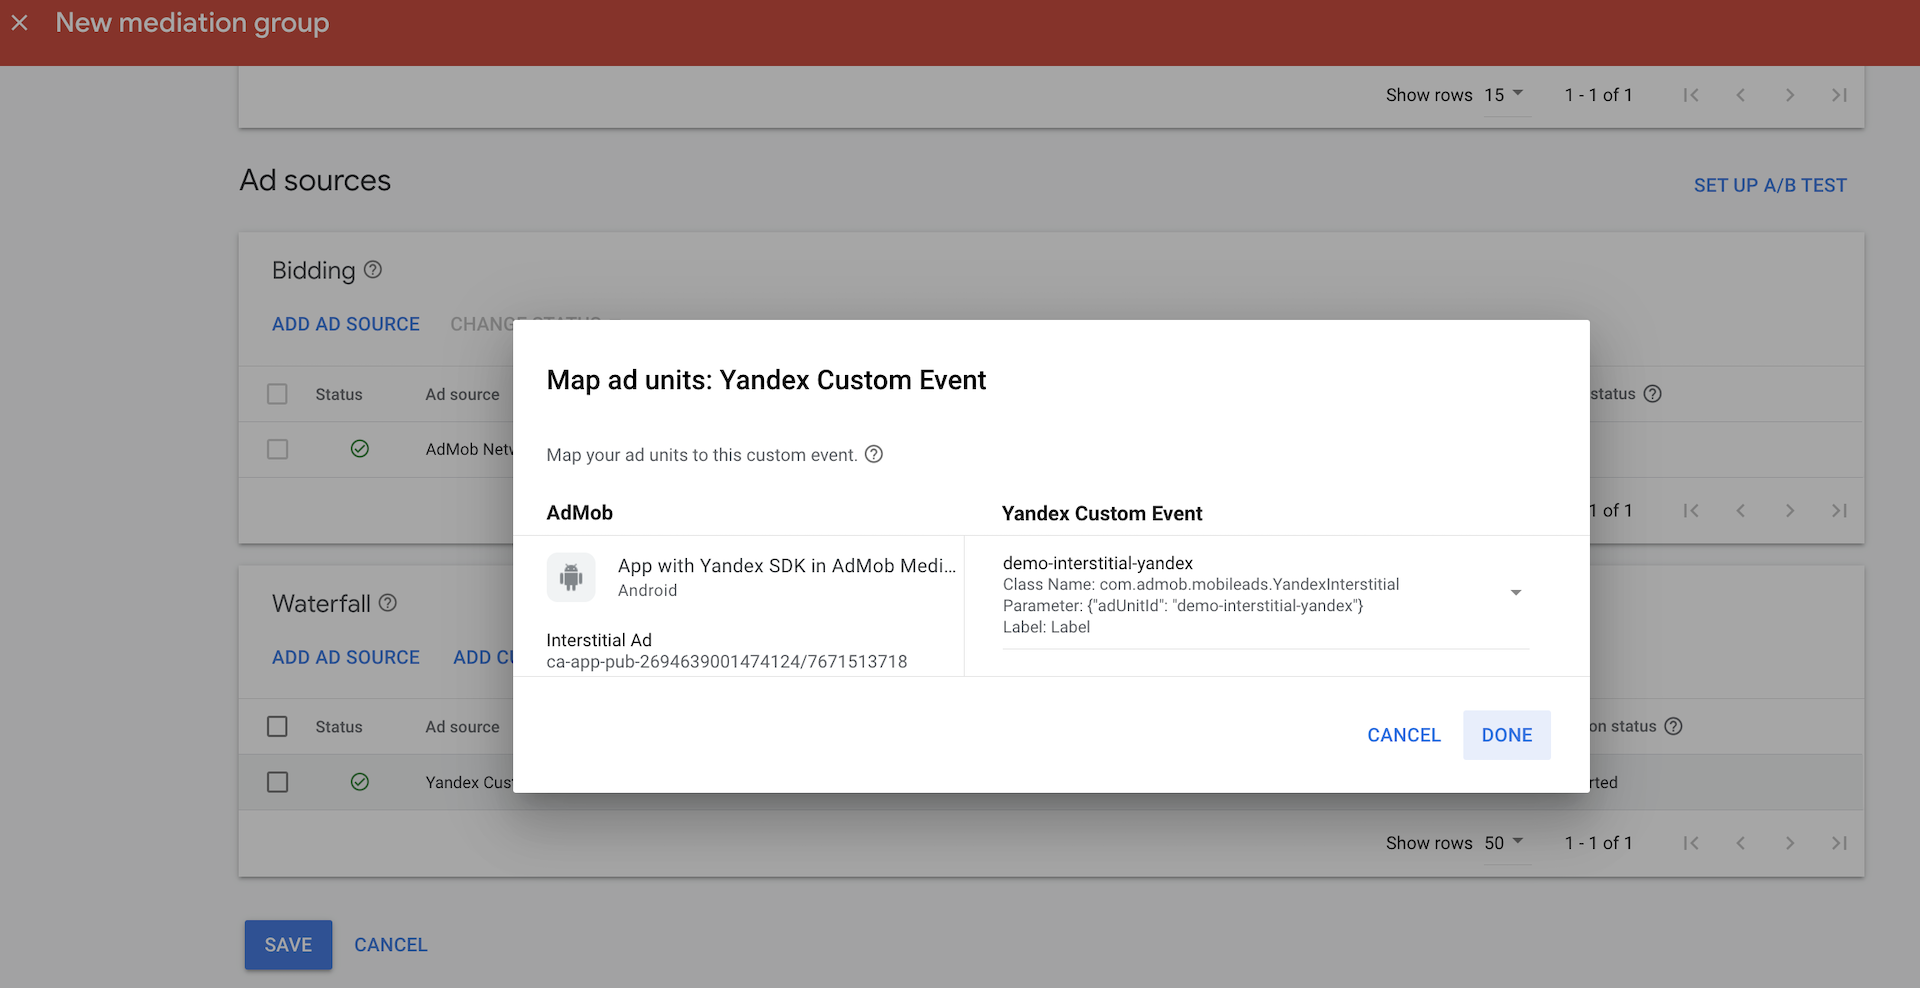
4. 选择您的应用,然后选择创建的广告单元,并添加该单元。您添加的广告单元应显示在 **Ad Units** 部分中。
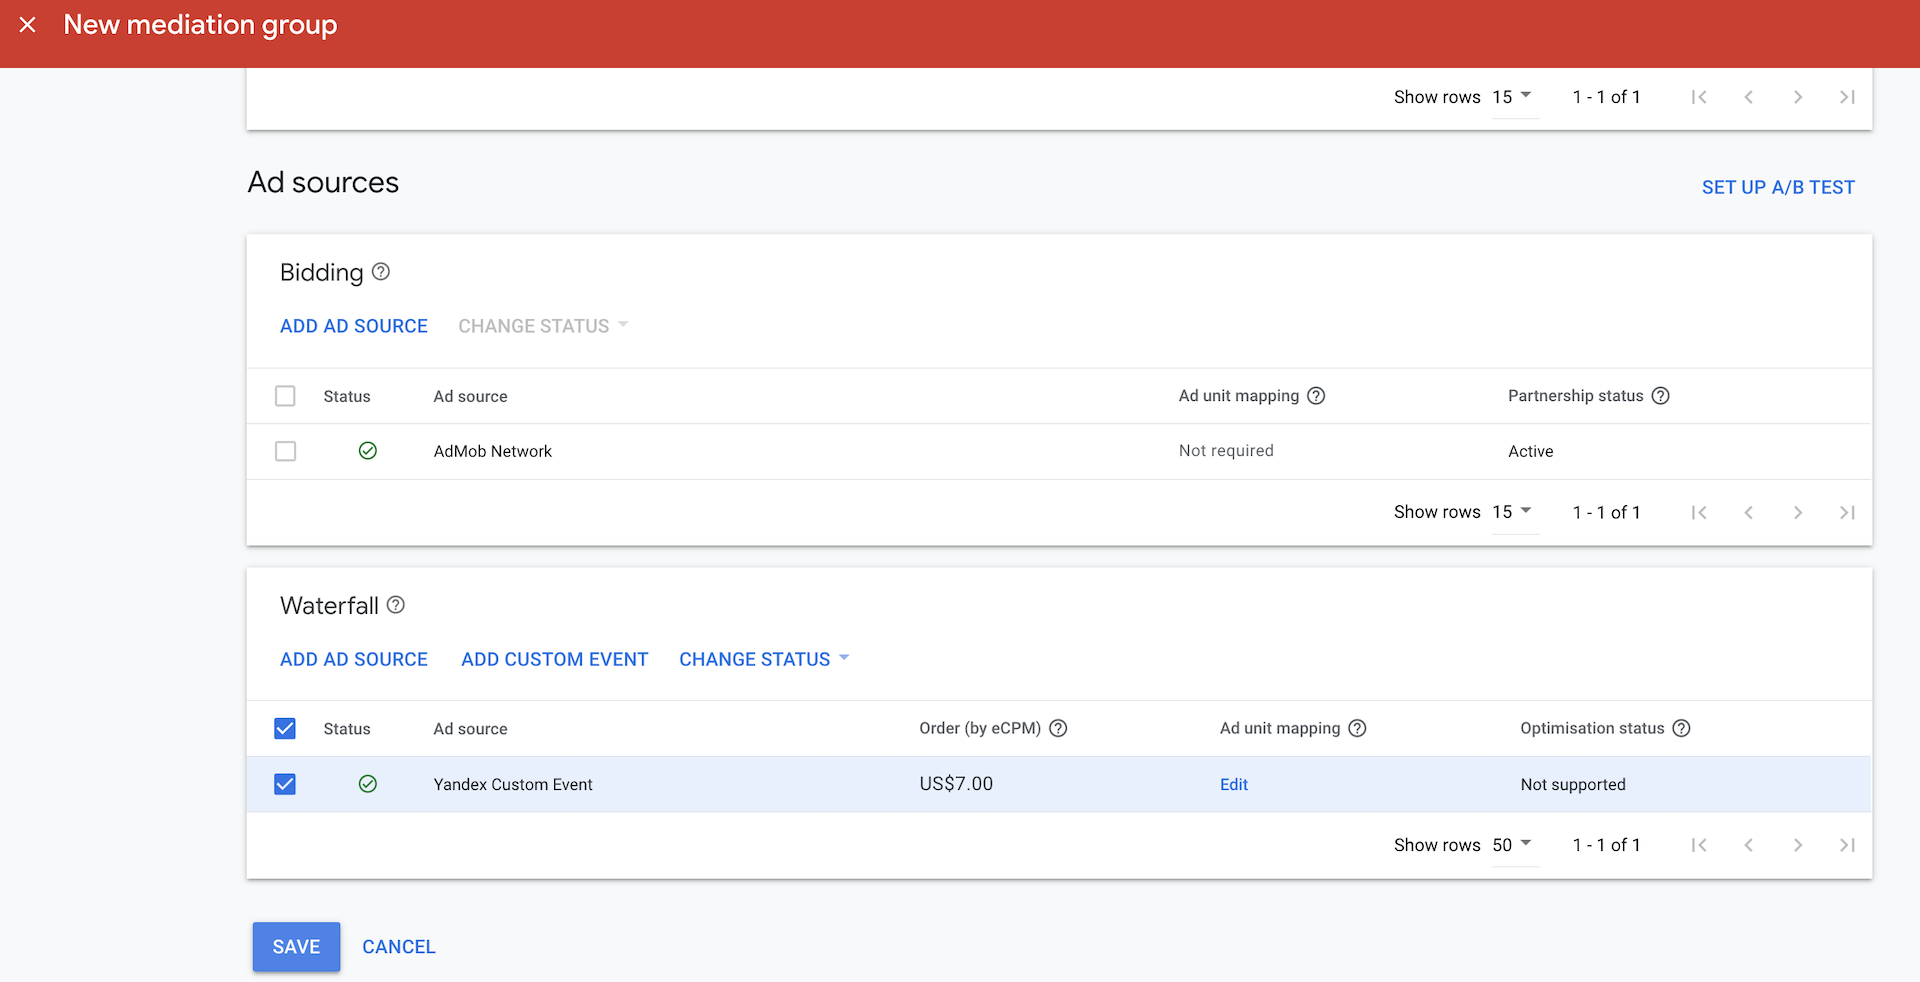
5. Yandex Advertising Network 只能作为自定义事件添加到 Google AdMob (ex. AdMob) 聚合中。点击 **Add Custom Event** 以添加自定义事件。为在 Yandex Advertising Network 界面中创建的每个 adUnitId 设置自定义事件。
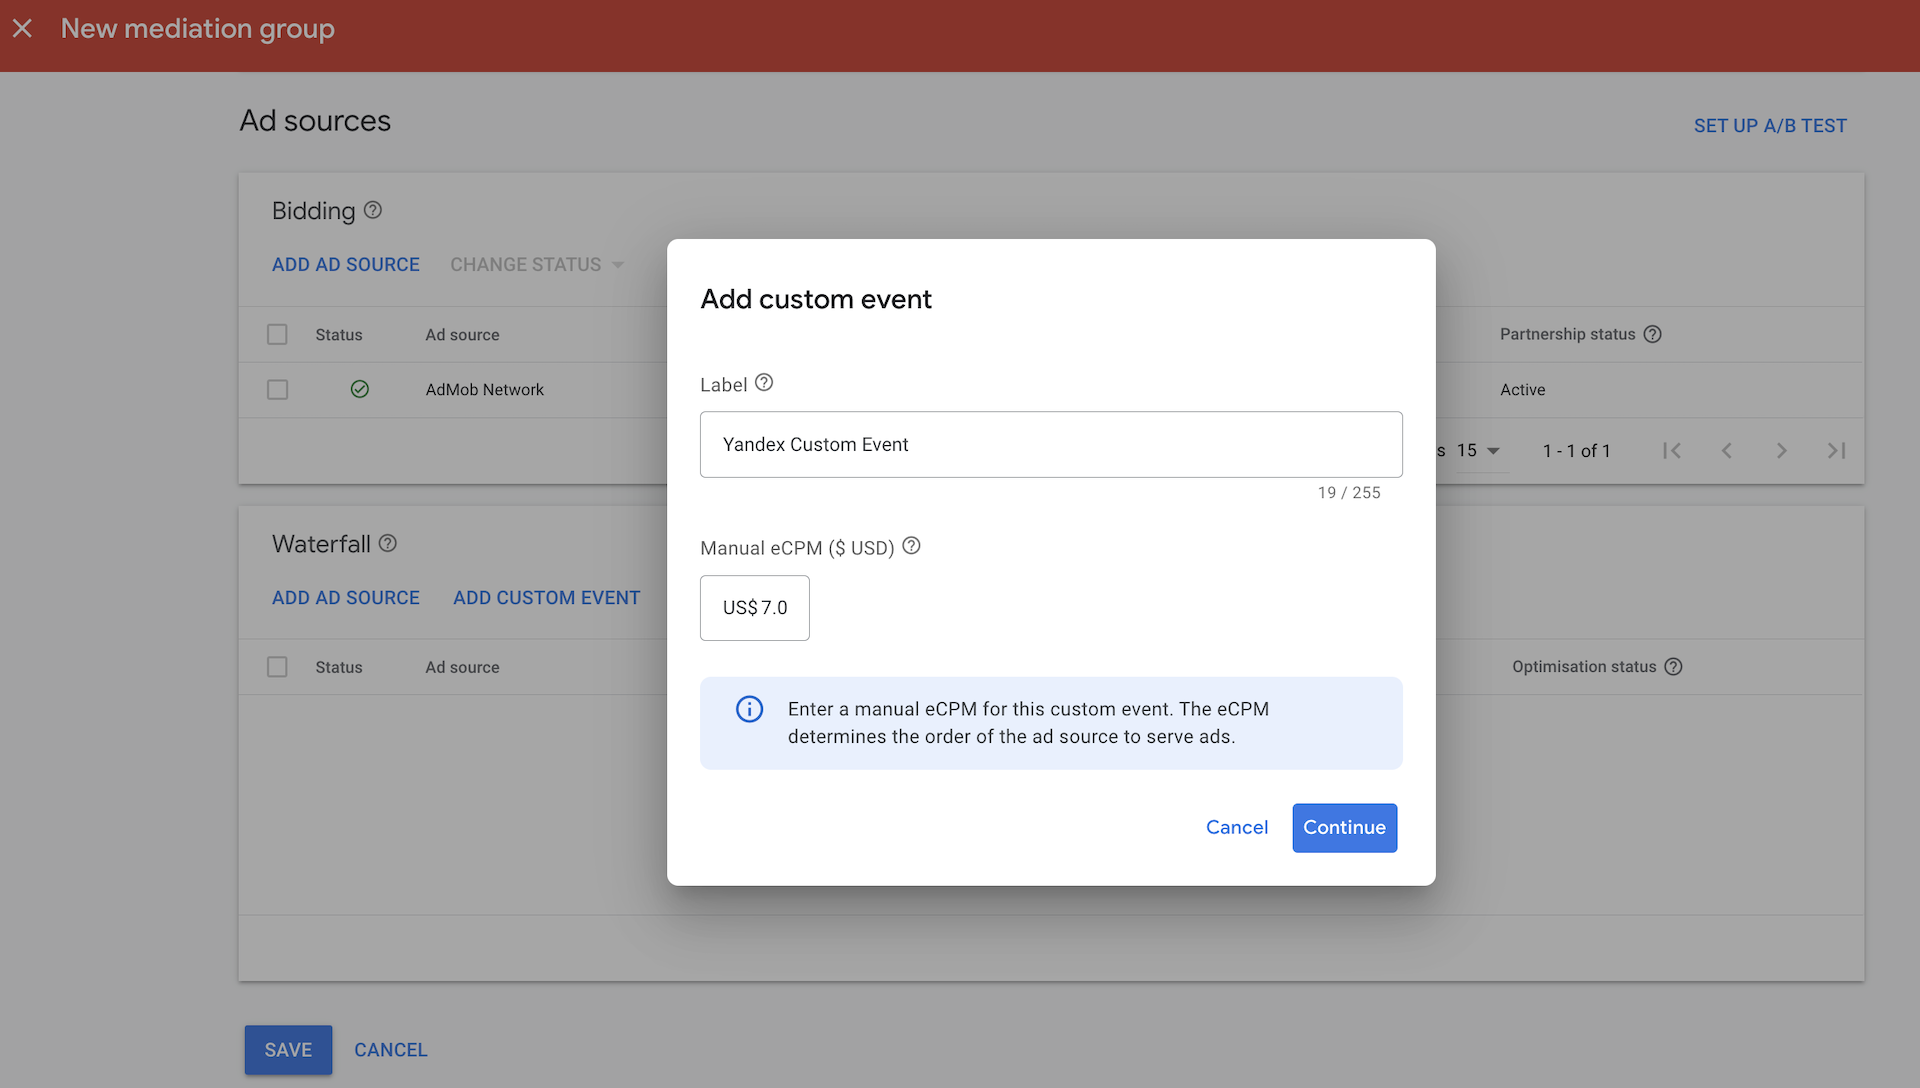
6. 通过设置事件名称和 eCPM 底价来配置访问 Yandex Advertising Network 的自定义事件。
{% note warning %}
eCPM 底价货币和值必须与您在 Yandex Advertising Network 界面中为广告版位设置的底价匹配。
如果您在 Yandex Advertising Network 界面中为广告版位选择了 **Maximum revenue** 策略且未设置底价,请在 AdMob 中填写预期或历史 eCPM。AdMob 使用此值确定自定义事件在瀑布流中的位置。
{% endnote %}
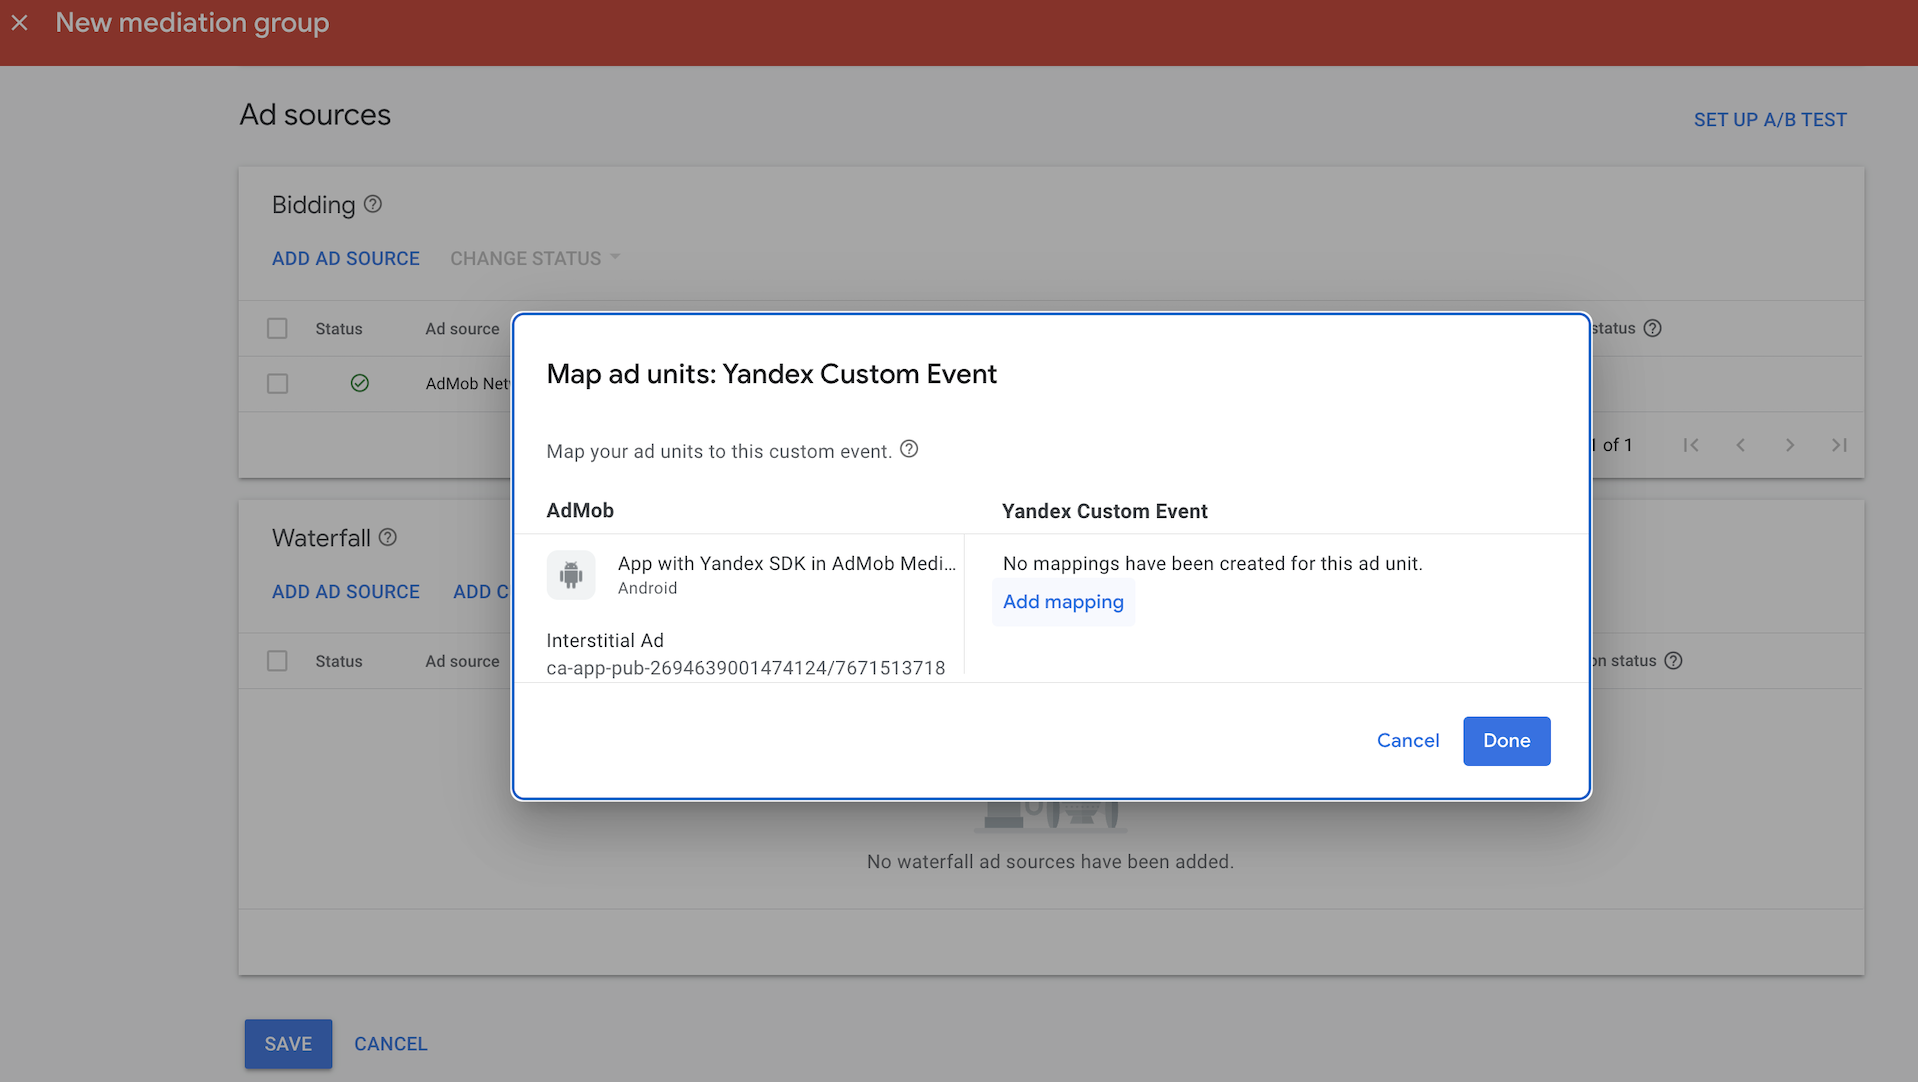
7. 设置自定义事件到 Yandex 适配器的映射:
- 设置映射名称。
- 设置与选定广告格式相对应的适配器类名称。
- 设置事件参数。
{#step-7}
每种广告格式都有相应的 Yandex 适配器类:
- `com.admob.mobileads.YandexBanner`(适用于横幅广告)。
- `com.admob.mobileads.YandexInterstitial`(适用于插屏广告)。
- `com.admob.mobileads.YandexRewarded`(适用于激励广告)。
- `com.admob.mobileads.YandexNative`(适用于原生广告)。
在 **Parameter** 字段中,以 JSON 格式配置自定义事件设置。确保为选定广告版位设置 adUnitId: `{"adUnitId": "R-M-XXXXXX-X"}`。
{% note warning %}
Yandex 适配器类名称和 `adUnitId` JSON 代码区分大小写。确保拼写正确,否则广告可能无法从自定义事件加载。
{% endnote %}
对于原生广告,当通过 Google AdMob (ex. AdMob) 连接到 Yandex Advertising Network 时,您必须提供 `store/storeView`,此内容用于传递必需 `domain` 素材。如果 `storeView` 未注册或未显示,则展示次数可能不会被统计。对于紧凑型布局,您可以单独使用一个不带签名的单行 `TextView`,并将其注册为 `storeView`。
8. 保存更改。
{% cut "Google AdMob (ex. AdMob) 界面的屏幕截图" %}
{% endcut %}
### 2. 创建 Yandex 广告单元
在 Yandex Advertising Network 界面中创建广告单元的 [指南](https://ads.yandex.com/helpcenter/zh/monetization/formats.yaml)。
### 3. 设置 Google AdMob (ex. AdMob) 聚合
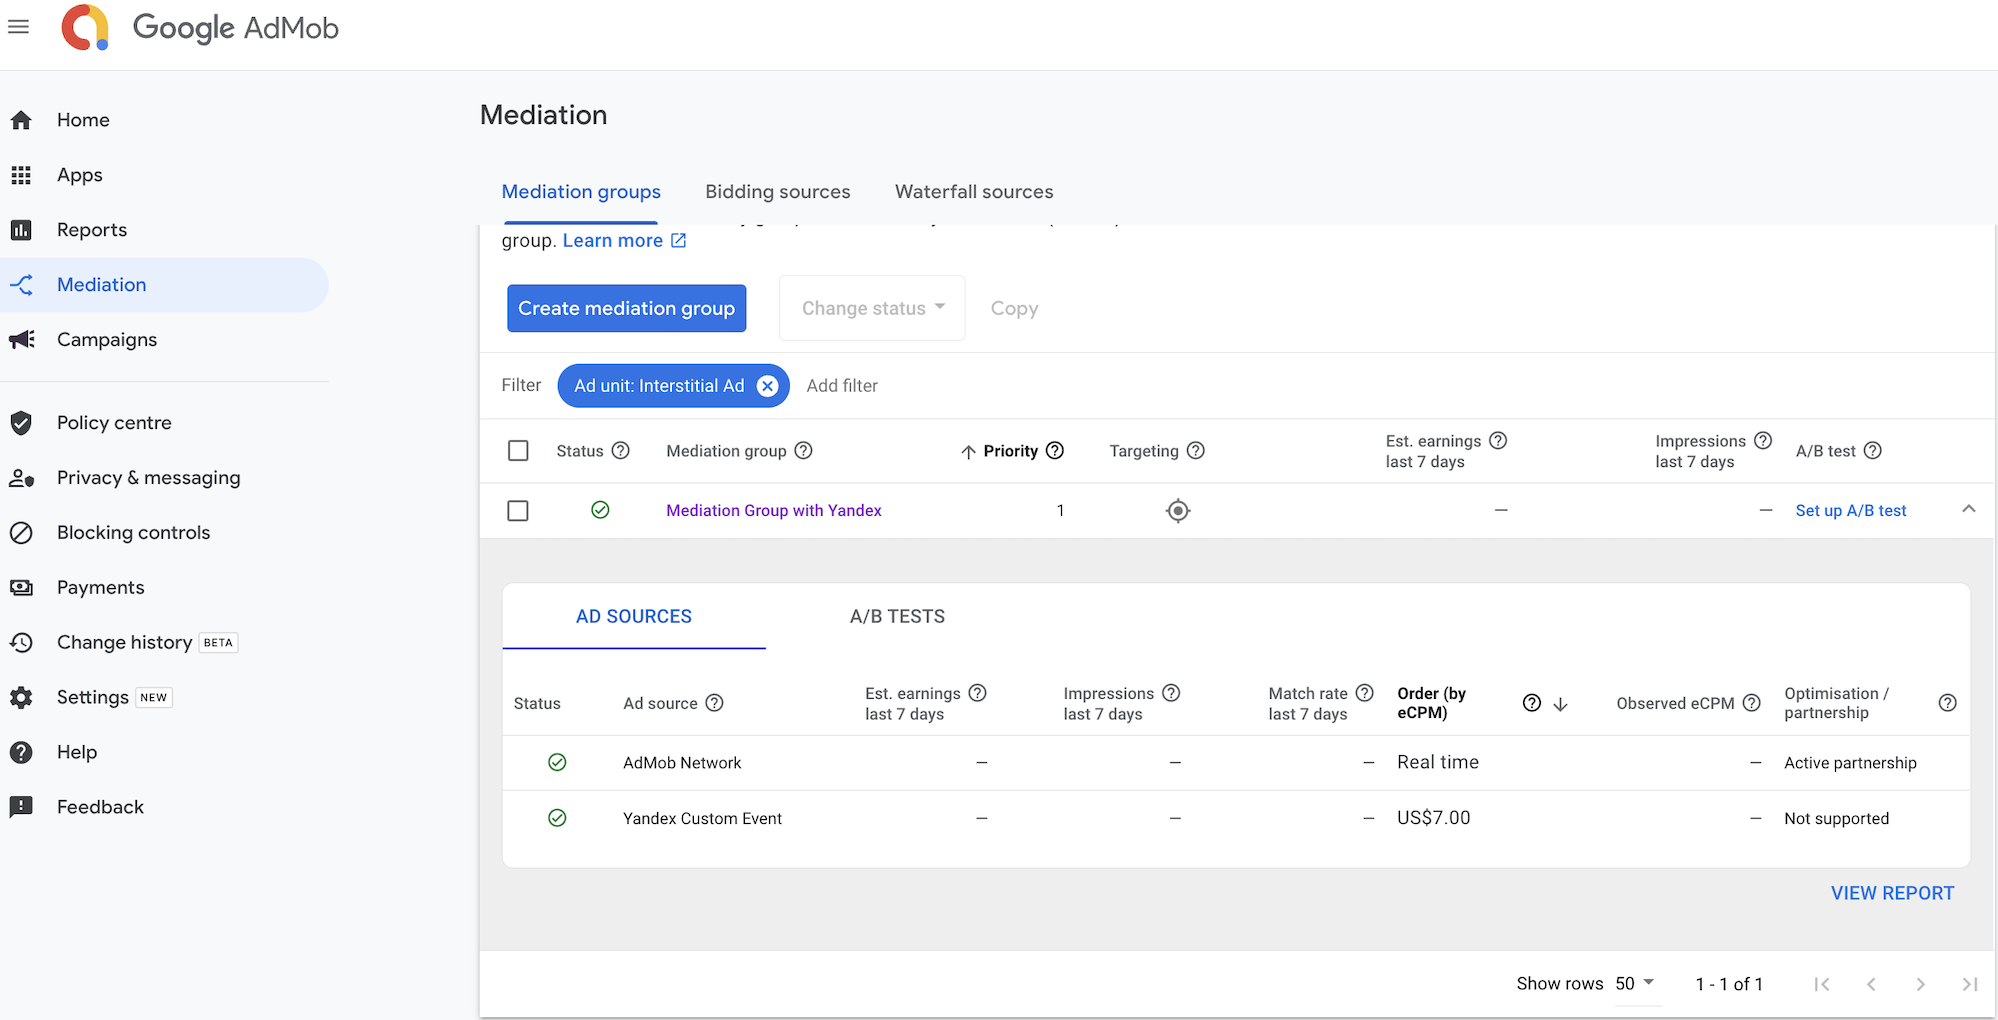
1. 在 Google AdMob (ex. AdMob) Web 界面中,前往 **Mediation** → **Mediation groups**,然后点击 **Create mediation group**。
2. 选择平台。
3. 设置名称和区域等聚合组参数,然后继续添加广告版位。
4. 选择您的应用,然后选择创建的广告单元,并添加该单元。您添加的广告单元应显示在 **Ad Units** 部分中。
5. Yandex Advertising Network 只能作为自定义事件添加到 Google AdMob (ex. AdMob) 聚合中。点击 **Add Custom Event** 以添加自定义事件。为在 Yandex Advertising Network 界面中创建的每个 adUnitId 设置自定义事件。
6. 通过设置事件名称和 eCPM 底价来配置访问 Yandex Advertising Network 的自定义事件。
{% note warning %}
eCPM 底价货币和值必须与您在 Yandex Advertising Network 界面中为广告版位设置的底价匹配。
如果您在 Yandex Advertising Network 界面中为广告版位选择了 **Maximum revenue** 策略且未设置底价,请在 AdMob 中填写预期或历史 eCPM。AdMob 使用此值确定自定义事件在瀑布流中的位置。
{% endnote %}
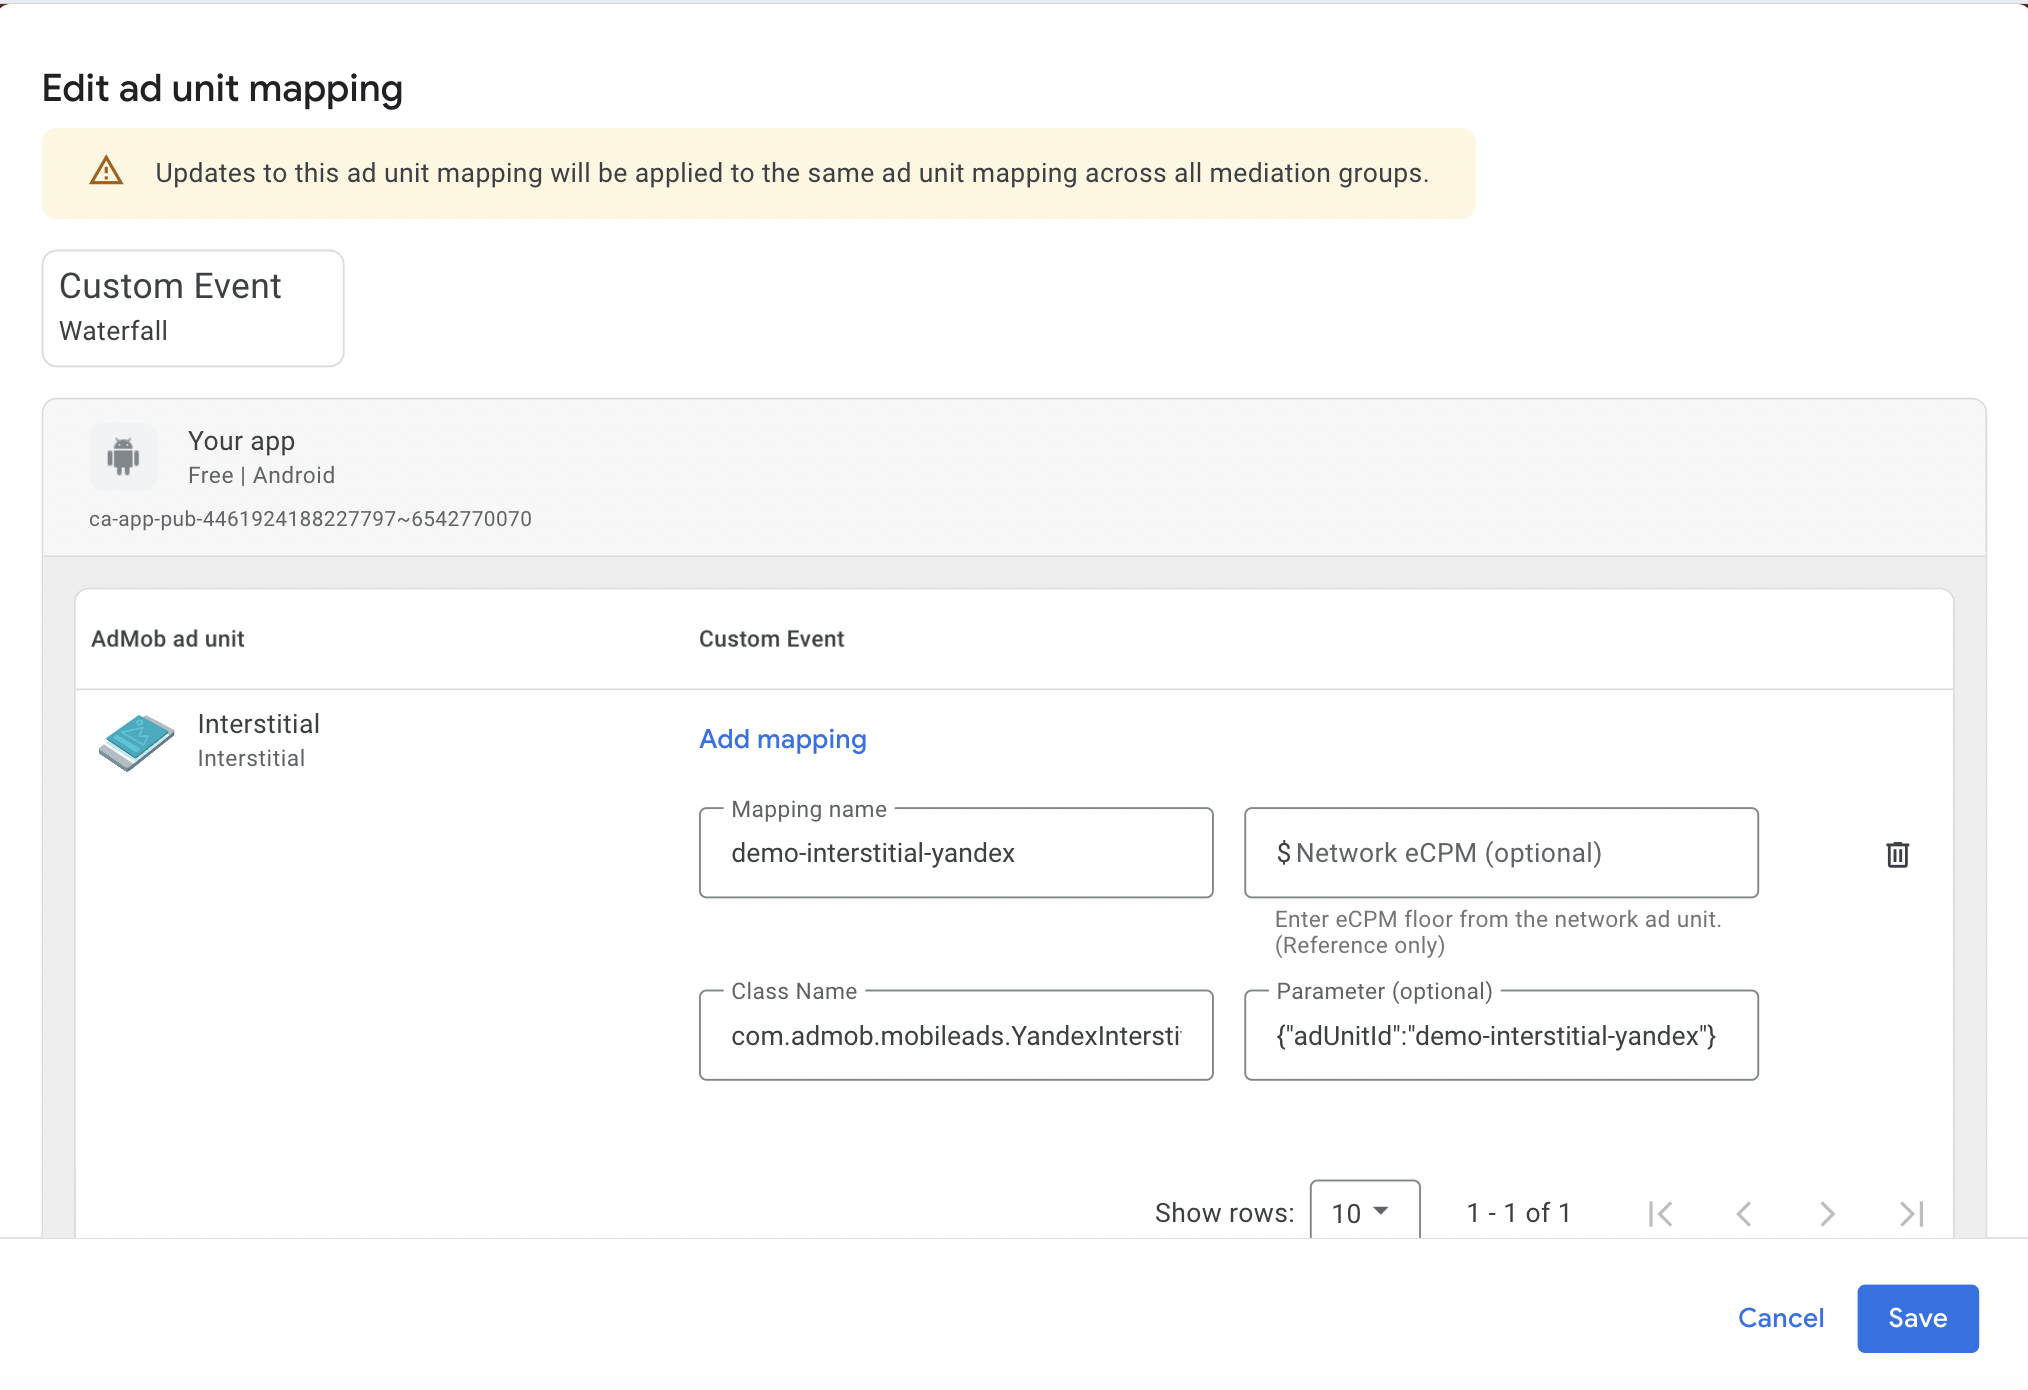
7. 设置自定义事件到 Yandex 适配器的映射:
- 设置映射名称。
- 设置与选定广告格式相对应的适配器类名称。
- 设置事件参数。
{#step-7}
每种广告格式都有相应的 Yandex 适配器类:
- `com.admob.mobileads.YandexBanner`(适用于横幅广告)。
- `com.admob.mobileads.YandexInterstitial`(适用于插屏广告)。
- `com.admob.mobileads.YandexRewarded`(适用于激励广告)。
- `com.admob.mobileads.YandexNative`(适用于原生广告)。
在 **Parameter** 字段中,以 JSON 格式配置自定义事件设置。确保为选定广告版位设置 adUnitId: `{"adUnitId": "R-M-XXXXXX-X"}`。
{% note warning %}
Yandex 适配器类名称和 `adUnitId` JSON 代码区分大小写。确保拼写正确,否则广告可能无法从自定义事件加载。
{% endnote %}
对于原生广告,当通过 Google AdMob (ex. AdMob) 连接到 Yandex Advertising Network 时,您必须提供 `store/storeView`,此内容用于传递必需 `domain` 素材。如果 `storeView` 未注册或未显示,则展示次数可能不会被统计。对于紧凑型布局,您可以单独使用一个不带签名的单行 `TextView`,并将其注册为 `storeView`。
8. 保存更改。
{% cut "Google AdMob (ex. AdMob) 界面的屏幕截图" %}
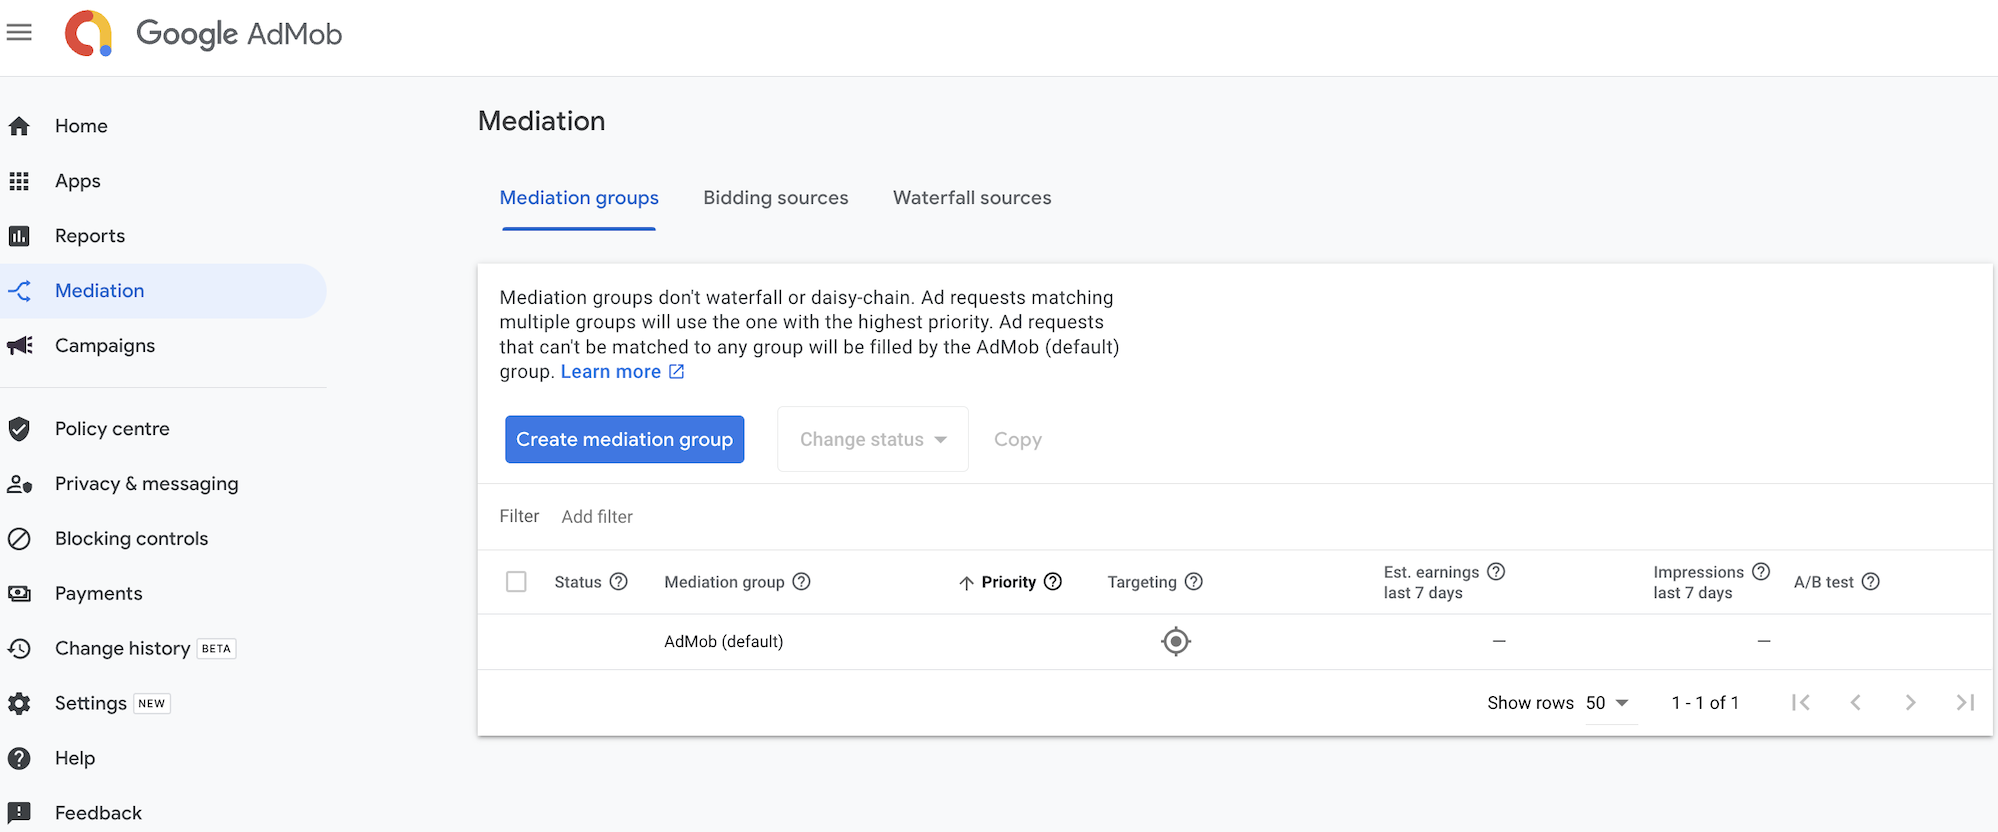
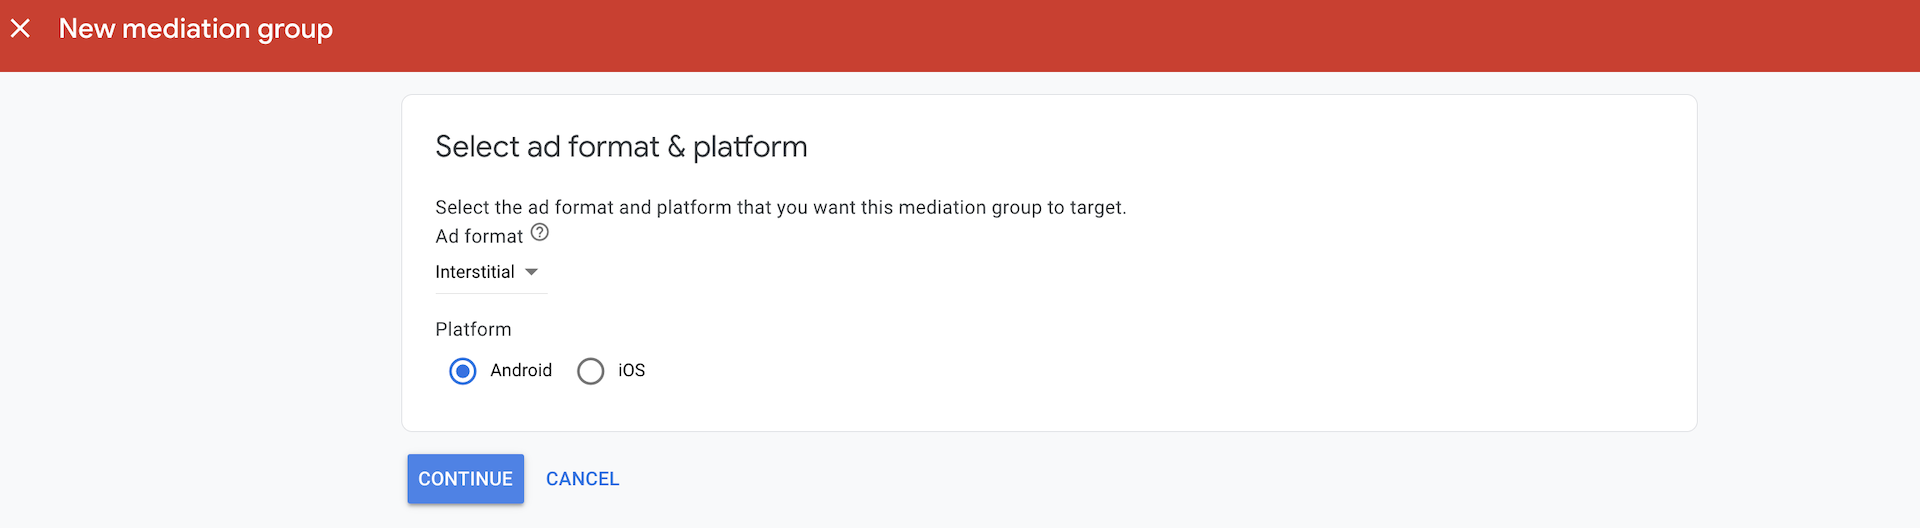
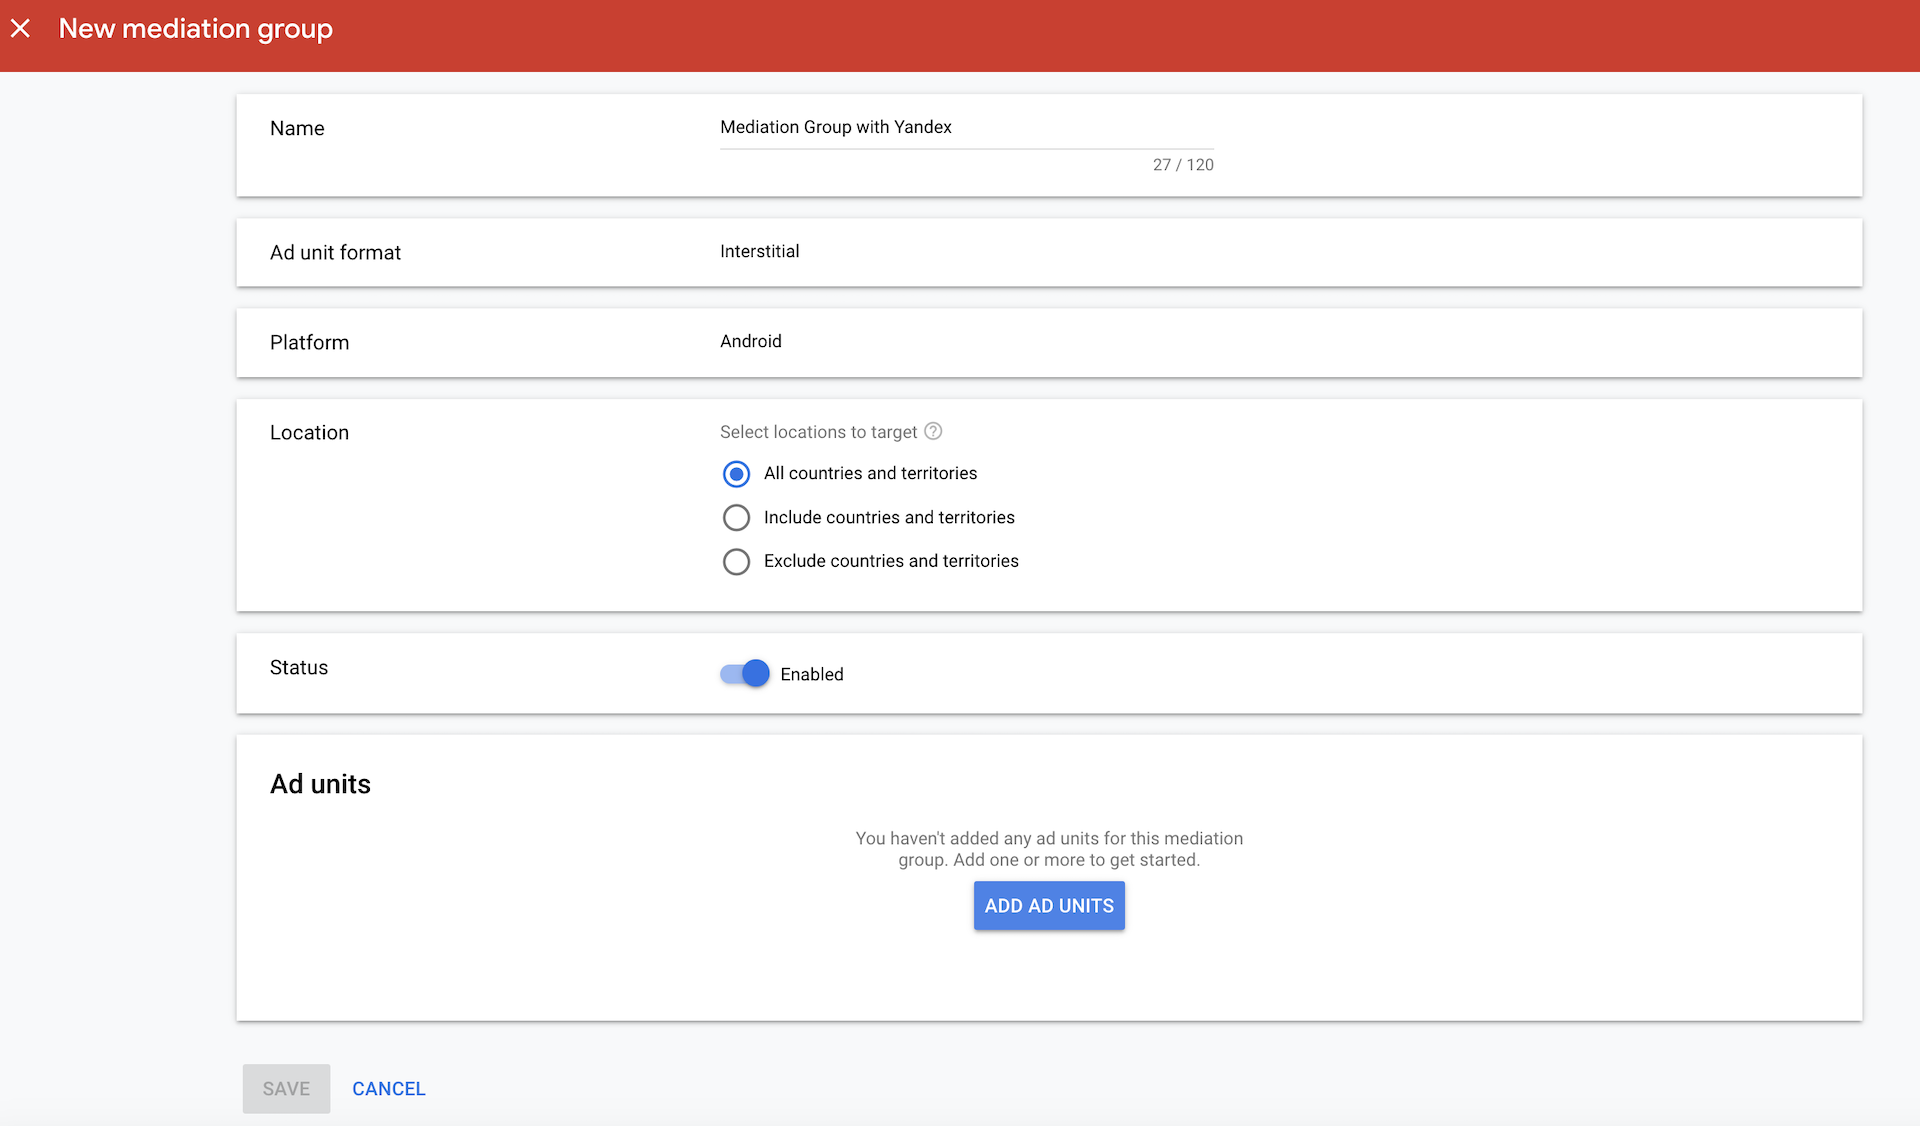
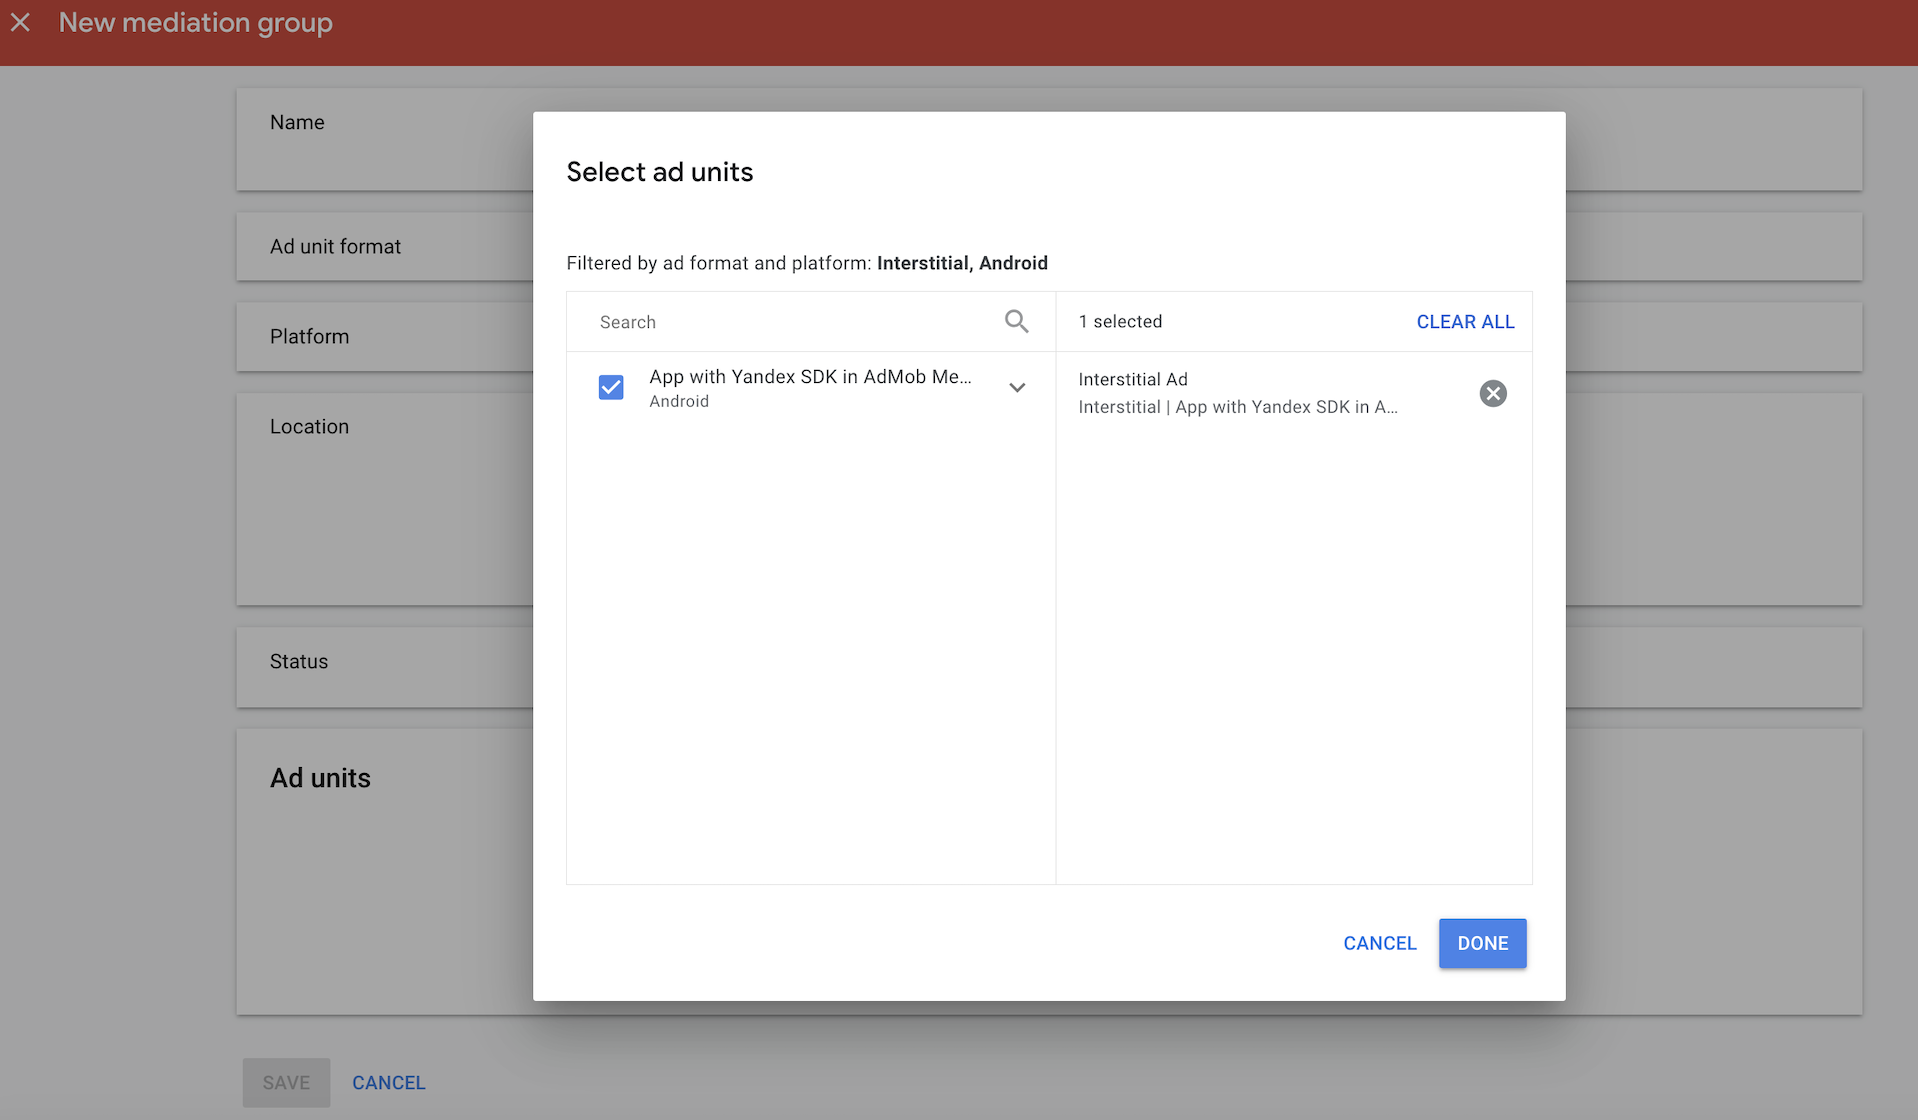
 {% endcut %}
### 4. 测试集成 {#test}
在发布应用前,请确保已正确设置自定义事件:
1. 检查是否完全按照 [步骤 7](#step-7) 中所示输入适配器类名称。
1. 确保您的自定义事件参数使用正确的 JSON 格式:`{"adUnitId": "R-M-XXXXXX-X"}`。
1. 使用演示广告单元或测试版位测试集成。
1. 检查您的应用日志和调试面板中是否存在适配器初始化或广告加载错误。
{% endcut %}
### 4. 测试集成 {#test}
在发布应用前,请确保已正确设置自定义事件:
1. 检查是否完全按照 [步骤 7](#step-7) 中所示输入适配器类名称。
1. 确保您的自定义事件参数使用正确的 JSON 格式:`{"adUnitId": "R-M-XXXXXX-X"}`。
1. 使用演示广告单元或测试版位测试集成。
1. 检查您的应用日志和调试面板中是否存在适配器初始化或广告加载错误。