---
metadata:
- name: generator
content: Diplodoc Platform v5.50.6
alternate:
- https://ads.yandex.com/helpcenter/en/dev/ios/feed-ad.md
- https://ads.yandex.com/helpcenter/ru/dev/ios/feed-ad.md
- https://ads.yandex.com/helpcenter/zh/dev/ios/feed-ad.md
---
> **Documentation Index:** Fetch the complete configuration index at https://ads.yandex.com/helpcenter/zh/llms.txt
# 广告信息流
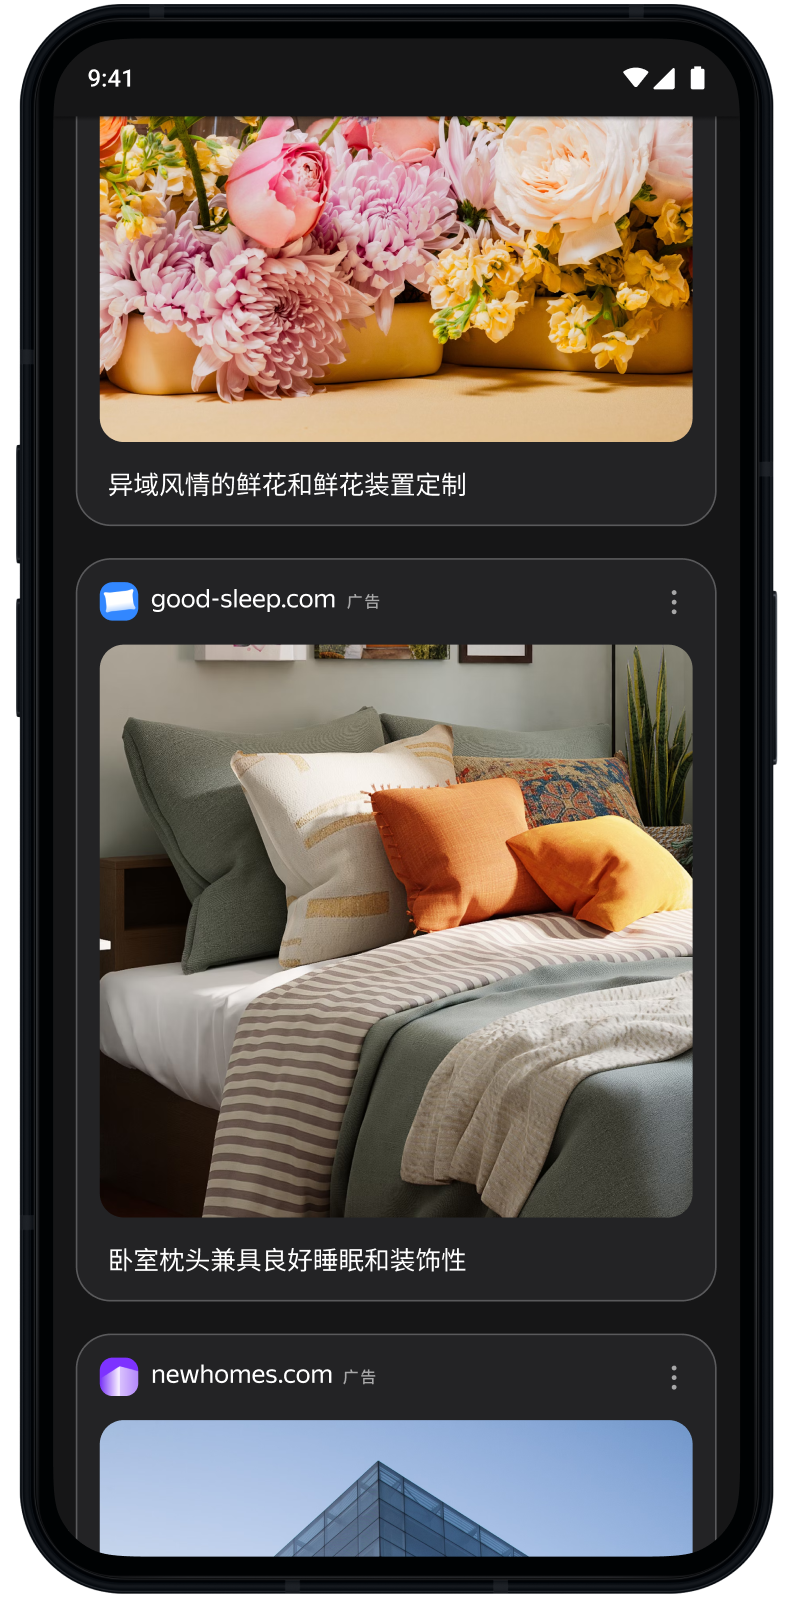
广告信息流是由一系列广告组成的单元。信息流可以作为应用的主要内容添加,或者添加到现有内容之后。信息流可能包含数十条广告,而这些广告会按顺序加载(一次加载多个广告)。
本指南解释了如何将广告信息流集成到 iOS 应用中。 除了代码示例和步骤之外,还包含格式建议和更多资源的链接。
{% cut "外观" %}
 {% endcut %}
## 前提条件 {#pre}
1. 请按照 [快速入门](https://ads.yandex.com/helpcenter/zh/dev/ios/quick-start.md) 中描述的 SDK 集成步骤进行操作。
2. 提前 [初始化](https://ads.yandex.com/helpcenter/zh/dev/ios/quick-start.md#init) 您的广告 SDK。
3. 确保您运行的是最新的 [Yandex Mobile Ads SDK](https://ads.yandex.com/helpcenter/zh/dev/platforms.md) 版本。如果您使用聚合,请同时确保您运行的是最新版本的 [统一构建](https://ads.yandex.com/helpcenter/zh/dev/platforms.md)。
## 实施 {#implement}
集成广告信息流的关键步骤:
1. 使用 `FeedAdAppearance` 配置信息流外观。
2. 创建 `FeedAd` 对象,设置其委托,并实施所需的 `FeedAdDelegate` 方法。
3. 加载广告。
4. 创建 `FeedAdCollectionViewAdapter`,并将其附加到 `UICollectionView`。
## 广告信息流集成说明 {#features}
- 在主线程中调用所有 Yandex Mobile Ads SDK 方法。
- 只要显示信息流的屏幕可见,请始终保持对 `FeedAd` 和 `FeedAdCollectionViewAdapter` 的强引用。
## 外观
创建 `FeedAdAppearance` 配置对象。
可用参数:
- `cardWidth`(必需):所投放广告的宽度(以点为单位)。 此宽度以屏幕宽度减去侧边距为基准。
- `cardCornerRadius`(必需):所投放广告的圆角半径(以点为单位)。
```swift
let feedMargin: CGFloat = 24
let cardWidth = view.bounds.width - 2 * feedMargin
let appearance = FeedAdAppearance(cardWidth: cardWidth, cardCornerRadius: 16)
```
## 加载广告
从 Yandex Advertising Network 界面创建具有广告单元 ID (`adUnitId`) 的 `FeedAd`。
您可以通过 `AdRequest` 扩展请求,以传递用户兴趣、页面上下文、位置或其他数据。 额外上下文通常能提高广告质量。 有关详细信息,请参阅[广告定位](https://ads.yandex.com/helpcenter/zh/dev/ios/target.md)。
设置委托并实施 `FeedAdDelegate` 以处理加载和广告事件:
```swift
final class FeedAdViewController: UIViewController {
private var feedAd: FeedAd?
func loadAd() {
let request = AdRequest(adUnitID: "R-M-XXXXXX-Y")
let appearance = FeedAdAppearance(cardWidth: view.bounds.width)
let feedAd = FeedAd(requestConfiguration: request, appearance: appearance)
feedAd.delegate = self
self.feedAd = feedAd
feedAd.loadAd()
}
}
extension FeedAdViewController: FeedAdDelegate {
func feedAdDidLoad(_ feedAd: FeedAd) {
// Called when an ad is successfully loaded
}
func feedAd(_ feedAd: FeedAd, didFailToLoadWithError error: Error) {
// Called when ad loading fails
}
func feedAdDidClick(_ feedAd: FeedAd) {
// Called when the user taps the ad
}
func feedAd(_ feedAd: FeedAd, didTrackImpression impressionData: ImpressionData?) {
// Called when an impression is tracked
}
func feedAdDidUpdateDataSource(_ feedAd: FeedAd) {
// Called when new ads are available — reload collection view
collectionView.reloadData()
}
}
```
## 显示信息流
对 `UICollectionView` `dataSource` 和`委托`使用 `FeedAdCollectionViewAdapter`。
在附加适配器之前,调用 `registerCells(in:)` 以注册单元格类型。 请在设置 `dataSource` 和 `delegate` 之前执行此操作。
### 作为主列表
在 `UICollectionView` 上设置适配器的 `dataSource` 和 `delegate`:
```swift
final class FeedAdViewController: UIViewController {
private let collectionView = UICollectionView(
frame: .zero,
collectionViewLayout: UICollectionViewFlowLayout()
)
private var feedAdAdapter: FeedAdCollectionViewAdapter?
func setupAdapter() {
guard let feedAd else { return }
let adapter = FeedAdCollectionViewAdapter(feedAd: feedAd)
adapter.registerCells(in: collectionView)
collectionView.dataSource = adapter.dataSource
collectionView.delegate = adapter.delegate
feedAdAdapter = adapter
}
}
```
### 与现有内容一起
如果您已实施 `UICollectionViewDataSource`,请将信息流部分委托给适配器:
```swift
final class FeedAdViewController: UIViewController {
private enum Section: Int, CaseIterable {
case content
case feed
}
private var contentItems: [ContentItem] = []
private var feedAdAdapter: FeedAdCollectionViewAdapter?
func setupAdapter() {
guard let feedAd else { return }
let adapter = FeedAdCollectionViewAdapter(feedAd: feedAd)
adapter.registerCells(in: collectionView)
feedAdAdapter = adapter
collectionView.dataSource = self
collectionView.delegate = self
}
}
extension FeedAdViewController: UICollectionViewDataSource {
func numberOfSections(in collectionView: UICollectionView) -> Int {
Section.allCases.count
}
func collectionView(_ collectionView: UICollectionView, numberOfItemsInSection section: Int) -> Int {
switch Section(rawValue: section) {
case .content:
return contentItems.count
case .feed:
return feedAdAdapter?.dataSource.collectionView(collectionView, numberOfItemsInSection: section) ?? 0
case .none:
return 0
}
}
func collectionView(_ collectionView: UICollectionView, cellForItemAt indexPath: IndexPath) -> UICollectionViewCell {
switch Section(rawValue: indexPath.section) {
case .content:
// Return your content cell
return dequeueContentCell(for: indexPath)
case .feed:
return feedAdAdapter?.dataSource.collectionView(collectionView, cellForItemAt: indexPath)
?? UICollectionViewCell()
case .none:
return UICollectionViewCell()
}
}
}
extension FeedAdViewController: UICollectionViewDelegateFlowLayout {
func collectionView(
_ collectionView: UICollectionView,
layout collectionViewLayout: UICollectionViewLayout,
sizeForItemAt indexPath: IndexPath
) -> CGSize {
switch Section(rawValue: indexPath.section) {
case .feed:
return feedAdAdapter?.delegate.collectionView?(
collectionView,
layout: collectionViewLayout,
sizeForItemAt: indexPath
) ?? .zero
default:
return CGSize(width: collectionView.bounds.width, height: 80)
}
}
}
```
## 测试广告信息流集成 {#test}
### 使用演示广告单元
为了验证广告信息流集成并测试您的应用,请使用测试广告。
为了确保在每次请求时都返回测试广告,请使用下方的特殊演示广告单元 ID。
演示 `adUnitId`:`demo-feed-yandex`。
{% note warning %}
在将应用发布到商店之前,请先将演示广告单元 ID 替换为从 Yandex Advertising Network 界面获取的真实 ID。
{% endnote %}
演示广告单元 ID 的完整列表位于[用于测试的演示广告单元](https://ads.yandex.com/helpcenter/zh/dev/ios/demo-blocks.md)中。
### 验证集成
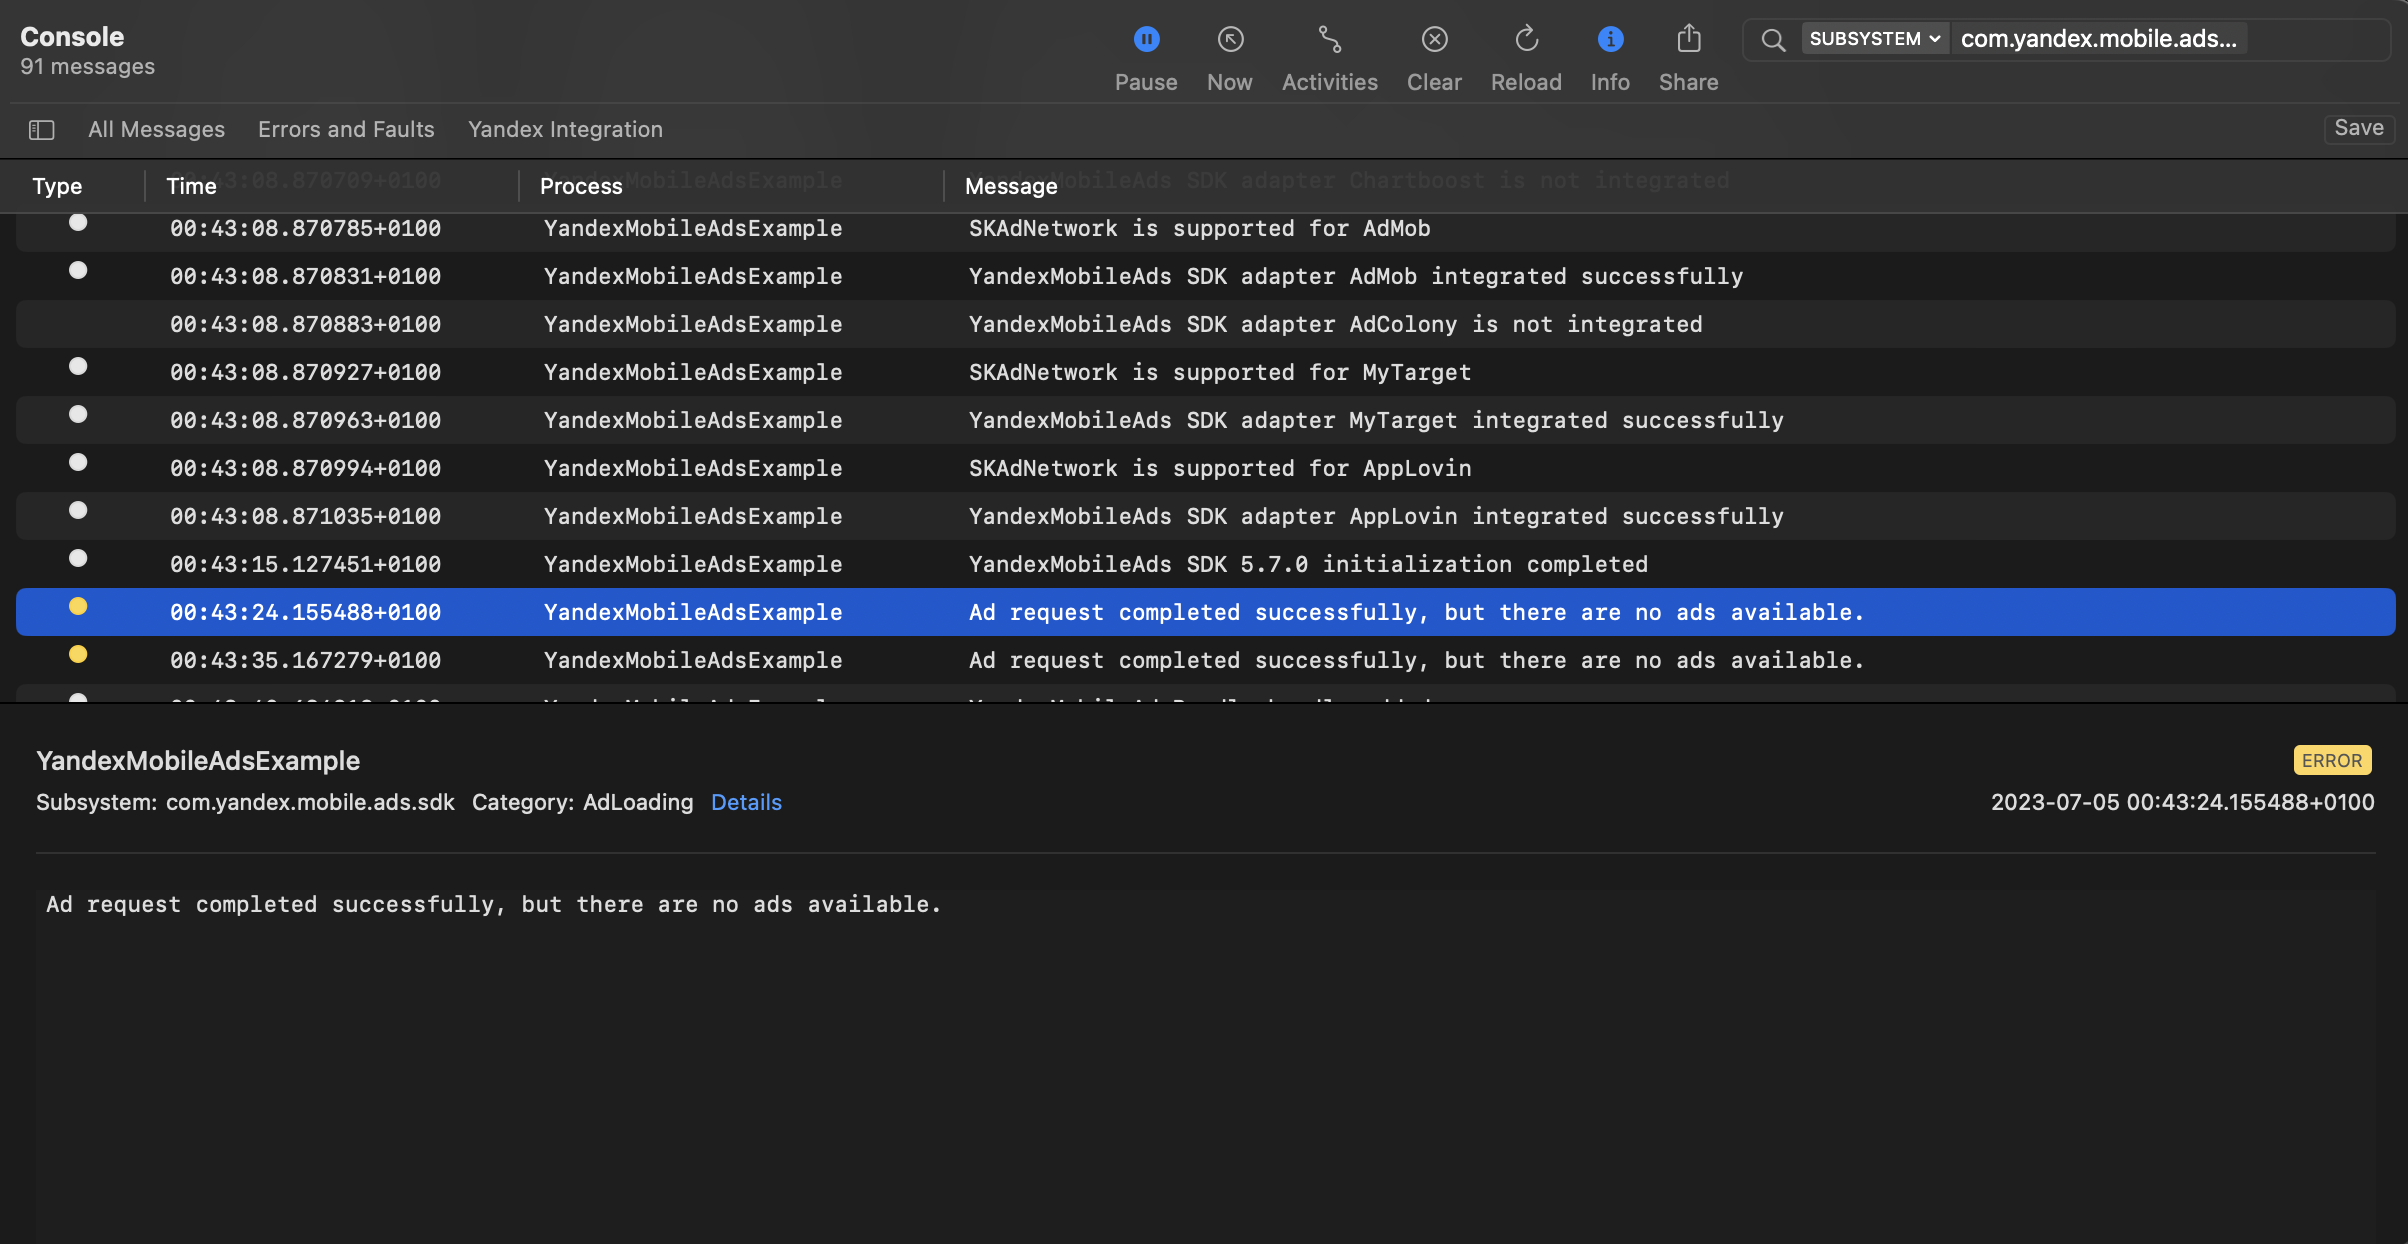
您可以使用本机控制台工具测试广告集成。
要查看详细日志,请调用 `YMAMobileAds` 类的 `enableLogging` 方法。
```swift
YMAMobileAds.enableLogging()
```
要查看 SDK 日志,请前往控制台工具并设置 `Subsystem = com.mobile.ads.ads.sdk`。您还可以按类别和错误级别过滤日志。
如果您在集成广告时遇到问题,您将获得有关问题的详细报告以及如何解决这些问题的建议。
{% endcut %}
## 前提条件 {#pre}
1. 请按照 [快速入门](https://ads.yandex.com/helpcenter/zh/dev/ios/quick-start.md) 中描述的 SDK 集成步骤进行操作。
2. 提前 [初始化](https://ads.yandex.com/helpcenter/zh/dev/ios/quick-start.md#init) 您的广告 SDK。
3. 确保您运行的是最新的 [Yandex Mobile Ads SDK](https://ads.yandex.com/helpcenter/zh/dev/platforms.md) 版本。如果您使用聚合,请同时确保您运行的是最新版本的 [统一构建](https://ads.yandex.com/helpcenter/zh/dev/platforms.md)。
## 实施 {#implement}
集成广告信息流的关键步骤:
1. 使用 `FeedAdAppearance` 配置信息流外观。
2. 创建 `FeedAd` 对象,设置其委托,并实施所需的 `FeedAdDelegate` 方法。
3. 加载广告。
4. 创建 `FeedAdCollectionViewAdapter`,并将其附加到 `UICollectionView`。
## 广告信息流集成说明 {#features}
- 在主线程中调用所有 Yandex Mobile Ads SDK 方法。
- 只要显示信息流的屏幕可见,请始终保持对 `FeedAd` 和 `FeedAdCollectionViewAdapter` 的强引用。
## 外观
创建 `FeedAdAppearance` 配置对象。
可用参数:
- `cardWidth`(必需):所投放广告的宽度(以点为单位)。 此宽度以屏幕宽度减去侧边距为基准。
- `cardCornerRadius`(必需):所投放广告的圆角半径(以点为单位)。
```swift
let feedMargin: CGFloat = 24
let cardWidth = view.bounds.width - 2 * feedMargin
let appearance = FeedAdAppearance(cardWidth: cardWidth, cardCornerRadius: 16)
```
## 加载广告
从 Yandex Advertising Network 界面创建具有广告单元 ID (`adUnitId`) 的 `FeedAd`。
您可以通过 `AdRequest` 扩展请求,以传递用户兴趣、页面上下文、位置或其他数据。 额外上下文通常能提高广告质量。 有关详细信息,请参阅[广告定位](https://ads.yandex.com/helpcenter/zh/dev/ios/target.md)。
设置委托并实施 `FeedAdDelegate` 以处理加载和广告事件:
```swift
final class FeedAdViewController: UIViewController {
private var feedAd: FeedAd?
func loadAd() {
let request = AdRequest(adUnitID: "R-M-XXXXXX-Y")
let appearance = FeedAdAppearance(cardWidth: view.bounds.width)
let feedAd = FeedAd(requestConfiguration: request, appearance: appearance)
feedAd.delegate = self
self.feedAd = feedAd
feedAd.loadAd()
}
}
extension FeedAdViewController: FeedAdDelegate {
func feedAdDidLoad(_ feedAd: FeedAd) {
// Called when an ad is successfully loaded
}
func feedAd(_ feedAd: FeedAd, didFailToLoadWithError error: Error) {
// Called when ad loading fails
}
func feedAdDidClick(_ feedAd: FeedAd) {
// Called when the user taps the ad
}
func feedAd(_ feedAd: FeedAd, didTrackImpression impressionData: ImpressionData?) {
// Called when an impression is tracked
}
func feedAdDidUpdateDataSource(_ feedAd: FeedAd) {
// Called when new ads are available — reload collection view
collectionView.reloadData()
}
}
```
## 显示信息流
对 `UICollectionView` `dataSource` 和`委托`使用 `FeedAdCollectionViewAdapter`。
在附加适配器之前,调用 `registerCells(in:)` 以注册单元格类型。 请在设置 `dataSource` 和 `delegate` 之前执行此操作。
### 作为主列表
在 `UICollectionView` 上设置适配器的 `dataSource` 和 `delegate`:
```swift
final class FeedAdViewController: UIViewController {
private let collectionView = UICollectionView(
frame: .zero,
collectionViewLayout: UICollectionViewFlowLayout()
)
private var feedAdAdapter: FeedAdCollectionViewAdapter?
func setupAdapter() {
guard let feedAd else { return }
let adapter = FeedAdCollectionViewAdapter(feedAd: feedAd)
adapter.registerCells(in: collectionView)
collectionView.dataSource = adapter.dataSource
collectionView.delegate = adapter.delegate
feedAdAdapter = adapter
}
}
```
### 与现有内容一起
如果您已实施 `UICollectionViewDataSource`,请将信息流部分委托给适配器:
```swift
final class FeedAdViewController: UIViewController {
private enum Section: Int, CaseIterable {
case content
case feed
}
private var contentItems: [ContentItem] = []
private var feedAdAdapter: FeedAdCollectionViewAdapter?
func setupAdapter() {
guard let feedAd else { return }
let adapter = FeedAdCollectionViewAdapter(feedAd: feedAd)
adapter.registerCells(in: collectionView)
feedAdAdapter = adapter
collectionView.dataSource = self
collectionView.delegate = self
}
}
extension FeedAdViewController: UICollectionViewDataSource {
func numberOfSections(in collectionView: UICollectionView) -> Int {
Section.allCases.count
}
func collectionView(_ collectionView: UICollectionView, numberOfItemsInSection section: Int) -> Int {
switch Section(rawValue: section) {
case .content:
return contentItems.count
case .feed:
return feedAdAdapter?.dataSource.collectionView(collectionView, numberOfItemsInSection: section) ?? 0
case .none:
return 0
}
}
func collectionView(_ collectionView: UICollectionView, cellForItemAt indexPath: IndexPath) -> UICollectionViewCell {
switch Section(rawValue: indexPath.section) {
case .content:
// Return your content cell
return dequeueContentCell(for: indexPath)
case .feed:
return feedAdAdapter?.dataSource.collectionView(collectionView, cellForItemAt: indexPath)
?? UICollectionViewCell()
case .none:
return UICollectionViewCell()
}
}
}
extension FeedAdViewController: UICollectionViewDelegateFlowLayout {
func collectionView(
_ collectionView: UICollectionView,
layout collectionViewLayout: UICollectionViewLayout,
sizeForItemAt indexPath: IndexPath
) -> CGSize {
switch Section(rawValue: indexPath.section) {
case .feed:
return feedAdAdapter?.delegate.collectionView?(
collectionView,
layout: collectionViewLayout,
sizeForItemAt: indexPath
) ?? .zero
default:
return CGSize(width: collectionView.bounds.width, height: 80)
}
}
}
```
## 测试广告信息流集成 {#test}
### 使用演示广告单元
为了验证广告信息流集成并测试您的应用,请使用测试广告。
为了确保在每次请求时都返回测试广告,请使用下方的特殊演示广告单元 ID。
演示 `adUnitId`:`demo-feed-yandex`。
{% note warning %}
在将应用发布到商店之前,请先将演示广告单元 ID 替换为从 Yandex Advertising Network 界面获取的真实 ID。
{% endnote %}
演示广告单元 ID 的完整列表位于[用于测试的演示广告单元](https://ads.yandex.com/helpcenter/zh/dev/ios/demo-blocks.md)中。
### 验证集成
您可以使用本机控制台工具测试广告集成。
要查看详细日志,请调用 `YMAMobileAds` 类的 `enableLogging` 方法。
```swift
YMAMobileAds.enableLogging()
```
要查看 SDK 日志,请前往控制台工具并设置 `Subsystem = com.mobile.ads.ads.sdk`。您还可以按类别和错误级别过滤日志。
如果您在集成广告时遇到问题,您将获得有关问题的详细报告以及如何解决这些问题的建议。
 ## 其他资源 {#resources}
*
[GitHub](https://github.com/yandexmobile/yandex-ads-sdk-ios/blob/master/Examples/YandexMobileAdsExample/YandexMobileAdsExample/Adapters/Yandex/FeedAd/YandexFeedAdAdapter.swift) 链接。
## 其他资源 {#resources}
*
[GitHub](https://github.com/yandexmobile/yandex-ads-sdk-ios/blob/master/Examples/YandexMobileAdsExample/YandexMobileAdsExample/Adapters/Yandex/FeedAd/YandexFeedAdAdapter.swift) 链接。